How to change the main photo in contact via phone?
Once upon a time, it was not possible to change the main photo (avatar) through a smartphone, only through a computer.
Fortunately, now all this can be done through the phone. To do this, we need to download the VKontakte social network application through the Play Market or App Store. Then you need to go into the application itself, go to your page by clicking on the button in the very bottom right corner. Then click on your avatar (next to your last name and first name), a small panel will appear. Now all that remains is to select “Open Photo”, find a suitable photo that you would like to put on your avatar, and click on it. Ready! Congratulations on the new photo.
Recently, in the VKontakte smartphone application, it is finally possible to change the main photo of your account (previously it was changed only in the full version of the VK website).
Below is a screenshot from the VK mobile application for iOS showing how to change your photo.
On your page, press your finger directly on your photo (red arrow), a menu will open at the bottom, in which you select “Edit photo” - then the entire gallery will open at once and next to the camera icon.
Selecting a photo from the gallery: click on the desired photo, click “Next”, then select an area, click “Done”.
If you point at the camera, you can take a selfie and upload this photo by clicking on “Use.”
Response date: March 31, 2021.
The photo in the mobile application changes!
The VKontakte mobile application is constantly being improved, although complaints about minor glitches in its operation are now no less received than before. But it’s good that you can now change the main photo through the application. Previously, it was possible only through the full version of the site. The first thing you need to do is click on your photo (avatar) and go to your main page. While on your page, click on your avatar in the circle. A menu will open. Next, you can choose two ways to upload a photo: you can upload it, or you can immediately take a photo and install it. If you select a photo, you will need to give the app permission to access your device. Next, take a photo and attach it, selecting the area for the thumbnail. Or you can download a finished photo or image from your device and install it in a similar way.
How to change your avatar using the mobile version?
In order to change your avatar you need:
- In the lower right corner of the VK mobile application, click on 3 stripes
- Go to profile Go to the profile in the VK mobile application
- Next to the first and last name, click on the photo icon Button to upload a new photo to your VK avatar
- Select where you want to upload the photo from (most likely “Upload from gallery”)
- Select photo
- Click “Attach” Attach the selected photo in VK to your avatar
- Select thumbnail
- In the lower right corner, click on the checkbox Confirm the change of avatar in the VK mobile application
Ready. As you can see, changing your avatar is very simple, both from a computer and from a phone. If you are interested in how to design your profile in a cool way, read the article How to design a VKontakte page for business, for dating, for yourself
Thanks to photos on the social network VKontakte, your friends and relatives can find you. Of course, sometimes most people use photographs that are not their own, but, nevertheless, thanks to these frames, you can share your vision of things with the world. Show nature, yourself and much more. Considering the fact that in most cases all social networks are somewhat similar to each other, it will not be difficult for anyone to find a section through which they can post pictures. If you don’t know where to go and what to do in general, then in this article we’ll talk about how to change a photo in VK.
How to change a photo on VKontakte
It’s even easier to change a VKontakte photo if it was once the main one on the page.
Now, you know how to change your avatar in contact in just a few clicks.
The social network VKontakte, like any other similar site, provides its users with the opportunity not only to upload and share any pictures and photographs, but also to set them as the header image of their personal profile. At the same time, VK does not limit users in any way in this regard, allowing them to set absolutely any pictures and drawings as the title photo.
Today, VK allows you to set a profile photo in two ways, depending on the presence or absence of an image pre-loaded on the site.
The VK administration sets extremely low levels of restrictions for its users, as a result of which literally any pictures can be installed on the profile photo. But even taking this into account, we should not forget about the general rules of this social network.
First of all, please note that images in the most popular formats can be uploaded to the site and installed as the main profile photo. The list of these includes the following file extensions:
How to remove defects and stains from photos on your phone
If you want to remove defects, the Pixlr application is suitable, but this can also be done in other editors. Upload the image you want, tap the toolbar icon in the bottom left, and then select the Healing brush. Next, select "Spot" and adjust the size. When you click on any defect, Pixlr will automatically use nearby pixels to hide the imperfections.
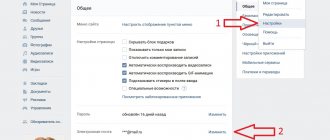
How to change the thumbnail in VK on your phone
From a mobile phone:
1. Go to any browser and open the mobile version of VKontakte (m.vk.com).
2. Open the menu
and below we go to the full version.
3. Open your page. Since there is no cursor on the phone, at the bottom of the avatar we click on the area where the “Change Thumbnail” button is approximately located.
4. Select the area and save the changes.
- It may not work the first time, but it’s quite simple;
- If you simply move your finger in this area, the button will appear on its own (at least for me);
There is no other way to change the thumbnail in VK via phone. The VKontakte application for phones does not provide this function.
Failed to change the thumbnail in VK? Watch our video tutorial.
How to combine photos into layers
Combining photos using multiple layers is probably one of the easiest tricks you can do with an image editor. But now you don't have to wait until you're at home to open Photoshop, it's now been replaced by iOS and Android with the Adobe Photoshop Fix app. Once you're in the app and have a picture open, tap the Plus icon on the right and then “Image” to add a new layer to your project (layer – picture on top of the picture). Click and drag the second image to fit it, then click Cut, then draw the part you want. At the bottom right there will be a “Check” button, you can see what you got, and if you like it, feel free to save the picture, if not, don’t despair and try again.
How to change your avatar on VK
Hello, friends! On the VKontakte social network, you can create many albums and upload as many images as you like. But each user has one “main photo” on the main page - an avatar. It is the first one that other people see if they: find you through a search, in their friends list, correspond with you, see your publications in the news, etc.
Some users change their VKontakte avatar regularly. But if you are not one of them, you once placed a photo a long time ago and happily forgot about it, and now you still have a desire to change it, then let’s figure out how this can be done.
How to cut out an unnecessary object from a photo
To remove some objects from a photo, you need to use the TouchRetouch tool (costs $2). First, also open the picture, click "Object Removal" and then the "Brush" tool. In the settings you can adjust the brush size for your convenience. Then select unnecessary objects and circle them, then click OK. The app uses the background to make deletion as seamless as possible. If it is not like that, then you can repeat the procedure: the second time everything should work out.
Changing the main photo from the computer
If you access VKontakte from a computer or laptop, then you can mark the main photo either by uploading it directly from your device, or by selecting one of those that are already on your profile. We will consider these two options.
Uploading photos from PC
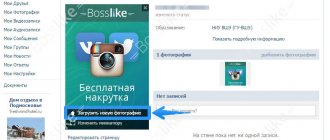
- In order to put a picture that is stored on your computer on your avatar, go to your VKontakte page and hover your mouse over the avatar. After this, a small menu will appear at the bottom, select “Update photo” in it.
- If you have a camera connected, you can take a photo and upload it immediately - to do this, click the “Take instant photo” button.
But I think few people will do this, so click on the “Select file” button.
- Explorer will open. In it, find the folder on your computer or laptop that contains the image that will appear on your avatar. Then select it with the mouse and click on the “Open” button.
- Next, select the area that users will see when they visit your page. Yes, other people will only see a fragment, and the full photo can only be viewed after clicking on it. Click "Save and Continue."
- Now select the thumbnail - this is a small round image that is shown in news, messages, comments. Click “Save changes”.
- The main photo of your page has now been updated.
We use a photo that was uploaded to VKontakte
If you want to put a picture on your avatar that was previously uploaded to your VKontakte profile, then follow these steps:
- Select "Photos" from the menu on the left.
- Now click on the album to which the image you need was added.
- Find the photo in it and click on it so that it opens completely.
- There are buttons under it. Hover your mouse over the “More” button and select “Set as profile photo” from the drop-down menu.
- Select the area that will be visible on your page.
- Next, define the image for the thumbnail and click “Save Changes.”
- The avatar will be successfully changed.
If you are interested in how to add photos to VKontakte or how to create an album for photos on VK, then read the detailed articles by following the links.
How to change your avatar using a computer?
In order to change your avatar you need:
- Go to your personal page in the full version of VK
- Hover over avatar
- The “Update photo” button will appear, click on it
How to change your avatar on VK from a computer - In the new window, click on “Select file”
Select a file to upload as an avatar - Select a photo from the library
- Select thumbnail
Selecting an area to display on the VK avatar - Click on “Save and Continue”
The thumbnail is the part of the photo that will be displayed in news, private messages and comments.
Changing your avatar from your phone
Selecting a photo from the device Gallery
- If you access the VKontakte social network through a mobile application installed on your phone or tablet, then open the side menu and click on the avatar to go to the main profile page.
- Then in the lower right corner of the image, click on the camera icon.
- In the menu that appears, select “Load from gallery.” If you want to immediately take a photo and make this photo your avatar, then click “Take a photo.”
- Find the photo you want on your device and click on it.
- In the next window you can start editing: add a filter, change brightness, crop, etc. When you are done, or if you don’t need to do anything, click “Attach.”
- Select a thumbnail that will be displayed by other users in messages, comments, news, and click on the checkmark in the lower right corner.
- When the photo is uploaded, a check mark will appear in the notification bar on your device.
Selecting a profile photo
Through the VK smartphone application, unfortunately for many, there is no way to put on your avatar a photo that has already been uploaded to your page. Therefore, you should use a browser and go to the full version of the site.
- Select any web browser on your phone or tablet.
- Then type “VK” in the search and go to your page.
- Now you need to open the side menu by clicking on the three bars at the top left.
- Scroll to the bottom of the list and click on “Computer version”.
- Then you can again select the same browser you are currently in.
- Here is the full version of VKontakte, as reported at the top of the page. To change the main photo, go to the “Photos” menu.
- All subsequent steps will be the same as from the computer, but let's look at them briefly. Select the album in which the photo you are interested in is uploaded.
- Find the image and click on it to open it for viewing.
- Among the additional buttons at the bottom there will be a “More” button. Tap on it and select “Set as profile photo” from the menu.
- Then you need to decide on the area and thumbnail to be displayed on the page. At the last step, click “Save changes”.
- Return to your page and enjoy the changed main photo.
That's all. I hope everything is clear to you, and now you won’t have any problems with the question: how to upload a new image to your VKontakte profile avatar.
How to adjust color shades in a photo
One of the most common problems is incorrect color rendering. You can perform this setup without resorting to special applications. For iPhone, select a photo and click “Edit”, then “Adjust” and “Color”. You will see a slider at the bottom of the screen. With it, you can correct all the flaws in a photo. For Android, everything is very similar: click the “Edit” button, “Color” and also customize the picture as you wish.
An easy way to change a photo in VK
Telegram channel Programmer and business. Every day there are interesting stories about how a programmer builds a business.
VKontakte users constantly exchange hundreds and thousands of photos. Without this, it is impossible to imagine a popular Russian-language social network. Uploading pictures to the site is quite simple, almost everyone knows this. But many people have a question about how to change a photo in VK? In this article we will look at ways to do this from a computer and phone. We will also look into what problems social network users may encounter.
How to change VKontakte photo on your avatar
Any VKontakte user understands that the most important photo of the page is the avatar, and you will learn how to change the photo on VKontakte in our article.
Without exaggeration, the avatar can be called the “face” of the page, because it is the one that is located on the main part of any page and the first thing that another user sees is the avatar. For some people, there is nothing complicated about how to change a photo on VKontakte , since they prefer to make such changes on their own page several times a week. At the same time, there are also users who do not consider it necessary to constantly change the main photo and it is common for them to download an avatar once every few months, or even years, and forget about it.
Ways to change a photo in VK
You can change your avatar photo on the VK social network in several ways, both from your computer and from your phone. Let's consider these methods in detail.
From computer
If you want to set your avatar to an image stored on your PC on your own page of the VK service, then you need to hover your mouse over the profile photo. At the bottom you will see a small menu that appears, click on the “Update photo” item.
When the camera is activated, you can take a photo and upload it. But usually, rarely does anyone do this. So, click on the “Select file” button.
Explorer will open. Find the folder with the desired picture on your PC, select it with the mouse and click on the “Open” button.
Select the area that will be visible to users who visit your profile and click on the “Save and Continue” link. The VKontakte website will create several pictures from the image. They will be used in news, notifications, and comments. Click "Save".
Now the main image of the page has been changed.
From phone
If you visit VK using a mobile application, then you need to open the menu on the side and tap on the avatar. This will take you to the main page of your own profile:
- Now in the picture below in the corner on the right, click on the camera icon.
- A menu will appear, select “Load from gallery”. You can also take a photo directly from your phone by clicking “Take Photo.”
- Select the required photo on your device and click on it.
- In the window that appears, you can perform image editing actions: change the brightness, turn on filters, crop. When everything is ready, you need to click “Attach”.
- Select the thumbnail that appears in other people's messages, news and click on the check mark icon in the corner at the bottom right.
When the photo is loaded, a checkmark will be visible in the notification line on the phone screen.
Using an already uploaded photo
To install an image that was previously in the “VK” profile, you must do the following:
- In the left menu, click on the “Photos” column.
- Now click on the album with the desired photo.
- Find the picture and click on it to open it fully.
- There are buttons below the image. You need to hover your cursor over the “More” button, and then enter “Set as profile photo” in the drop-down menu.
- Select the area that is visible to other users on your page.
- Select a photo for the thumbnail and tap “Save.”
The profile avatar has now been changed.
How to lighten shadows in a photo
This technique is suitable if you want to lighten only part of the photo. Here you can use the Snapseed app. Open an image, tap the Tools button, and select Adjust Image. Tap the slider icon at the bottom of the screen and select the function you want. Tip: Highlights are useful for darkening bright areas, and Shadows are useful for brightening dark areas. If, after changing, you press and hold on the image with one finger, you can see the original version of the image.
Changing the VK thumbnail
Today, this procedure, both in the case of a profile and a community, can only be performed in the full version of the site, which we will continue to use. Moreover, if you do not have access to a PC, but actively use a smartphone, you can follow the recommendations through a mobile browser by activating the “Full version of the site” mode in the settings.
Option 1: Personal page
Changing the thumbnail on a personal VKontakte page is one of the simplest procedures that requires a minimum number of actions. In addition to this, as we mentioned earlier, you can update the photo according to our other instructions, also changing a small copy of the image.
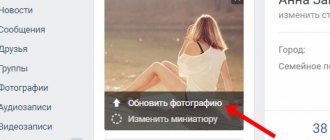
- Through the main menu of the site, open the “My Page” section and hover your mouse over your profile photo. After this, you must select “Change thumbnail” from the menu that appears automatically.
You can see changes to all versions of the thumbnail after closing the window in the “What’s new” block. This is where the procedure ends.
Please note that, regardless of the original photo, you can select a thumbnail only from the area that was specified when setting the avatar. If you are not happy with this restriction, you will have to update your profile photo one way or another.
Option 2: Community
The main and only difference between updating a thumbnail in a community and a personal page is the slightly different location of the required menu. At the same time, the editing interface itself, as well as the above-mentioned restrictions on selecting an image area, are completely identical to the first method. Moreover, you can re-upload the image and select a new preview at the same time.
- Go to the group's start page and hover your mouse over the avatar in the upper left corner next to the name. From this list we are interested in the “Change Thumbnail” item.
If the group does not have a cover, you need to do the same with the page by hovering the mouse over the avatar and selecting “Change thumbnail”.
As a result, you will find yourself in the thumbnail editing window with the ability to select an almost arbitrary size, but strictly square preview. To complete and update, just click the “Save” button at the bottom of the page.
Since the thumbnail area is solely based on the avatar, this can be inconvenient if there is a cover image. To use this particular picture to select a preview, you can only replace the photo.
Other versions of VKontakte and, in particular, the mobile application are constantly developing, gradually catching up with the website in terms of functionality. In this regard, it is quite possible that after some time there will be ways to change the thumbnail without using a browser.
How to fix distortion in a photo
If you want to correct distortions in a photo or correct perspective, then you need the SKRWT application (paid, about $2) - the most convenient application: you get maximum results with minimal effort. Simply upload an image and use the slider below to align the photo. This trick can also be done in other free applications.
How to add or edit an entry
First you need to enter the Club, that is, enter your name and password.
How to add an entry
To add a new entry to your blog, you must first go to the Blog Console. The console is a control panel where you can make any changes. The easiest way to get there is to hover your mouse over the My blogs in the top panel, then hover over the desired blog, and click on the Console that appears next to it.
Then in the menu on the right you need to select Add in the Posts .
A form for the entry will open with the title New Entry .
In the first line, you must enter the Post Title (Each post must have a title!), then write the text itself. On the right side you can select tags and categories (more about them below).
To publish a post, you need to click on the blue “ Publish ” button on the right side of the screen.
How to change an entry?
To change an entry, in the Entries , select Edit . A list of all made entries will open. If you hover the cursor over any entry, then under the title you will see the actions that you can do with it: Edit, Properties, Delete, View.
Edit - when you select this item, a form for editing a record will open, exactly the same as when creating it. Here you can make any changes, and then click on the blue “ Update record ” button.
Properties - when you select this item, a form for quick editing will open. Here you can quickly change the title of the post, data on categories and tags, but you cannot change the text of the post itself.
Delete —deletes an entry. Be careful, these recordings can no longer be returned!
View - when you select this item, the entry will open as it looks on the blog.
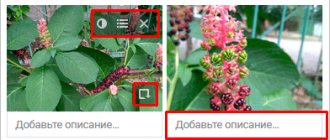
How to upload a picture?
To add a picture to a post, you need to click on the very first icon after the words Add media file . When you hover over it with the mouse, the words “ Add an image ” will appear.
A separate form for adding pictures will open. Click on the “ Select file ” button and upload the desired image. The name of the picture must be written in English letters or numbers , otherwise it may not be shown or may not be shown to everyone.
In the Gallery you can find all the pictures that were uploaded to this post. In the File Library you can see a list of all the pictures ever downloaded.
If the picture is large, it will be automatically reduced. In this case, you can select the desired image size.
For example, if you need to insert a small picture into a post, which, when clicked, would open a larger picture, then you need to select a small size (Miniature or Medium), and under the Link , click on the File Link .
And then click on the “ Insert into post ” button.
Why are rubrics needed?
Rubrics allow you to break down posts by topic. For example, on my website with tests there are sections “Tests about love and friendship”, “Tests about character” and so on. That is, all the tests do not lie in a heap, but are sort of neatly laid out on shelves. On the blog about Winx there are sections “Screenshots”, “Winx Games” and others. By choosing a category, you receive entries on a specific topic.
When creating a new post, there is a “Categories” menu in the right column. There are already several categories there, you can choose any of them for your entry. Or click on the inscription + Add a category just below, and enter the name of the new category. As a rule, one entry corresponds to one category, but there may be several.
What are tags?
Tags are keywords for a post. It is not necessary to add them, but it is still more convenient when they are there. For example, if the test “Who are you from Harry Potter” belongs to the heading “Who are you, what are you?”, then it has several tags - Harry Potter, Magic, movies, books...