From this article you will learn how to create a group on VK in 2021 and set it up correctly. In particular, select the type of community, the name of the group, set up the main sections, fill out the description, put a memorable community avatar, upload a beautiful cover, and so on. If you are a beginner and are just starting to figure out how to work VKontakte, this step-by-step manual will be especially useful for you.
Advantages and capabilities of the VKontakte group:
- Fast creation. After reading the article to the end, you will understand that creating a group takes 10-15 minutes.
- For free. You can create a VKonakte group absolutely free, and with proper promotion, it can be compared in effectiveness to a landing page or website.
- Easy to use. Most of the actions related to business promotion in VK are intuitive and simple.
- A lot of information. There are many articles and videos on the Internet about the work of VKontakte: promotion, monetization, etc.
- The largest audience is a Russian-speaking audience of all ages - among them there are definitely your clients.
How to create a group on VK: step by step
Step 1:
Receive up to 18% of expenses on contextual and targeted advertising!
We recommend : Click.ru – marketplace of advertising platforms:
- More than 2,000 advertising agencies and freelancers are already working with the service.
- You can connect yourself in 1 day.
- Earn from the first ruble spent, without initial restrictions, without an entry barrier.
- Payments via WebMoney, to a card to an individual, reinvestment in advertising.
- You still have direct access to advertising accounts, a paradise for accounting for document flow and payments.
Start earning >> Advertising
Community creation
So, we already have a personal page and we need to create a group on VK so that we can place all advertising materials there and not spam our account. On the left side of the menu, click on the “Groups” tab. A page will open that shows what groups we are in. At the top, click “Create a community.”
Step 2:
Choosing a community type
A pop-up window will appear in which the social network asks you to select the type of community. Which one to choose?
As you can see, VKontakte itself explains for what purposes this or that type of group is suitable. Choose what suits you. And don’t be afraid, if necessary, the community type can be changed at any time in the settings.
Step 3:
Name and theme of the group
Next, another pop-up window appears, where, depending on the selected type of community, we will need to write a name, indicate a category or topic, whether it will be an open or closed community, add a link to the site and a physical address (if any).
In the group name , enter the name of the group. How to name a VKontakte group?
- Use the name of the company or brand.
- First name or last name for a personal blog.
- A keyword by which potential clients may search for you.
For example , if you are engaged in repairs in Moscow, then it is better to name the group [Repair in Moscow] and write the name of the company or brand through a dash or vertical slash. Finally, click on the “Create Community” button and go to the page of the new group.
This is what the newly created group looks like. All that remains is to set it up and fill it.
How to buy subscribers
Today there are a large number of projects on the Internet where you can buy VK subscribers and therefore sometimes problems arise with choosing the right and high-quality service.
We have selected the most popular and effective:
- VKtarget;
- LikeMania;
- SMMLaba;
- CashBox.
This is just a small drop in the ocean. All these projects will help you buy the required number of participants in just a couple of clicks. The main advantage of these services is their low cost. Disadvantage: not the target audience.
Cheating does not happen immediately, but over a period of time. It all depends on the volume of the order.
Let's use one of the services as an example to try to buy 100 participants. Let's take the LikeMania service for this:
- We go to the website likemania;
- Select the social network “VKontakte” in the top menu;
- We put a tick next to the service that we need (in our case, these are subscribers);
- We write the required quantity;
- We put a link to the community;
- Click on the button with the price;
- We pay for the order in a convenient way and enjoy the result.
As you can see, everything is simple. Other services work similarly.
How to set up a group on VK
Step 4:
Avatar
A VKontakte group avatar is an icon that is displayed next to the group’s posts in the news feed. To install it, click “Upload photo” in the upper right corner.
The recommended avatar size is 200x200 pixels . Try to ensure that the picture chosen as your avatar is bright, concise and memorable. This will help followers differentiate your group's posts from others. After loading, VKontakte will first offer to crop the main image, and then adjust the thumbnail.
Click “Save changes” and move on.
Step 5:
Group information
To continue setting up the group, click on “Manage” directly under the newly installed avatar.
Next, fill in the basic information about the group; this is what users who land on your page will see.
In the description of the community we write what the group is about, for companies we list a list of services or goods, and write a unique selling proposition (your advantages).
Here we can make the group closed or open (it’s better to make it open), put a nice page address and upload a community cover.
Step 6:
Cover of the group in VK
Recently, beautiful covers can be added to VKontakte groups, with basic information about the group and additional indicators. For example, like our group :
To add such a cover, you need to go to the community settings, click “Upload”, select a pre-prepared picture on your PC (1590 by 400 pixels in JPG, GIF or PNG format) and click “Save”.
To ensure that the cover displays correctly on tablets and mobile devices, it is better to place text and other important elements in the center.
Step 7:
Sections of the VKontakte group
At this point in the settings of your new VKontakte group, you need to enable or disable certain sections. We recommend disabling sections that you do not intend to use.
You can also configure the access level for all sections: open or limited. This affects who can add content to these sections. Open - everyone can add, limited - only community administrators and editors.
Here you can turn on products, set the main and secondary blocks. This is what will be shown first when visiting a group; by default, the group description or pinned post .
These are the basic settings that need to be made after creating a group. At your discretion, you can set up a comment filter, add links, enable messages, connect additional applications, etc.
Invite and add. Same?
These concepts are similar, but do not always mean the same thing. It all depends on what kind of group you have. If it is open, then there is essentially no difference. If it is closed, then there is a difference.
By invitation we mean directly sending requests. And adding is the approval of received requests.
For example, you created a group and made it private. Only certain people are in it. You share any information there and so on. To add a new member to the group, you have two ways. The first is to send him an invitation. Second, he must apply to join, and you will either add him or not.
How to hide a group
Many VKontakte users are wondering how to hide a group. That is, make it inaccessible to the public.
We would like to remind you that you can restrict access to the community only if it is a group. If you have a public page, then this is not possible. This is a limitation set by the social network itself. network.
If you have a group, then follow the instructions:
- Go to the settings, namely “Community Management”.
- Find "Group Type" and select "Closed" or "Private".
- Click save.
“Closed” – anyone can apply to join.
“Private” – you can join only by invitation.
If you have a public page, but you want to make it private, then you need to first transfer it to a group, and then restrict access. You can do this by clicking on the ellipsis button and selecting the last item. And then proceed to the instructions described above.
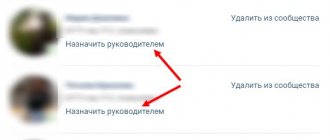
How to remove people from a group
Sometimes community leaders need to remove some members. But not everyone knows how to do this.
Let's take a closer look at everything.
- To get started, go to “Community Management”.
- On the right, select the “Participants” section. A list of all subscribers is displayed here.
- Find the person you want to exclude and click “Remove from Community.”
As you can see, no problem. People are removed as easily as they are invited.
How to fill a newly created group
Adding the first entry
To add the first entry on behalf of the group, click in the empty field where the inscription “Add entry” looms temptingly. If next to the entry field the avatar of your personal page is lit, then click on the arrow at the bottom right and select “On behalf of the community” so that the entry can be seen by those who are subscribed to the group.
How to create a group discussion
Create discussions where users can leave reviews, discuss topical issues, share their vision, opinions, etc.
In order to create a new discussion, you must first enable them. Go to the group settings and go to the “Sections” tab. Choose one of the options:
- open - everyone can create and delete discussions;
- limited - only community administrators can create new discussions.
After that, return to the main page of your group and under the main photos, click “Add discussion”.
Group album and photos
Turn on the Photos section in Settings and create a group album. Post only real photos! This will help build trust. Click “Add photos” in the lower right menu of the group and upload them from your device.
The photos you add will be uploaded to the group's main album.
Also on the right you can find the “Photo Albums” tab and add a new photo album calling it, for example, “Repair of one-room apartments.” This way you will divide all the photos into separate categories for the convenience of users.
How to add products to a group
Another advantage of VK is the opportunity to create and develop an online store based on social media. networks. To do this, go to the “Section” tab in the settings again and turn on “Products” .
Settings will open in which you need to specify:
- the city in which your store operates;
- enable or disable comments on products;
- choose the monetary unit in which the cost of goods will be measured (ruble, tenge, euro, dollar or Belarusian ruble);
- configure where purchase requests will be sent: in community messages or in personal messages to administrators;
- store description.
Then you can add product cards on the community home page.
You need to fill out the product card as follows:
- category - select the category to which the product belongs, or if there are no suitable ones, put “Other”;
- name and description of the product - write the name of the product, a short description and its characteristics;
- photos - you can upload different color options, as well as photos from different angles;
- cost - the price of a product or service being sold.
If a product is out of stock, it is not necessary to remove it from the display case and then add it again, just put it on.
How to accept applications from your phone?
To approve the entry of new people into your ranks from your phone, you need to do the same first steps as from your computer. That is, you need to open the admin panel from the main page to manage it.
To do this, click on the gear icon at the top next to the name.
Next you will see sections, one of which will be the “Application” tab. Then, similar to the diagram above, an overview of those wishing to become participants appears, along with buttons for approving and rejecting their candidacies.
The only difference is the absence of a button with which you can approve all requests at once. Each person will have to take it manually click by click.
How to make a group interesting?
To make your group interesting, you need to make an effort and follow a few simple rules.
- Create quality content. Do not constantly publish posts with the content “Buy, order, call” and so on. There should be selling posts, but in moderation.
- The time when you could post cats and demotivators is long gone. Therefore, first, think carefully about what might be interesting to your target audience.
- Be consistent. Don't abandon the group and publish 1-2 posts a day.
- Make polls about what content your subscribers would like to see.
- Post real photos of your office, store, warehouse, your workplace and yourself.
Conclusion. Well, now we have figured out how to create a group on VK, set it up correctly, add photos and the first entry.
What to do next? Read our materials on promoting VKontakte:
- Setting up a VKontakte group
- How to promote a group on VK
- Mass liking VKontakte
- Cheating likes on VK
Write in the comments the address of the group you created following our guide! Let's see who did better
Inviting friends to public
You won't be able to send out an invitation if you're dealing with a public page and not a group. If you are a simple subscriber, then the only option is to advertise the public by reposting an interesting post on your wall or by clicking the Tell Friends button. Then an advertising post written by managers will be sent to your wall.
You can also always repost an interesting post not only on your wall, but also as a personal message for several friends at once. These are the same invitations if you add your own comment or personal note to it. For this:
- select interesting material from the public content that your friends will like;
- click on the button with the image of a loudspeaker;
- in the window that appears, select one or more friends to whom the selected post and messages will be sent;
- Click the Share post button and the post will be sent to the selected people.
This way you can not only send many private messages to friends, but also share material with all participants in a group conversation. Only on the condition that the creator of this conversation is you yourself.