Why do you need fonts in Word?
Hello, friends!
When articles, books, and other text materials are written in Word documents, users are forced to change the text font. Why change it? To make it convenient to read every sentence in the text. Another example can be given. For example, you make money on the Internet and write articles to order for customers as a freelancer. As usual, customers indicate in the text task what font is needed for the text.
It is unlikely that people will read an article where everything is written in an incomprehensible font and small size. In this article we will look at the question of how to change the font in Word. I'm sure this information will help beginners.
Bold font as a way to highlight the main thing
Words highlighted in bold font look brightest and catchiest. Such words and phrases immediately catch the eye. So, in order to learn how to quickly highlight the necessary places in the text, you should remember a special HTML code. Bold font is set using a paired tag.
Before the word or phrase or sentence that should be highlighted, an opening tag is placed . After the last letter of the text that should be highlighted, a closing tag is placed
. Anything between these two tags will appear in bold when displayed in the browser.
How to change the font in Word, main
In practice, the process of changing fonts in text is very simple. To change it, open any Word text document on your computer and select the text in it with the left mouse button. Next, on the main document panel you can see a panel with fonts that you can use for text (Screen 1).
Click on the list of fonts and select any font from the list (Screen 2).
As you change the font, the text will change to a different format. It is also possible to increase the font size to make it more visible. On the right side, where the fonts are located, there is a panel with sizes from 8 to 72. You can enter your option in the size field. Now, we know how to change the font in Word. This was the basic and easy way to change the font in Word.
Combine text highlighting with CSS and HTML
It will be best if you learn how to combine HTML fonts and CSS text highlighting techniques in HTML documents.
HTML is great for defining the meaning of selected text, while CSS styling is responsible for the appearance of the text.
Style sheets can be used to modify and style elements such as, etc. Therefore, it cannot be said with complete certainty that pieces of content surrounded by tags will necessarily be bold.
This publication is a translation of the article “HTML Bold”, prepared by the editors of the project.
How to make font bold in Word, italics
In Word text documents, not only fonts change. The text can be made bold and italic. Typically, headings or subheadings are highlighted in bold. So, in order for us to do this, we open our Word document again. Then, select any sentence and click the “F” button at the top of the Word panel (Screen 3).
After this, your selected text will become bold. Now, the text can be made italic. This function in Word converts text into italics. We also select the text and click at the top of Word – “K”, this means italics (Screen 4).
As you can see, the text has become italic.
How to make a font bold using the font-weight CSS property
Don't know how to make text bold in CSS? CSS provides us with a special property, font-weight, which allows us to make CSS bold.
Let's take a look at the following example:
An example of bold text using CSS... ...as well as bolding an entire paragraph.
An example of bold text using CSS... ...as well as bolding an entire paragraph.
This property can also be used to specify text density. Plus, you can identify text that you don't want to highlight.
The example above uses inline styles. But I strongly recommend that you use external files and CSS classes, as this will help apply consistent styling to all pages of the site at the same time.
How to change the font in Word from uppercase to uppercase
When you type some text in Word on your computer, you can mistakenly press the Caps Lock key, which makes capital letters. How can I change the font from capital letters to uppercase so that I don't have to type the text again? There is the easiest way to change. Select the text in the document and press two keys on your computer keyboard at the same time - Shift+F3 (Screen 5).
The text that was highlighted in the document will change to uppercase, and the capital letters will disappear.
Making text bold using the bold font tag in html
Most people familiar with the language of hypertext, when they see bold HTML font, immediately think of the tag.
Let's look at an example of how to make text bold in HTML using the tag:
An example of bold text using an HTML tag... ...as well as bolding an entire paragraph.
An example of bold text using an HTML tag... ...as well as bolding an entire paragraph.
An HTML tag is the fastest way to make text bold.
How to change the font in page numbering in Word
Page numbering is quite common in Word documents. To make the numbering different and noticeable, it is changed to a different font. To do this, click on the number of a particular page twice with the left mouse button. Next, select it. At the top of the main Word panel, we can again select any font we like and set it to numbering (Screen 6).
The list of fonts in Word to choose from is large.
Selecting text with the keyboard.
And now about the most effective ways. You can select any piece of text by combining the Shift key with the arrow keys for cursor control - Left, Right, Up, Down. In this case, the combinations Shift+Left and Shift+Right highlight text character by character. Therefore, this method is only suitable for small fragments of text, part of a word, several characters. Moreover, even for highlighting part of a word, it is not always the most effective, but more on that later.
Keys for highlighting lines of text
The combinations Shift+Up and Shift+Left allow you to select text line by line, one line up and down from the cursor, respectively. It is worth noting that if the initial position of the cursor is the middle of the line, then such a combination will select a fragment from the middle of the line, starting from the place where the cursor is located, to the middle of the bottom or top line, respectively, to the place exactly above or below the cursor.
Next, let's remember the keys for moving to the beginning (Home) and end (End) of the line. Using them together with Shift will give the effect of selecting a fragment from the current cursor position to the beginning or end of the line, respectively.
Selecting a single word.
I believe you already understand the logic of text selection, so remembering the combinations of word-by-word movement through the text, you can display the corresponding word-by-word and paragraph-by-paragraph selection. Ctrl+Shift+Left (Right, up, down). But this combination is already quite complicated. The position of the fingers for him is the left little finger - left Ctrl, the left ring finger - left Shift, and the right little finger on the desired arrow key. Here, pressing ctrl and shift at the same time can be difficult. But in any case, it needs to be mastered, because it is used not only when working with text, but also in many other combinations.
Page selection
To do this, use the shift+pgUp and shift+pgDown keys to select the page up and down, respectively.
The combinations Ctrl+Shift+Home and Ctrl+Shift+Home will allow you to select the entire document from the current cursor position to the beginning or to the end.
Working with text in Word.
Working and editing text in Word is an integral part of any profession related to a computer, in full or in part. Properly formatted text is the key to the success of any work related to documents. And in this publication we will look at the main tools for editing text in Word.
In the article “Editing Text in Word” we looked at the basic tools necessary for working with text. Now let's try to put the theory into practice. The very first rule of working with text is to apply all tools only to the selected area of text. To select text, you need to move the mouse cursor over the beginning of the desired section of text so that a vertical stick appears. Then press the right mouse button and, holding it down, smoothly move along the text. The selected text area will have a dark background. You can now apply various tools to the selected area. Let's look at an example:
1. Select the text and use the text selection tools:
- and all three instruments together
Let's look at an example:
All three tools are used to highlight or emphasize certain areas of text. Something to pay attention to. All text in a document should not be made italic or bold, as if for beauty. Honestly, it looks disgusting and unprofessional.
2. Apply text alignment tools.
- left alignment
- right alignment
- center alignment
— alignment to page width
Let's look at an example:
One of the necessary tools for text display format. Mostly centered alignment is used – headings, chapter titles. Align to page width - body text, all edges of the text are aligned to the edges of the page.
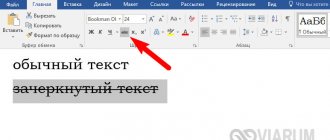
3. Font style and font size.
The Word editor has a set of standard fonts, most of which are displayed correctly on a computer monitor. Some fonts may not be displayed due to computer specifications and system settings. Most documents have specific font formats, such as style and size. For example, each of you fill out document forms. Pay attention to the font style and size, it is the same throughout the document. Except the header is made a little larger in size. Let's look at an example:
4. Apply stylistic effects.
— Animation. Used to give text an original display. (highlighted in green)
— Text highlight color. Used to highlight the most important sections of text. The handmade analogue is a highlighter or marker. “Fill” is also used to highlight text. (highlighted in red)
- Text color. It is also used to highlight particularly important sections of text. And also to give the text a colorful look. (highlighted in orange)
— Register. The letters of the selected text are capitalized, lowercase, as well as various spelling options with a capital or lowercase letter at the beginning of a sentence. (highlighted in pink)
Let's look at an example:
,
,
,
And
These tags are used to display subheadings at different levels. Use this tag when you want to draw attention to a specific word or phrase for reference purposes. This element reflects the importance and value of the content it frames. How to make a beautiful font in html: sizes, colors, html font tags
The element should be used when other highlighting elements are not suitable. To be more precise: the elements from
serve to highlight headings, focusing attention is done using the element, important fragments should be highlighted with the element, and help text can be marked with the tag.
Selection methods
Fragment
There are different situations when you need to highlight certain parts of phrases, paragraphs or pages of text. Let's consider various options:
- If you need to select a word or phrase, place the cursor at the beginning of the first word and simultaneously press “Control+Shift+right arrow”;
- When selecting text from the cursor to the beginning of the line, press “Shift+Home”, from the cursor to the end of the line, press “Shift+End”;
- If you need to select a certain fragment, move the cursor to its beginning, hold down the “Shift” key and use the arrows to select the desired area. If you use the arrows “right” and “left”, the selection will move one character in the given direction; if “up” and “down”, the area will move one line in the selected direction;
- When using the combinations “Control+Shift+up arrow” or “Ctrl+Shift+down arrow”, paragraphs above or below the cursor are selected;
- If you select all the text from the page above or below you need to use the combinations “Shift+PageUp” and “Shift+PageDown” respectively.
Full text
- When using the “Ctrl+A (Latin)” keys, the entire text of the document is selected, regardless of the location of the cursor.
- By pressing the combination “Control+Shift+Home”, all text from the cursor position to the beginning of the document is selected, and “Ctrl+Shift+End” - respectively, to the end of the document.
Copy
Well, now we know how to select the fragment of text we need. Sometimes, having read useful information on the Internet, so as not to lose it, we want to save it in a text document on our computer and use it later, even if there is no Internet connection.
In order to copy previously selected text using the keyboard, use the key combination “Control + C”. When you execute this combination, the information is copied to the clipboard. Next, go to the text document and press the “Ctrl+V” keys - the information is inserted into the document.
In some cases, after copying information into a text editor , we want to change the sequence of paragraphs or lines. The copy function for this operation will be irrelevant; the “Cut” function will be needed here. To do this, select the desired fragment in your document and use the “Ctrl+X” combination. The text disappears, put the cursor in the selected place and use the insert function described above.
How to select all text.
You can select all edited text at once using the Ctrl+a combination. Moreover, this combination works not only for text. Let's say you can highlight an entire web page with its help. The same combination can be used for operations with files and folders, which you can learn about in the corresponding article.
Delete selected text.
Any selected piece of text can be completely deleted using the Delete or Backspace keys, and in this case they will work the same way. Selected text can be replaced by performing a paste operation, or by typing the replacement fragment on the keyboard.
Now you can effectively edit text without using a mouse at all. And if you use these methods, you will very soon notice that the speed of working with text has increased significantly.
The only thing left to learn is the copy, cut, and paste shortcuts if you don't already use them.
Admin
IT specialist with higher technical education and 8 years of experience in system administration. More information about the author and contacts. I provide free consultations on information technology, the operation of computers and other devices, programs, services and Internet sites. If you haven't found the information you need, then ask your question!
Our projects:
The document should look beautiful, so that it is pleasant to look at, so that all tables are neat, the most important thoughts are highlighted, so that there is nothing superfluous on the page and at the same time there are no unreasonably empty spaces. The ideal is not achievable, but there are a number of techniques that make it easier to change a document in order to, through trial and error, get at least a little closer to the cherished perfection.
Font effects play an important role in the perception of text. Let's look at some of them in more detail.
To underline a word, you need to select it and then simultaneously press the Ctrl+U key combination. In this case, both all characters of the selected text and the spaces between them will be underlined. To underline only words you need to use Ctrl+Shift+U. To select a block of text in italics, you can use the combination Ctrl+I. If, to increase clarity, it was decided to highlight some phrases in bold, then for this there is a convenient alternative to the mouse - Ctrl + B.
It is often necessary for a phrase to be typed in capital letters. The easiest way to do this is to immediately type in uppercase. However, it is not always possible to do everything correctly, so a special command was developed to convert a selected piece of text into upper or lower case - Shift+F3.
All the key combinations described above work as switches. This means that to return to the previous text input mode, you must press the same key combination again that changed the standard mode. For example, the Ctrl+U command will set the font attribute responsible for the underscore. To remove this attribute and return to the normal style, you must press Ctrl+U again.
Notes and footnotes are an integral part of any creative work. Of course, you can use the menu item of the same name to insert a footnote, but it is much easier to do this by pressing Ctrl+Alt+F.
To insert a page break, it is convenient to use Ctrl+Enter.
Some things can only be done if you use a mouse and keyboard at the same time. The most common example is smooth resizing of table cells. This is achieved by resizing the cell using the mouse and simultaneously pressing the Alt key.
It's no secret that text looks much better on a computer screen or in printed form when it is aligned in width. This alignment is achieved by increasing the length of the space between words. However, such behavior is not always justified. For example, you need to type a sentence that contains a surname and initials. If you put a simple space between them, then when aligned, the initials may be located far from the surname, which is incorrect. To eliminate this effect, there is a special character - a fixed space. The easiest way to insert it is by pressing Ctrl+Shift+Spacebar at the same time.
So, let's summarize.
- to change the font effect, use the commands: Ctrl+I, Ctrt+B, Ctrl+U, Ctrl+Shift+W;
- to convert letters to uppercase: Shift+F3;
- to set a fixed space: Ctrl+Shift+Space;
- to break pages: Ctrl+Enter.
It is impossible to know all the keyboard shortcuts for quick access to menus to simplify basic text editing operations. But the main thing is different. The main thing is to learn to use the set of commands that are used most often than others. Each person will have a unique set. Of course, there will be similarities, but in general everyone will plan to work with documents. Through trial and error, you can find how to quickly perform similar operations in order to save time and effort.
How to write text in bold
The sequence of actions may vary significantly. It all depends on which version of the messenger the phone owner uses. For Android the procedure will be one, for iOS or Windows it will be different. However, there is a universal method that can be used on all three systems. It's worth getting to know him first.
The first method: universal
When figuring out how to write in bold when the phone is running on a specific operating system, you should first consider this option. It involves the use of a special character. To write in bold, just put “*”, write the text itself, and then put “*” again.
This is done in the following sequence:
- We launch the messenger and go to the desired chat. After waiting for the opening and making sure that a chat with the desired interlocutor has opened, we place the cursor in the field in which the text will be typed.
- Enter "*".
- Immediately, without a space, type the phrase or individual word that needs highlighting.
- Enter "*".
- If necessary, we complete the message and send it to the interlocutor by pressing the appropriate key.
When using the mobile version running on iOS or Android, the desired effect will be achieved immediately after completing the phrase. With Windows the situation is somewhat different. There is no option to format phrases before sending a message. However, after pressing the appropriate key, you will be able to place the accents correctly.
It is not necessary to immediately highlight a specific phrase in bold. If necessary, you can type all the text, and then insert asterisks in the right places and thereby format the text.
Method two: context menu
To use this method, you need to type the text, select it, and after the context menu appears, select the desired format. On an iOS phone, touch the arrow pointing to the right. This will allow you to open the “BIU” item, where the format is hidden.