This tutorial shows you how to automatically wrap text in a single cell and how to manually insert a line break. You'll also learn about the most common reasons why Excel transfer doesn't work and how to fix it.
Microsoft Excel is primarily designed for calculating and manipulating numbers. However, you may often find yourself in situations where, in addition to numbers, you need, for example, to write a long title in the header of the table. If the bulk text does not fit in the cell, you can, of course, do the most obvious thing and simply make the column wider. However, this is not the best option when you are working with a large worksheet that has a lot of data to display.
A much better solution is to write a phrase that is larger than the width of the column on multiple lines, and Excel provides several ways to do this. This tutorial will teach you how to wrap text in an Excel cell and share a few tips.
Table Of Contents
- What is text wrapping in a cell?
- How to automatically wrap text in Excel.
- How to insert a line break manually
- Inserting breaks using formulas.
- Using Find_and_Replace (CTRL + J trick)
- Why doesn't line wrapping work in Excel?
What is text wrapping in a cell?
When the input data is too large, one of two things happens:
- If the columns on the right are empty, the long phrase extends beyond the cell boundary into those columns.
- If there is any data adjacent to the right, it is cut off at the cell border.
The figure below shows these two cases:
Word wrapping in a cell can help you display a long sentence in its entirety without it creeping into other cells. This term means displaying the contents of a cell on multiple lines rather than on one long line. This will avoid the “truncated column” effect, make the table easier to read and more convenient for printing. In addition, it allows you to keep the column widths the same throughout the entire sheet.
The screenshot shows what it looks like:
Now let’s look at several ways - how to make a transfer and achieve such an effect.
Dividing into lines by Alt+Enter via Power Query
There are situations when the user needs to divide multi-line text information not into columns, but into lines.
12
The “Power Query” add-on, which has appeared in the spreadsheet editor since 2021, is perfect for implementing this procedure. The detailed instructions look like this:
- Using the combination “Ctrl+T” we transform the source data into a “smart” sign. An alternative option is to move to the “Home” subsection and click LMB on the “Format as table” element.
- Move to the “Data” subsection and click on the “From table/range” element. This operation will allow you to import the plate into the Power Query tool.
13
- We select a column with multi-line text information. We move to the “Home” subsection. Expand the list of the “Split Column” indicator and click LMB on the “By Separator” element.
14
- Click on “OK” to confirm the changes made. Ready!
15
How to automatically wrap text in Excel.
To make a long phrase appear on multiple lines, select the positions you want to format, then turn on the line break feature using one of the following methods.
Method 1. Go to the "Home" tab> - "Wrap text":
Method 2: Press Ctrl + 1 to open the Format Cells dialog box (or right-click the cells you want and select this option), go to the Alignment tab, check the box as shown, then OK.
Compared to the first method, this one requires a few extra clicks. But it can save you time if you want to make multiple cell formatting changes in one fell swoop (for example, alignment + font + wrap).
Note. If the checkbox is solid, it means that the selected range has different transfer options, i.e. In some places the data is modified, but in others it is not.
Result. Whichever method you use, the data is distributed across the width of the column. If you change the width, the data will automatically resize to the next line.
As you might guess, the two methods described above are also used to cancel the transfer if it suddenly becomes unnecessary. Do the same operations and simply uncheck the box that you previously checked.
How to insert a line break manually
Sometimes you may want to start a new paragraph at a specific position instead of automatically wrapping long text. To mark the beginning of a paragraph manually, do the following:
1. Enter edit mode by pressing F2 while double-clicking either a cell or formula bar.
2. Place the cursor where you want to break the phrase and use the keyboard shortcut Alt + Enter.
Result. When you manually insert a line break, the Wrap Text option is automatically enabled. However, manually entered breaks will remain in place as the column becomes wider.
Note that the cell must be in wrap mode for the content to wrap down. If it is not enabled, you will see all the data on one line (even if you inserted a hyphen). But they will be visible in the formula bar.
This feature is sometimes used to make long formulas more readable. Insert a break (Alt + Enter) before the individual parts within the formula, and understanding how it works will become much easier. Here's what a formula for counting the number of words in a phrase might look like:
The following figure shows both scenarios (word wrap is entered twice, as you can see):
Word settings
For ease of use in the text editor, the following hyphenation options are provided:
- Manually
The command used is: after writing the text, open the Page Layout tab and click Hyphenation - Manual.
Next, a window appears and sequentially offers possible options for breaking down the syllables for the last words in the lines. Select the appropriate location and click Yes to confirm.
- Autotransfer
This feature can also be enabled in the Page Layout tab. In this mode, Word arranges syllables independently.
Inserting breaks using formulas.
You can add a new paragraph using a formula.
This can be useful when you have different positions that you want to combine and still add a line break there so that each part is separate.
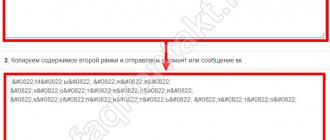
Below is an example where I used a formula to combine different parts of an address and added a break in each part.
And here is the formula that adds carryover to the final result:
=A2&" "&B2&CHAR(10)&C2&CHAR(10)&D2&", "&E2&" "&F2
Use CHAR(10) to add a new paragraph when merging cells. CHAR(10) uses ASCII code that returns the result we need. By placing it where required, we force the formula to break down the final result.
You can also use the UNION() function instead of the ampersand character (&):
=CONNECT(;;A2;" ";B2;CHAR(10);C2;CHAR(10);D2;", ";E2;" ";F2)
or here's the old CONCATENATE() formula if you're using earlier versions of Excel:
=CONCATENATE(A2;" ";B2;CHAR(10);C2;CHAR(10);D2;", ";E2;" ";F2)
Please note that in order for this division to be visible in the table, you will need to ensure that Excel's line break format is enabled. If this format is not applied, the steps above will not result in visible changes to your table.
Note. If you are using a Mac, use CHAR(13) instead of CHAR(10).
Using name definition instead of CHAR(10)
If you need to use SYMBOL(10) often, a great hack would be to give it a name. This way, you can enter a short code instead of the entire function in a formula.
Here's how to do it quickly.
- Click the Formulas tab
- You need the "Define name" option.
- In the New Name dialog box, enter the following information: Name: PSTR (you can call it whatever you want - no spaces)
- Scope of application: Book
- Range: =CHAR(10)
Now you can write PSTR instead of a function.
So the formula for merging addresses could now be:
=CONCATENATE(A2;" ";B2;PSTR;C2;PSTR;D2;", ";E2;" ";F2)
or
=A2&" "&B2&PSTR&C2&PSTR&D2&", "&E2&" "&F2
Using Find_and_Replace (CTRL + J trick)
This is a super cool trick!
Let's say you have a data set like below.
If you want to insert a line break where there is a comma in the address, you can do so using the FIND and REPLACE dialog box.
Below are the steps to replace a comma with a line break:
- Select the positions where you want to replace the comma with a hyphen.
- Click the "Home" tab.
- Then - “Find and select”, then - “Replace” (you can also use the keyboard shortcut CTRL + H).
- In the Find and Replace dialog box, enter a comma (,) in the Find what box.
- Place your cursor in the Replace box and then use the keyboard shortcut - CTRL + J (hold the CTRL key and then press J). This will insert a new paragraph into the box. You may see a flashing dot in the box after this operation.
- Select Replace ALL.
- Make sure transfer is enabled.
These steps remove the comma and replace it with a newline.
Note that if you use CTRL+J twice, it will insert a carriage return twice and there will be double spacing between sentences.
You can also follow the same steps if you want to remove all line breaks and replace them with a comma (or any other character). Just swap the Find and Replace with options.
Why doesn't line wrapping work in Excel?
As one of the most commonly used functions in Excel, long content conversion has been designed to be as simple as possible and you are unlikely to have any problems using it.
Still, if it doesn't work as expected, check out the following troubleshooting tips.
Fixed line height
If not all content is visible in a table cell, then most likely it is forced to a certain height. To fix this, select the problematic position, go to Home tab > Format > Auto-Fit Line Height. Or you can set a specific height by clicking Row Height and then entering the desired number in the appropriate field. Fixed height is especially useful for controlling how table headers are displayed.
Merged cells
Wrapping text in a cell does not work if several of them are combined into one. So you will need to decide which feature is more important in your case. If you save merged cells, you can display their full contents by making the columns wider. If you select "Wrap text", then separate them by clicking the "Merge and place in .
Extra options
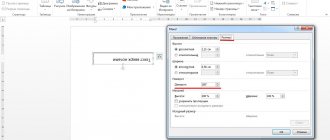
You can also change settings individually for text in the Page Layout tab.
In the window that opens, set the necessary parameters and save by clicking OK.
Advice! To reduce the number of hyphens in the text, you need to increase the spacing in the Zone width… field. To limit the number of consecutive hyphens, you need to increase the interval in the Max. number of consecutive hyphens field.