17.12.2018
| no comments
You sit on VK and regularly cover your life there, but is it inconvenient for some of your older relatives to watch your reports there? Do you have a small store on VK, and do you want to expand its audience by opening a profile on Odnoklassniki? One way or another, you are faced with a task: how to transfer a photo from Contact to Odnoklassniki. Solving it is not difficult.
Transfer a small number of photos manually
When you need to transfer several photos, the easiest way to do this is by copying:
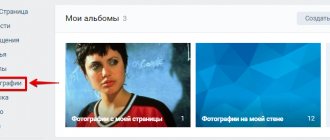
- We go to our page in Contact, find the necessary photos.
- Right-click on each image and in the menu that appears, click on “Save image as...”.
- Then select the folder where the photos will be placed. Let's save them.
- Open a page on Odnoklassniki. Go to the “Photo” tab.
- Select an album from existing ones or create a new one. We are looking for the “Add Photo” button, it is located above all the pictures.
- By clicking on it, you can see all the drives and folders that are on the computer.
- Now you just need to find the folder with saved images (1), select one or more photos with the cursor (2) and click on “Open” (3).
After a few seconds, the photos will appear in the album.
Attention: if you have photos on your computer, you do not need to copy them from VK.
From your phone or tablet
If you want to share a photo on Odnoklassniki directly from your phone or tablet, go to the mobile application and follow the instructions below.
- Open the side menu and select the desired section from it.
- Then click on the plus sign in the upper right corner, or go to the “Downloads” tab.
- Personally, I liked the “Downloads” tab better. Here you can: and select some photos from the device Gallery (1); and download all pictures taken on a certain date (2); and select one of the albums created on your phone (3). For example, let’s take the first option and add only certain pictures to the Odnoklassniki page. To do this, opposite the inscription “Upload these photos”, click “All”.
- Scroll through the Gallery and mark the photos you want by clicking on them. Next, at the bottom left, decide on the album. By default, the images will be added to the “Mobile Album”, but you can select any of the previously created ones or add a new one. Then click "Download".
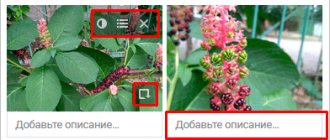
Note! If you click on the photo itself, it will open in full-screen mode, and you will be able to add a description to it and edit it (write text on top, apply a filter, add a sticker, adjust brightness, contrast, rotation, etc.). By scrolling left and right, you can view photos in this mode and, if you want to add them to the downloaded ones, mark the ones you want with a tick (1). When you have selected everything, click the “Download” button at the bottom.
- Wait until the download completes. Everything that was selected will be added to the specified album in Odnoklassniki.
Transfer a large number of photos manually
But what should you do if you want to transfer a large number of images, or even an entire album, from VK? The safest and easiest operation is performed using Yandex disk.
- First, you need to register a mailbox on Yandex or log into an existing one.
- At the top of the page you will see four tabs. We are interested in "Disk". We click on it.
- There is a list on the left, select “Photo” in it. Several more sub-items will open for you. From them you need to select the line called “Photo from social networks”.
- A list of all available social networks will appear in front of you, select VK from them.
- In the window that appears, you must enter your username and password for your page. The system will ask for permission to access personal and general information; you need to provide it by clicking on “Allow”.
- After this, copying all photos to Yandex disk will begin automatically.
Now you should send the photo to Odnoklassniki
- We mark on the Yandex disk all the photos that need to be transferred (you can mark one or more folders) (1).
- A menu will appear on the right. Select the “Upload to social networks” button there (2)
- In the list that appears we find Odnoklassniki.
- Then follows the identification procedure that is already familiar to us (enter your login and password, allow access to the data).
- Click on the “download” button. After some time, the images will appear on Odnoklassniki.
Attention: saving photos to Yandex disk and further posting them on social networks is absolutely free, any request to transfer money for services rendered is fraud!
Through the Photo section
The simplest and most familiar method for many, try it, perhaps it will become your favorite. We do the same work. Go to our page and click “Photo Section”. It looks like this as shown below.
I remembered the song, there are three roads, three paths, but which one should I take?
What I mean is that we now have three options:
- We create a new album and upload the photo to it.
- We place the pictures in our already created album.
- Or simply click “Upload photo”.
I propose to consider each option in more detail in order to better understand what is at stake.
Transfer photos automatically
There are various services that transfer photo albums from one social network to another, for example itamitut.ru and filecloud.me. Each has certain pros and cons, but the principle of operation is similar to Yandex disk, which is currently considered the safest. It is difficult and time-consuming only during the first transfer; later it will be much easier. When saving photos next time, you will not need to re-authorize, just click on “Save new photos”. Uploading to Odnoklassniki is also carried out without re-entering data. The process will take a maximum of a couple of minutes.
When using various services to synchronize data between social networks, do not forget about security and do not leave your passwords on unverified sites. Then you will be protected from unpleasant surprises in the form of account hacking and unauthorized debiting of funds.
Next page
If there are not enough photos
If you only need to transfer one, two or three images, then you should not look for complicated ways. There is a very simple way to do this: download photos from Contact to your computer.
Then you need to go to Odnoklassniki and upload the same images to your page from the folder to which they were moved.
By the way, this way you can “steal” a photo from someone else’s page. However, you should not do this without the permission of the profile owner. This method is quite simple and convenient, but it is ineffective if you need to move a lot of photos at once. The user will have to spend a lot of time. Therefore, in such situations, the following, more complex method is used.
Creating a new album
- First, we are required to click “Create Album”.
- Then a window will appear in front of us where we need to enter the name of the album and click “Create”.
Important! I suggest you pay attention to your privacy settings. We may limit who can view our album. If the need arises, you can completely hide it from everyone and only you will see it.
- So, we have done the above steps, now we have this picture in front of us.
- Before us is the window of the album we created. Click on “Upload photos”.
- As a result, the same window called Windows Explorer will open in front of us.
- Here we select the files we need and then click “Open”.
By the way, you can simplify the situation by adding photos. We take and select the number of them we need and “Open”. At the same time, we do all this from the PC folder directly into the browser window from the Odnoklassniki website.
After all, our pictures will be loaded and you can see them on your page. A notification will also appear indicating the completion of our work.
Transferring a photo using a computer
There is one easy way to transfer photos from a contact to Odnoklassniki using a computer. To do this, you just need to download the image to a folder or to the desktop of your laptop.
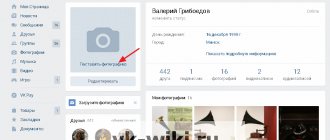
- On the main page of the site, fill out the login and password fields to log into your account.
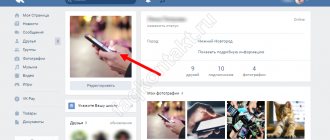
- Once on your personal page, go to the “Photos” tab.
- Select the desired photo card.
- Right-click on it.
- In the pop-up window, select the line: “Save image as.”
When you click on this line, a window will appear:
Read more: How to connect generator g273v1
- you need to decide where to save the image. Let’s do this on the desktop by double-clicking with the left mouse button on the “Desktop” line on the left;
- In order not to lose the picture, we will change the name in the bottom line;
- In the window at the bottom right, click “Save”.
Now we can easily find the photo on the desktop.
- Next, let's go to Odnoklassniki and load the image from where we saved it. Just like with a contact, you need to enter your data on the main page of the site.
- Go to the “Photos” tab and click the “Add Photos” button in the center of the page.
Using this method, you can transfer images from a computer from various social networks, not only from your page, but also from the pages of other people, as well as groups and communities.
From the news feed
The very first thing we see after registering with OK is, of course, the news feed. What am I talking about all this and the fact that you can add images straight from the feed.
To do this, there is a “Photo” button just in the note-taking block that I told you about above. Our actions will be the same: click this button, then select the necessary files on your PC.