VKontakte pretty much spoils the quality of uploaded photos. In some cases this is especially noticeable (for example, when loading a very large image). I even posted examples of how some of the photos were ruined. This may not be noticeable to some users, but the trained eye of a wedding photographer, or just an attentive person, sees two different photographs. So how to deal with this? Until recently, I simply changed the size of the photo, however, from time to time I still noticed, albeit not so significant, but still a deterioration in the quality of the photo. After reading about this problem on the Internet, I learned an interesting technique, which (slightly improved) I will share with you.
So, we have a big and beautiful photo. I’ll make a reservation right away that I’m writing only for those who have Photoshop - I wasn’t interested in how to do similar operations in other editors, but the principle should be the same. How can we post this photo on VKontakte so that the straight lines do not become jagged, and the colors remain the same as we see them? In short, there are three points here:
1) Greatly increase the sharpness of the photo. In full-size form, the photo should even become too sharp, too sharp, but after reducing the sharpness will return to normal.
2) In a cunning way, we reduce the size of the photo to the size that the contact person likes (1024 in height for vertical photos, and 1280 in width for horizontal ones).
3) We save in an equally cunning way, so that the photo does not contain unnecessary information, is in the sRGB color space and is of optimal quality.
Now more details. As an example, I took my photo from a beautiful lovestory photo shoot in an abandoned estate.
1. Open the photo in Photoshop.
2. Create a duplicate layer, apply a filter to it - another - color contrast with a radius of about 3 pixels. Then set the layer to “Overlay” mode and flatten it. Thus, we increased the sharpness of the photo.
3. Select Image -> Image Size.
4. Set: For a horizontal image – width 1920, for vertical – height 1536 (dimensions are one and a half times larger than the final ones), resampling – Bicubic, with reduction (in other versions of Photoshop – Bicubic, sharper), apply.
Sending photos without compression to Telegram via PC
Unlike the two methods described above, on a computer, photos and videos are sent in 3 clicks. One is spent on clicking on the “paperclip”, the second on selecting the necessary photos, and the third on sending them exactly as files.
It all looks like this:
As you can see from the screenshot above, instead of selecting “Send as an album” and “Send photos separately”. The method for transferring photos while maintaining image quality has been selected. That is, in the form of a file.
VKontakte pretty much spoils the quality of uploaded photos. In some cases this is especially noticeable (for example, when loading a very large image). I even posted examples of how some of the photos were ruined. This may not be noticeable to some users, but the trained eye of a wedding photographer, or just an attentive person, sees two different photographs. So how to deal with this? Until recently, I simply changed the size of the photo, however, from time to time I still noticed, albeit not so significant, but still a deterioration in the quality of the photo. After reading about this problem on the Internet, I learned an interesting technique, which (slightly improved) I will share with you.
So, we have a big and beautiful photo. I’ll make a reservation right away, I’m writing only for those who have Photoshop - I wasn’t interested in how to do similar operations in other editors, but the principle should be the same. How can we post this photo on VKontakte so that the straight lines do not become jagged, and the colors remain the same as we see them? In short, there are three points here:
1) Greatly increase the sharpness of the photo. In full-size form, the photo should even become too sharp, too sharp, but after reducing the sharpness will return to normal.
2) In a cunning way, we reduce the size of the photo to the size that the contact person likes (1024 in height for vertical photos, and 1280 in width for horizontal ones).
3) We save in an equally cunning way, so that the photo does not contain unnecessary information, is in the sRGB color space and is of optimal quality.
Now more details. As an example, I took my photo from a beautiful lovestory photo shoot in an abandoned estate.
1. Open the photo in Photoshop.
2. Create a duplicate layer, apply a filter to it - another - color contrast with a radius of about 3 pixels. Then set the layer to “Overlay” mode and flatten it. Thus, we increased the sharpness of the photo.
3. Select Image -> Image Size.
4. We set: For a horizontal image - width 1920, for vertical - height 1536 (dimensions are one and a half times larger than the final ones), resampling - Bicubic, with reduction (in other versions of Photoshop - Bicubic, sharper), apply.
5. Select Image -> Image Size.
6. Set: For a horizontal image - width 1280, for vertical - height 1024, resampling - Bicubic, smooth gradients (in other versions of Photoshop - Bicubic, best for smooth gradients), apply.
7. Click File -> Save for Web and Devices. Set the quality to 80, and check the “Convert to sRGB” checkbox.
We upload the resulting file to the contact. As a result, quality loss will be minimal and colors will match what you saw on your monitor. I think that this technique is suitable not only for VKontakte, but also for other social networks, and simply transferring files over the Internet, because as a result you get an image of optimal weight, size and clarity, which will be displayed equally in any color space (i.e. i.e. on any computer).
PS Here is what VKontakte support writes about this:
How to add a photo to VK from a computer
Often, users prefer to upload new images from their computer. This is due to the convenience and ability to process a photo in a high-quality manner in a special editor.
Reference. You can add a photo column to the main menu for quick access to photos. Move your mouse cursor slightly to the left of the “My Page” inscription. When you hover over it, a gear sign appears. Click on it. In the window that opens, check the box next to “Photos”.
Loading
To upload an image from your computer, follow these steps:
- Go to your VK page.
- In the menu on the left, select the “Photo Albums” section.
- Click the "Add Photos" button.
- Find the photo on your computer and click “Open”.
After some time, the photo will be uploaded to the social network.
Important! Using the described method, you can add one or several images. For example, to upload two photos at once, select them with the mouse and click “Open”.
What can you do with the image?
After successfully uploading a photo to the server, you can perform certain actions with it.
- Add to album. If you uploaded pictures through the general upload window, you can place it in one of your photo collections. To do this, do the following: Click on the “Add to Album” button.
- In the window that opens, select exactly where you want to move the photo card.
- Hover your mouse over the image.
Recommended: Failed to load VK image
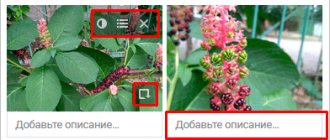
- You can correct your photo in the built-in VK photo editor. To get to the editor, click the button in the form of a half-filled circle. The functionality of this Photoshop from the VKontakte developers is very impressive. Here's what you can do with a photo card. Add text. Press the "A" button to write the letter.
- Crop - crop an image or cut it out and save only some part of it.
- Blur. After applying this function, some parts of the photo will be blurry. This tool can be used to focus attention on a specific part of the picture.
- The sun-shaped button will allow you to make auto-correction. This function will select the optimal, from a VK point of view, colors and filters for your photo.
- If you are not satisfied with the quality of auto-correction, you can adjust the settings yourself using the tools at the bottom of the image page.
Important! After processing the photo, be sure to click the “Save” button. Otherwise all work will be lost.