How to take a screenshot in VK on a computer?
Below are the two most effective methods.
- Using the Print Screen key.
Users do the following:
- Open a page with data that needs to be saved as a screenshot.
- Click on the Print Screen button (it is located in the upper right part of the keyboard).
- Open a “Dialogue” with the person for whom the image is intended.
- Insert a picture into the field intended for entering a message by simultaneously pressing the Ctrl + V key combination.
- Send the file.
The disadvantages of this method include the fact that it saves a screenshot from the entire PC monitor screen. To level it out, you may need to crop the image.
- Using the standard “Scissors” utility.
You need to do the following:
- Open a page in VK, a screenshot of which must be taken on a computer.
- Launch the application (located in the Start menu).
- Use the “Create” function.
- By holding down the left mouse button, select the area of the screen from which you want to take a screenshot.
- Save the resulting graphic file to the desired folder.
The advantage of this method is that there is no need to crop the image.
Using the above methods, the user can easily take a screenshot of VKontakte from a computer.
Send a screenshot as an attached file
The simplest and at the same time the most inconvenient way, in my opinion, is to send everything via attached files. To do this, just take this same photo and save it in JPG format.
After that, go to any dialogue or conversation in VK, click on the paperclip icon and select the “Photo” item. We can also click on the camera icon and also select a picture. The only difference between these two points is that in the case of a paper clip, you can select a picture not only from your computer, but also from any of your VKontakte albums, and also take a picture with your webcam.
Next, look for the same screenshot (several possible) on your computer’s hard drive, and then send a message.
If it is important to you that quality is not lost, although this is unlikely to be applicable for screenshots, then you can send photos as a document. To do this, click on the paperclip icon again and select “Document”. And then we select pictures from our computer in exactly the same way.
Taking a photo using a special program
The Internet is replete with applications specifically designed for taking screenshots from your PC screen. One of the most popular utilities is Screenshot Creator.
Working with the program is quite simple. To do this you will need:
- Launch the utility when the need arises to take a screenshot.
- Enter the combination Ctrl + PrtSc.
- Use the mouse cursor to select the area to take a screenshot.
- Click on the Enter key.
- Once these manipulations are completed, save the image in the required format, for example: *.jpeg.
The application supports a number of other functions. To see all the available ways to take screenshots, you will need to open the settings menu.
Screenshot program
It is much faster and more convenient to take screenshots in a special program. Screenshot Creator is just such software, and it weighs only 494 KB. We offer a small guide for downloading and installation:
- Go to the link https://www.softportal.com/software-5454-screenshot-creator.html
- Save the installation file on your computer and click the “Download” tab.
- Unpack the rar archive and install the program in the standard way.
Now you can proceed directly to creating a screenshot. The program can take pictures of the entire screen, only certain areas or the active window. In order to familiarize yourself with the working keyboard shortcuts, you need to go to the settings menu. This can be done by right-clicking on the icon of the running program (located near the clock).
We recommend: Search by image VKontakte
If you don’t want to keep all the settings in your head, you can do this:
- Simultaneously press the Ctrl+PrtSc keys.
- Use the mouse to select the part of the screen you are interested in.
- Press the Enter key.
- In the dialog box, set the saved image format: *.jpeg.
Now the screenshot will be sent to the clipboard, from where it can be pasted into any place convenient for the user.
How to take a screenshot on Mac OS
The OS supports two modes for taking screenshots:
- Take an image of the entire screen using the keyboard shortcut Shift-Command (⌘)-3. The finished file will be saved on your desktop in PNG format.
- Take a screenshot of a specific part of the screen using the keyboard shortcut Shift-Command-4. The cursor will appear as a crosshair. It should be moved to the starting point and, while holding Option, Shift or Spacebar, select the desired part of the screen. The photo can also be found on your desktop.
To save screenshots to the memory buffer, the combination Control-Shift-Command-3 is suitable.
Screenshot in VK on the phone
Many users of the social network VKontakte work with the service on their mobile phones. Therefore, there is an increased relevance of taking screenshots on such a gadget. Under these conditions, it is necessary to understand that the methods for manipulating screenshots on different OSes are different. You can make a graphic file based on a specific situation.
Photos from Android
Smartphones based on Android OS have the ability to create screenshots by simultaneously pressing the desired combination.
- Simultaneously hold down the Home and Power keys.
- Volume adjustment button (“Down”) + “Power”.
- Press the Home and Back buttons simultaneously.
The specific method depends on the smartphone model.
To create a screenshot from VK on a smartphone, you can set the necessary settings and take an image of the screen using a command built into the phone settings (for example, moving the edge of your palm across the entire surface of the screen).
Windows Snapshots
Previously, it was not possible to take a screenshot on VKontakte on Windows Phone due to the complete absence of such a function. With the advent of the 8 and 8.1 series, the technical ability to take pictures became available to users.
The methods below do not work on earlier versions.
For Windows Phone 8:
- Press and hold the Windows and Power buttons at the same time.
- A characteristic click will indicate the completion of the operation.
You can find the file by following the path: “Photos” – “Albums” – “Screenshots”.
For Windows Phone 8.1:
- Combination – “Power on” + volume up button.
- A beep will sound indicating that the screenshot has been successfully taken.
Searching for images is similar to that described above.
Keyboard shortcuts
When working with screenshots on a laptop, you will need to know a number of combinations for more successful and convenient manipulation of the resulting graphic files. Below are the main combinations:
- Print Screen – screenshot of the entire screen.
- Ctrl + V – paste an object into the corresponding field.
- Ctrl + C – copy the file to the clipboard.
- Ctrl + A – selects all pictures in the target folder.
A more complete list of useful combinations can be found on the official website of the OS used.
Editing a photo, sending
Correction of the resulting screenshot is possible using special applications, for example, Paint. This graphic editor and its interface are logical and intuitive. Among the main available functions:
- Sketching a separate area of the image.
- Crop and rotate pictures.
- Underlining, highlighting the necessary places in the photo.
- Changing the file size.
- Completion of directional arrows and other graphic elements.
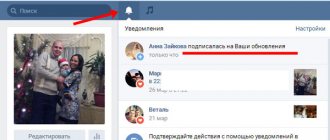
To send a screenshot to a specific person on VK, you will need to do the following:
- Copy an object to the clipboard.
- Open your page and dialogue with the recipient.
- Insert an image into the message field.
- Wait until the image is completely uploaded.
- Send a message by clicking on the appropriate button.
The function of creating screenshots in VK is available on most modern devices. However, the way they work can vary significantly depending on: the software used, the installed OS, and the specific version of the operating system. More detailed methods for taking screenshots can be found on the official website of the manufacturer of the laptop, PC, tablet, smartphone, etc. or the software manufacturer.
Second way
If you have a desire to somehow stand out in front of your friends and for this you want to use a more professional screen, then this method is for you.
To create such a screenshot, you will need a special program. It allows you to screenshot selected areas of the screen and then edit them (it is also possible to create scheduled screenshots and much more). Let's look at these simple programs in more detail:
- Simple Screenshot is a fairly compact program that does not require installation, and can easily be minimized to the system tray after launch. To launch it, you must simultaneously press the Windows logo key and the S button.
If everything is done correctly, a dialog box should appear on the monitor in which you need to select the name of the screen that you want to save and the folder where it will be located at the end of the process. This program is completely unsuitable for creating a screenshot of the selected window or part of it. To do this, you need to use a more powerful program.
- Screen Shot Maker - it will give you the opportunity to screenshot any selected areas of the screen, which can be either active or inactive. You can also use it to control screen frames and backgrounds.
- DuckCapture - this program can also help you take a screenshot of certain places on your monitor.
Instructions
Place the screenshot on the operating system's clipboard - press the Print Screen key.
If you need to insert a screenshot into a text document, and you have the opportunity to use the Microsoft Office Word application, the procedure will be very simple. After launching the program and loading the desired document, position the input cursor at the location where the screenshot will be placed. Then use the insert operation: select this item in the context menu or press the key combination Ctrl + V. After inserting, the screenshot can be adjusted to the size of the document using the tools of the additional tab “Working with Pictures: Format”.
If you need to insert a screenshot into messages on web forums, blogs, social networking sites or any other Internet resources, you will have to save it to a file. Word won't help with this because the document format it saves won't appear as an image on the web page. Use, for example, the standard graphics editor included in the Windows OS - MS Paint. Find a link to launch it in the main OS menu and open the application. This will automatically create a blank document. Press the Ctrl + V keys and the screenshot contained in memory will be inserted into the document.
Using the “hot key” Ctrl + S, open the file saving dialog and select jpeg, gif or png in the “File type” field. In the “File name” field, be sure to replace the name “Untitled” with something else made up of Latin letters. This must be done, since many web scripts cannot work with Cyrillic file names.
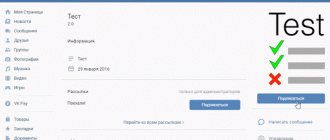
Attach a screenshot file to your message. The procedure on different web resources may be the same or different depending on what scripts are used on these sites. For example, on the VKontakte social network, to insert a screenshot, click on the “Attach” link under the right edge of the message entry field. In the drop-down list, select “Photo”, and in the separate window that opens, click the “Browse” button. A standard file search dialog on your computer will open. Find the screenshot you created, select it, and click Open. After this, a small preview image will appear under the message you are typing, and you can send it.
Screenshot
(from the English screen - screen, shot - snapshot) - an image obtained by a computer as a result of pressing certain keys, displaying what the user sees on the monitor at a given time.
Instructions
There are many programs for taking and saving a screenshot, but the easiest and fastest way to do this is with built-in Windows tools. To do this, you just need to press the Print Screen key; on the keyboard its name is PrtSc SycRq. It is usually located in the very top row, next to the F12 key.
After pressing the PrtSc SycRq key, the screenshot is saved to the clipboard. To save a picture from it you need to open some kind of graphic editor. It is more convenient to use the built-in Windows program – MS Paint. Click "Start" - "All Programs" - "Accessories" - MS Paint. Program address on drive C: WINDOWSsystem32mspaint.exe.
Select the menu “File” - “Save As”. The Save As dialog box opens. By default, Paint suggests saving the file to the My Pictures folder in My Documents. You can choose any convenient folder for saving. Decide on the format in which to save the image.
How to insert a screen into a VK dialogue, step-by-step instructions with screenshots.
Do you want to know how to consistently earn money online from 500 rubles a day? Download my free book =>>
Often when communicating with partners, colleagues, students or assistants, you need to show a screenshot. If the conversation is conducted according to , then it is enough for this.
In this case, you can not just show a photo, but also demonstrate any actions, accompanying the display with voice accompaniment. It is very comfortable.
But, in my practice, there have been situations when a student or client did not have one, and I had to communicate on social networks by writing messages.
Often, I had to attach screenshots to such messages. It happens that I ask to show what is happening on the student’s screen, and in response I receive the question: “I don’t know how to insert a screenshot into the VK dialogue, tell me what needs to be done.”
At first I thought it was a fairly simple action that could be described in two words. However, upon reflection, I realized that it is simple for those who are good at computers. And from the point of view of beginners, such an action can be quite difficult.
Therefore, it was decided to write detailed, step-by-step instructions for beginners.
A screenshot is a snapshot of the entire screen or any part of it. I have already written more than once about how to properly take a screenshot and where to find the screenshot on your computer. That is, how to find out in which folder it was saved.
For those who don't know about this, read the following articles:
I will go directly to the topic of the lesson. So, there are quite a lot of ways to transmit images on social networks, I will tell you about three that I use myself.
Insert screenshot using hotkeys
The fastest way to insert a screenshot is as follows:
This is a quick and easy way to send a screenshot in VK messages. However, I want to note that this method may not work for everyone. There have been cases when a student was unable to insert a screenshot using this method.
I can’t say what the reason is, it’s possible that the Print Screen button didn’t work, or maybe there were other reasons. But, be that as it may, if this method did not work for you, then move on to the next method.
Uploading a screenshot from your computer
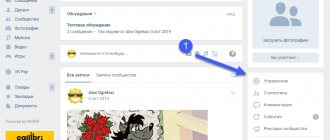
For the second method, you should save the screenshot on your computer. Since the screenshot is saved as a graphic file, it therefore needs to be uploaded in the same way as photographs. Open the section with VK messages, find the message into which you should upload the screenshot.
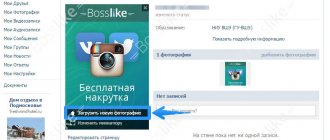
Then, to the right of the dialog box in VK, click on the thumbnail with the image of the camera.
Or move the cursor to the paperclip miniature to the left of the text entry window and select a photo in the window that appears.
An explorer will open, with which you will find the desired image on your computer. Click on it once and click on the “open” button. Or by double-clicking on the picture, you will immediately start the process of uploading the screen to a VKontakte message.
Screenshot online
These days I prefer to take screenshots with Lightshot. The convenience of this program is that you don’t have to download the screenshot to your computer, but save it on the server, that is, on the Internet.
At the same time, my computer is not cluttered with unnecessary screenshots. By taking a screenshot and saving it online, I get a link to that screenshot.
How to insert a screenshot into a VK dialogue, summary
So we’ve looked at three simple, quick ways to add a screenshot to messages on VK. I hope you find a method that suits you. Share in the comments how you insert a screenshot into a VKontakte dialogue.
PS
I am attaching a screenshot of my earnings in affiliate programs. And I remind you that anyone can earn money this way, even a beginner! The main thing is to do it correctly, which means learning from those who are already making money, that is, from Internet business professionals.
Get a list of proven Affiliate Programs in 2021 that pay money!
Download the checklist and valuable bonuses for free =>>
1. What is a screenshot?
2. How to take a screenshot?
4. 4 steps to take a screenshot.
1. What is a screenshot?
Screen, screenshot (from the English “screen” - screen) is a screenshot. A snapshot of what you currently see on your computer monitor. When taking a screenshot, you are taking a photograph of the image from the monitor.
2. How to take a screenshot?
Screenshots can be taken using special programs, for example
snagit
, one of the simplest and most convenient. Programs, first of all, are necessary for those who have to take a lot and often take screenshots. You can find and download programs on the Internet. If you don't have the program, or you don't take screenshots often, we'll look here at how to take a screenshot manually.
To do this, press the Prt Scr (Print Screen)
and the screenshot will be copied to the clipboard.
In this case, when you press only the Prt Scr (Print Screen)
The entire screen will be “photographed” (see screenshot below with a “frame” of icons and tabs).
If you press the Alt + Print Screen
, then you will get a snapshot of only the active window, without unnecessary details.
3. About screenshot saving formats.
Experts advise saving screenshots:
text - in PNG text + picture - in PNG picture - in JPEG format
You can select the format type when saving the file.
4 steps to take a screenshot.
Step 1. Click Print Screen
or
Alt + Print Screen
, then go to any image editor: Paint, Abode Photoshop and others.
For example, let's look at how to make a screenshot in the Paint
, which is available on almost every computer.
Step 2. Open Paint: Start - Programs - Accessories - Paint
Step 3. Click the Insert button
(or press Ctrl+v on the keyboard).
The picture is pasted from the clipboard. That's it, the screenshot is taken.
Step 4. Save the screenshot.
Most often this is done like this: File -> Save As. Give the file a name and save it on your computer, choosing the saving format according to step 3: text - in PNG format text + picture - in PNG format picture - in JPEG format The format type is selected when saving the file.
5. How to insert a screenshot into a message?
The screenshot is inserted into the message, like a picture from your computer.
If you want to take a screenshot not of the entire image on the screen, but only take a fragment of the screenshot
(i.e. part of the text from the screen or a picture), then you can cut out the desired “piece” as follows:
After clicking the Insert button (step 3 of creating a screenshot), you will see on the screen the entire image that you “photographed”. Next, click the Select button, highlight the desired fragment with the cursor and click the Trim button. Only the selected part of the image will remain on the screen. Next, save the file (step 4).
And we get a cut out picture
And further. If you work with Dropbox, you can take screenshots with it. Dropbox takes screenshots by default in PNG format and sends the screenshot to the cloud. You just need to check the box in the settings.
You can select other formats in the Snippings application (%windir%\system32\SnippingTool.exe) and save the clipping in any format if necessary.
When communicating on social networks, quite often there is a need to quickly send the necessary information to the interlocutor. The most convenient way to do this is using a screenshot, but for many users this task remains overwhelming. There's really nothing complicated about it. In the article below we will figure out how to take a screenshot in VK and then send it to your interlocutor.