With the advent of social networks, the Internet has become orderly. Now VKontakte has many different functions: video, audio, etc. Most user data is now publicly available and easy to view. And it’s become very easy to upload a couple of photos with the help of albums: smile:, where you can simply post a photo shoot about a cool party or show exotic places you’ve visited. However, sometimes there is a need to delete unnecessary or mistakenly uploaded photos from a photo album on VKontakte. Getting rid of unnecessary images is easy.
How to delete VKontakte photos?
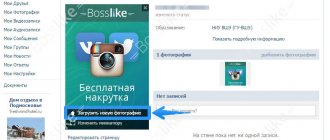
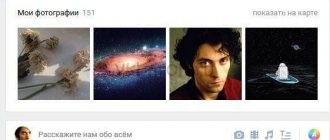
You should log into your Vk account and select My Photos in the left menu.
The second way is to find the Photo Albums column below the avatar and click on the inscription. As a result, a page will open with a list of all VKontakte albums. Click on the desired photo album from which you want to remove unnecessary photos. Now we look for an unwanted photo and click on it. In the lower right corner of the window there is a navigation menu where we look for the Delete button. After clicking on it, the photo will be deleted. We perform this simple operation with the remaining images.
If you accidentally deleted the wrong VKontakte photo, then it is possible to correct the error, but only if you immediately start restoring it. When deleting, the removed image is displayed and a line is written at the top of the window that the Photo has been deleted. Restore. In this case, you can still change your mind about removing the photo from the VKontakte page and have time to return the photo to its place: smile:. If you exit the album editing mode, it will be impossible to return the pictures.
Today, the quality of cameras is increasing, simple cameras are built into all mobile phones, making it very accessible to capture every happy moment in life. Social networks provide a great opportunity to share joy with friends and add pictures. To work comfortably with VKontakte albums, you should know how to add, how to view, how to delete or remove photos.
Every person has a need to stand out from the crowd. Some people take selfies on skyscraper lightning rods to do this, others experiment with hairstyles and piercings. And there are people who just need to change the theme and avatar in the operating system to feel special.
What is an avatar and why is it needed in Windows
An avatar is a picture that users of social networks and forums set in addition to their name/nickname. This could be a personal photo, a favorite character, a movie hero, etc., etc. Thus, the user becomes less faceless. Windows also has a site with the ability to open discussions, and comments are accompanied by an image. It is also used for your account and is a means of personalizing your computer. Avatars are stored in a special Windows folder, which can be found along the path:
C:\Users\username\AppData\Roaming\Microsoft\Windows\AccountPictures.
It is also possible for the pictures to be placed here:
C:\ProgramData\Microsoft\User\AccountPictures.
If AppData is not detected, check in Settings to see if System Folders are hidden.
By default, a faceless silhouette of a stylized man is used as an avatar, but, as you understand, you can set your own image.
- Type in “Search”: “Options” (or press Win + I, or open “Start” and click on the cog wheel icon).
- Here we are interested in the “Accounts” item and the “Personal Data” tab.
- In the window you will immediately see a proposal to change your avatar. You can take an instant photo on a webcam or choose something ready-made. Depending on this, either the Explorer window or the camera will open.
- The selected photo is instantly loaded, and the next time you turn on the computer, a new avatar will appear.
If you registered on the Microsoft website, the image will automatically be installed there too, and it will be saved even if you buy another PC. All previous photos used as an avatar are stored in the same folder, the path to which is indicated above. You can also change the picture on the Microsoft website, but there is one problem - the old avatar will remain on the computer. Unfortunately, the developers have not yet fixed this problem.
Now let's look at how to change the avatar in Skype installed on the system.
- Open a window with dialogs - your name will be above them.
- Click the circle and you will see personal information, as well as a button with the ability to add a photo.
- Select and download what you need.
You can also go directly to the Skype website and do the same.
How to remove a Windows avatar
The actual removal of an avatar in Windows 10 is a very complicated procedure. You can do it simpler - change the picture to a standard outline of a man or something vague. This is done like this:
- Go to “Accounts” and “Personal Information”.
- Try to add an avatar, wait for Explorer to react and select the default picture offered to all users (for convenience, you can change the viewing type to “Icons” to immediately notice it).
- Delete all other images in this folder.
If this method does not suit you for some reason, try the following:
- Open the folder where the avatars are collected again, find the file with your nickname and .dat extension.
- Remove it.
- Press Win+R, enter “cmd” there (without quotes) and click “Inter”.
- The “Command Prompt” will launch, where you need to type “wmic useraccount get name,sid” (without quotes) and also press “Inter”.
- Delete the found folder as administrator.
- Don't forget that the picture continues to be used on the Microsoft website - go there, open your profile and delete the avatar.
Now you see how difficult it is to remove an avatar in Windows 10, although the developers claim that they are doing everything possible for the convenience of users. In some cases, to consolidate the changes, it is not enough just to restart the computer - you need to log out of your Windows account and log in again.
- This is not difficult to do. Go to your page, upload this picture to your photos:
- camera image;
- animal head (blocked user).
then set it as your avatar.
By the way, this picture just means that the user does not have a photo.
In most cases, when you put a photo on your VKontakte avatar and then if you want to make it empty, difficulties may arise. Even if you delete a photo that is standing, another one may automatically appear on your avatar, etc. There is an easier way - just download a ready-made empty ava. There are basically 2 types of them:
You can download both avatars directly from here:
Anyone who has never put a photo on their avu always has an empty one (camera).
Yes, it’s very simple to find and download the corresponding picture on the Internet, and upload it to your avatar. Many users from time to time put empty avatars or avatars of a blocked user. For example, this avatar is for a VKontakte user who is actually temporarily or permanently blocked.
If you already have a photo as an avatar on the VKontakte website, then you can put an empty avatar in only one way, so as not to delete photos from your albums. You just need to download a picture with an empty avatar and put it on your page as an avatar.
If you have photos posted on VKontakte, but you want them not to be displayed on your avatar, then just upload one of the pictures suggested below to the existing photos and install it on your avatar. These pictures will confuse many, since empty avatars are automatically displayed for users without any uploaded photos.
The simplest thing is to replace the avatar by uploading any saved image that imitates an empty avatar, having first copied and downloaded it to your computer. For example this
Can you do this
It depends on what goal you are pursuing.
All active VKontakte pages must have avatars, so you can’t simply remove photos. We found another way for this. Find the picture you need and upload it as an avatar. This one might suit you.
An empty avatar is installed like a regular photo. You can install it from the Internet, or you can download it to your computer and then install it on VKontakte. There are several options for empty avatars, for example, you can download this avatar and then put it on VK instead of your photo.
I solved this problem this way - I simply inserted an empty photo with an outline of a person into my avatar and did not delete any photos. For almost 2 years now I have had this photo hanging on my avatar and nothing has happened. Everything is done quite simply - upload a photo, and then select it as a profile photo.
Almost any of the latest Windows systems has the ability to install an avatar on your account. But many people think about changing it or removing it altogether. Now we will talk about how to delete a Windows 10 account avatar. On the one hand, everything seems simple, on the other hand, you need to take into account some of the features of this modification of Windows.
Recovering photos from browser cache
If you recently viewed this photo in full size, then it could remain in the cache of your browser - the program with which you view websites. In other words, in her temporary files. This is one of the real chances, you will need a program to view the cache.
Search criteria - the site address must contain “vk.com”. And the link must be to a file with a jpg or png extension. We are looking for a graphic file on the Contact website.
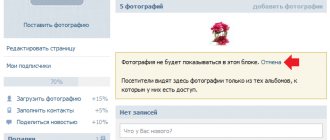
It is impossible to restore a deleted album. They are deleted once and for all. Think before you delete the entire album, it might just be easier to hide it. And it is also impossible to restore photos with likes. Therefore, before you take and delete any photo, think.
Log in to your VKontakte page right now. Save your photos on your computer or any disk so that you don’t have to restore them later.
and is it needed?
First, let's look at what an avatar is. Essentially, it is a thumbnail image or photo that is displayed when the user logs in and opens the Start menu. If there are several registered users working on the terminal, then upon login, an account selection menu with user pictures is displayed.
By and large, no one except people working at a computer sees such pictures, so there is little point in using them. However, many of us have a tendency to decorate or want to stand out. There is nothing wrong with this, of course. But sometimes there comes a time when you get bored with your avatar and want to change it or remove it. And it turns out that not everyone knows how to delete an avatar in Windows 10. Let's look at a few basic methods.
How to remove an avatar in Windows 10 from settings
So, let's assume that the user is tired of the installed image (own or factory) and wants to replace it with something else. In order to solve the problem of how to delete an avatar in Windows 10, you will need to delve into the settings of your “account”.
To access the main settings, use the “Start” menu, where we select the settings section, and when entering it, go to the accounts item.
In the new window below the installed image there is a browse button, by clicking on which you can select the desired image and apply the changes made.
A simpler access method is to call the menu with the line to change your own “account” by right-clicking on the avatar in the “Start” menu. This is logical to do if there are quite a lot of registered users working on the computer, so that later you don’t have to look for yourself in the list.
We use the Web Archive service
There is an old site on the Internet that is a kind of historical repository. There are copies of all the resources that existed on the network.
Well, to be precise, not all of them, and not for all dates. But still, a fairly large array of data. Any user can use it to view long-erased pages. As you guessed, we use this tool to try to open a remote user page on VK.
For example, I will manually delete my test page (see instructions for deleting a VKontakte page).
Her id is “id384697376” (see how to find out a VKontakte user id). When we try to open it on a social network, we will see the following picture.
The page has been deleted - we cannot see the data that was published on it
And we urgently needed to see the last post on the wall. It’s good if the restoration period has not expired - just restore the page and see all the necessary data. What if it’s too late and the profile is completely destroyed? This is where the web archive can help.
The link to the service is below:
https://archive.org/web/
To work with it, I recommend that you use the Opera browser in private mode with VPN enabled. This way you are guaranteed to be able to access it. This is due to the fact that the site is periodically blocked.
I remind you that to enable this mode, open the menu and select the appropriate item. In the new window, activate the VPN function. Hint below.
Being on the start page of the service, we need to enter a link to the desired page into the form. In our example it looks like this:
https://vk.com/id384697376
Enter it into the form and click on the “Browse History” button.
Enter a link to the site in the web archive
Then there are two options for the development of events.
The service has some copies of data related to the specified url address. As you understand, the data may have changed over time. Therefore there may be multiple copies. This can be seen on the timeline at the top of the screen. If there is information for a certain year, you will see the corresponding mark.
Now click on the desired year. Below in the calendar, the date for which there is data will be marked in color. To view the page, just click on this mark.
As you can see, we were able to find a snapshot of the page. This would work even if it were locked and there was no access to it. Now we can see the user's personal data, some photos and wall posts. The goal has been achieved.
But the method does not always work. The web archive does not contain all the pages that exist on the Internet. If there is no copy of the data, we will see a corresponding notification.
No copy of the required page
In this case, you need to move on to the next method.
Subtleties of Windows 10 settings
How to remove an avatar in Windows 10 using the simplest method is already clear. Now let’s take a short digression and look at some of the nuances of the system settings.
Unlike their predecessors, the tenth and eighth versions have an original function of remembering the last three pictures that were ever set as an avatar. This is why many users want to delete all pictures altogether and install the icon that was displayed by default. We'll talk about deleting your files a little later, but for now let's restore the default settings.
How to recover photos through support?
The last chance is to write to VKontakte technical support and ask to recover deleted photos. Do it as quickly as possible, you literally have only a few days! Give them the following information:
- Photos on my page have been deleted, please restore them.
- How many photos have been deleted?
- What was the name of the album or albums they were on.
- When exactly the photos were deleted (date, time).
In order not to search, you can create a new support request about deleted photos using this link: Create a new support request (it may not open in the mobile application, do it through the full version of VK).
Recovering deleted data is not guaranteed in any case. Good luck!
How to delete an avatar in Windows 10 or restore factory settings?
All standard images used in user settings are located in the User Account Pictures directory, which is nested in the Microsoft folder of the Program Data directory, which is hidden by default. Therefore, to set a standard image, you must first set the option to show hidden files and folders in the view menu in Explorer.
After this, in the settings of your registration record, you should repeat the steps described above and set the picture from this location. Please note that there is no reset button in Windows 10. After that, simply select the desired image and save the changes. If necessary, the display of hidden objects can be removed again.
Is there a photo left somewhere?
If it was a truly valuable photo or profile picture, then most likely it is somewhere else. For example, on your computer in a folder with photos, on your phone, somewhere on a disk or on a flash drive. Perhaps your boyfriend or girlfriend. If someone else made you an avatar, then that person probably still has it. One of your VKontakte friends can help you restore a deleted ava, if he liked it and saved it somewhere at home. Don't be shy to ask people!
Manually deleting unused files
How to delete an avatar in Windows 10 is already clear. Now let's see how to delete your pictures. Again, they are located in hidden directories. Therefore, first you need to use the view menu again and in the user directory named after the user name, go through the AppData folder in the Roaming directory, then Microsoft, Windows and AccountPictures. This is where you need to delete all the pictures.
In principle, to simplify the procedure, you don’t have to use the view menu with subsequent transitions, but simply set the directory path in the “Explorer” search bar (usually %appdata%\Microsoft\Windows\AccountPictures). In this case, the search specifies the variable parameter “%”, which indicates the search for a hidden object. After deleting all the images in the list of used images, they will not be shown, and only the selected standard icon will be displayed in the welcome message (when logging in).
Instead of a total
As can be seen from all of the above, there is nothing particularly difficult about changing or completely deleting an avatar, as well as the issue of deleting previously used images. Whether to set an avatar for yourself or not is a matter of personal considerations and preferences. By and large, it is not needed on a home terminal, except in offices where a lot of people work at the same computer. Although one can argue with this.
With the advent of social networks, the Internet has become orderly. Now VKontakte has many different functions: video, audio, etc. Most user data is now publicly available and easy to view. And it’s become very easy to upload a couple of photos with the help of albums: smile:, where you can simply post a photo shoot about a cool party or show exotic places you’ve visited. However, sometimes there is a need to delete unnecessary or mistakenly uploaded photos from a photo album on VKontakte. Getting rid of unnecessary images is easy.
How to delete VKontakte photos?
You should log into your Vk account and select My Photos in the left menu.
The second way is to find the Photo Albums column below the avatar and click on the inscription. As a result, a page will open with a list of all VKontakte albums. Click on the desired photo album from which you want to remove unnecessary photos. Now we look for an unwanted photo and click on it. In the lower right corner of the window there is a navigation menu where we look for the Delete button. After clicking on it, the photo will be deleted. We perform this simple operation with the remaining images.
If you accidentally deleted the wrong VKontakte photo, then it is possible to correct the error, but only if you immediately start restoring it. When deleting, the removed image is displayed and a line is written at the top of the window that the Photo has been deleted. Restore. In this case, you can still change your mind about removing the photo from the VKontakte page and have time to return the photo to its place: smile:. If you exit the album editing mode, it will be impossible to return the pictures.
Today, the quality of cameras is increasing, simple cameras are built into all mobile phones, making it very accessible to capture every happy moment in life. Social networks provide a great opportunity to share joy with friends and add pictures. To work comfortably with VKontakte albums, you should know how to add, how to view, how to delete or remove photos.
Avatar is a Windows 10 user image that is displayed when the operating system boots. Those who want to make their computer unique need to know how to change it.
How to edit a VKontakte photo?
Everything is very simple and clear. Open any photo (it doesn’t matter if it’s a photo from an album or your ava) and click “Edit” in the lower right block.
The photo will open in a smaller window and you'll be able to edit it. Below you can choose one of the filters, for example, make a photo black and white, or antique. There are two more elements at the bottom left. Using the first, you can crop the photo, and the second, you can adjust the blur level of the photo.
By the way, still on the topic, I think it will be interesting to read an article about that. Well what can we say about the new function. Well, of course, there are few options yet, but most likely over time the editor will be updated and new features will appear. Something tells me that now VKontakte will begin the era of black and white and blurry photographs :). Good luck friends, I'm off to edit the photo :).
There is no magic button that will easily and simply restore a deleted photo or VKontakte ava. “Recover” link appears.
in case the photo was deleted by mistake. But if you have already left there, read this instruction to the end.
Deleted photos disappear from your page, but remain on VKontakte servers. This does not mean,
that it will be easier to recover a deleted photo (or avatar) and especially does not mean that anyone can look at your deleted photos. The fact is that it is easier for VKontakte owners not to delete photos completely, but only to remove them from the pages so that no one can find them.
How to change
You can change your picture by going to the Start menu and selecting your avatar picture. Then click "Change account settings."
This will take you to the Options section where the image you are using is displayed. Next, click browse and select the file that you would like to see when logging into the operating system.
Important! If you are using a laptop or have a camera connected to your computer, you can take a photo for your avatar. For this purpose, in the “Options” section there is a special “Create an avatar” button.
Deleting old images
In Windows 10, there is a function to remember the last three pictures that were used for the avatar. You can see them when you get to the Settings menu by clicking on the Change account settings image.
Important! The operating system does not have a function for directly deleting these files, but this can be done by going to the root folder of the system drive.
Go to Explorer and enter C:/Users/User-Name/AppData/Roaming/Microsoft/Windows/AccountPictures
.
Instead of User-Name,
enter the name under which you registered when logging into the operating system.
Second option - try entering the following into the search bar: %appdata%\Microsoft\Windows\AccountPictures
.
This option is simpler, since the " %appdata%
" variable will automatically replace the correct address. In addition, this method of writing saves time.
After this, you will be taken to the folder in which the Windows 10 account pictures you previously used are stored. Delete those files that you do not need by pressing the Delete button on the keyboard, having first selected them, or by right-clicking and selecting “Delete”.
photos from albums in Odnoklassniki
To delete a photo in Odnoklassniki, first of all you need to log in to the site by entering your username and password. Once logged into your account, go to the “Photos” section and open the desired album.
Under each photo you can see small squares, hover your cursor over the ones you don’t like and mark them by clicking the left mouse button.
If checkmarks appear under all unnecessary images, pay attention to the line located at the top above the list of photos; it contains a “Delete” section.
By clicking on this button you will get rid of the selected photos.
Restoring the standard picture
If you don't want the previously set image to be displayed when you log into Windows 10, restore the default image. The standard picture is stored in the root folder of the system, but after you change the avatar, the directory disappears because it is hidden.
To set a default avatar, open Browse from the Change Account Settings menu and navigate to C:\ProgramData\Microsoft\User Account Pictures
, registering it in the Explorer search and turning on the display of hidden files and folders in the “Folder Options” section in advance. Select an image of appropriate size from the catalog and save it as an avatar.
Conclusion
Changing your avatar in Windows 10 is very simple through the "Change Account Settings" section. But you can delete an account image only by going to the root folder of the disk with Windows 10 installed, where the last three files used as an avatar image are stored.
In Windows 10, as well as in Windows 8 and 8.1, it is possible to set an avatar for an account. It, in turn, appears in the Start menu, many Windows Store apps and some desktop programs (such as Microsoft Office), and some Microsoft web services (such as OneDrive). Setting an avatar on Windows 10 is very easy.
An avatar in Windows 10 is set through the Windows Settings panel. One way to open it is:
— launch the start menu;
— in the lower left part of the menu that appears, click on the “gear” icon.
After a second, a window with a list of categories will open. In it you need to find and select the “Accounts” item. A new screen will appear. By default, the “Your Data” tab will be open - this is exactly what you need.
You can immediately go to the desired section of the settings control panel. To do this, you need to open the Start menu, click on the icon with the avatar, which is located at the bottom left, click on it and select change account settings.
If an avatar was not previously set, in its place there will be a gray picture with an abstract image of a man. To change it to your own, you need to find the “Create an avatar” item somewhere at the bottom of the screen, and then select one of the ways to do this: “camera” or “Select one element”.
Using the first one, you can use a webcam to create a photo, for example, of your face, and set it as an avatar. Using the second, you can set any of the photographs already present on your computer or any other image you like as your avatar.
To take a new photo for your avatar, you need to perform the following series of actions: - click on “camera”;
— take a photo by clicking on the round button with the “camera” icon in the window that opens;
— crop the image using the “Frame” tool in the additional window that opens;
— click on the “Done” button with a “tick” icon if the picture is suitable or on the “Cancel” button with a “cross” icon if you don’t like the photo;
— if “Cancel” was pressed, repeat the snapshot creation.
Once the “Done” button is pressed after cropping the photo, the avatar will be installed.
To set any image as an avatar, you need to select another item - “Select one element”. By clicking on it, a window will appear in which you need to select an image file. You need to follow the path where it is located, select the picture you are interested in, and then click on “Select picture”, crop it as you like, and click on “Done”. A moment later the avatar will be installed.
Setting or changing an avatar in Windows 10 is a very simple task. At the same time, you can put anything as it. The system supports many different image formats and a wide range of resolutions (including very large and small).