Any social network contains a large amount of personal information about the user, if he does not hide anything about himself and regularly fills in all the columns on his page. Contact is no exception. Personal information, photographs, friends lists and much more can tell a lot about the account owner and find out detailed information about him. But sometimes a person does not want all users of a social network to be aware of what is happening in his life, and at the same time there is a circle of people with whom he wants to share this information. Then the question arises: “how to restrict access to the page?” We will talk about how to do this in this article.
Why is this necessary?
The purpose of providing privacy features is to preserve your personal information. You have the right to choose who and what personal materials will be available.
Let's say you don't want any user to see your photos (see how to hide photos on VK from other users). They should only be available to your friends. Or you don’t want to enter into correspondence - then you can block the ability to send you private messages.
For which data and materials can you configure privacy settings?
You can partially close or completely block access to the following items.
- My page
- basic information
- Photos, audio and video recordings
- List of groups
- Gifts (see how to send a gift to VK for free)
- Friend list
- Places on the map (see how to tag your best friend on VKontakte)
- Entries on the page
- Access to other people's records
- Possibility to leave notes on the wall
- Viewing and writing comments (see make comments on VK for free)
- Contact me
- Writing messages (text and audio calls)
- Calling via apps
- Invitations to communities and applications
- Other
- Page Visibility
- My updates
Please note: if you completely delete the page (see how to delete from VK) so that no one can view your data, then users will still have this option. I wrote about this in detail in the material on how to view a deleted VKontakte page.
How to work with privacy settings
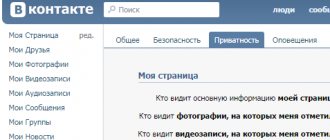
To do this, we need to go to the privacy settings menu. Open your page and in the menu block find the “My Settings” link. Click on it.
In the top menu, click on the “Privacy” item. A menu will open where we can block access to our VKontakte materials.
Now you can go directly to the settings.
In the menu list you will see all the available options for which we can set the privacy mode. As you can see, to the left of each item the current option is indicated (in the form of a clickable link). If you click here, a drop-down list will appear in which all options for restricting/opening access will be available for selection. They are duplicated below.
- All users
- Only friends
- Friends and friends of friends
- Just me
- Everything except...
- Some friends
- Some friends lists
Let's look at it with an example. Let's say we want to completely block access to the groups in which we participate. To do this, find the item “Who sees the list of my groups”, and set the parameter “Only me” for it.
In the same way, you can specify access restriction parameters for any of the items. If desired, hide your VKontakte videos, lists of friends and groups (see viewing hidden VKontakte friends). Disable the ability to send you messages and invite you to groups.
Black list
There is another way to rid your page of unpleasant visits. There is a blacklist for this. So, this list is still in the same “Settings”. When you open the corresponding tab, you will see an empty line at the top. There you need to enter either the name of the person who bothers you, or a link to his/her page, then click on the “Add to blacklist” button. That's all! Now your page is closed from him or them. By the way, the difference between a restriction and a black list is that those who are “restricted” can write you a message, but those who are “ignored” are deprived of this right, so from now on they will not be able to bother you. At least on a social network.
Let’s understand in general, why restrict access to your account? Immediately after registration, the profile is open and available for viewing by absolutely everyone. Anyone can read the wall, photographs, information about where the user studied, lives, works. Not everyone likes openness. Some users simply do not want strangers to view their publications; others are afraid that relatives or friends might find out something and be disappointed; still others close the pages because the employment contract says so. But in fact, the access restriction function guarantees the user the chance to create a space where they will speak the same language. Not to mention protection from scammers and intruders.
When actively using VKontakte, you often encounter closed profiles. Their appearance is quite different. An outside guest can only see bits of information, namely:
- Avatar;
- Age;
- Country of Residence;
- Language.
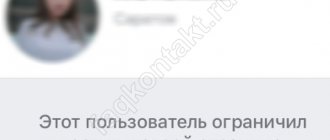
And the message: “The user has restricted access to his contact page.” In fact, the account does not represent anything useful for attackers or enemies.
If you go to someone’s page and see such a warning, then you should consider two options:
- You forgot to log in to a social network. Many users block access to pages for unregistered VK users and visitors from search engines.
- You are not part of the circle of trusted people. Are you sure that the access restriction for you is purely an accident? Write to a friend and ask him to open the page, maybe he just made a mistake when choosing the access level.
How to restrict access to your page in contact
If you want to prevent other users from viewing your page, you should do the following.
In the page settings, go to the “Black List” tab. Here in the input field we indicate the name of the user for whom we want to completely restrict access to our page, or a link to his account. Then click the “Add to black list” button (see add to black list on VK).
Now if he wants to view your page, he will see a message like this.
If you subsequently decide to partially or completely open access, check the appropriate boxes in your privacy settings.
Update. Added private profiles feature
Recently, VKontakte added a new feature - a private profile. Now any user can hide their personal data and limit viewing of their profile. It is enough to configure one parameter in the privacy settings.
This is done as follows. Open the page, go to the menu in the upper right corner, then the “Settings” item.
Open the “Privacy” tab and go to the end of the list. Here set the value to “Closed” for the “Profile Type” item.
Now a visitor to your page who is not your friend will not see your personal information, but will receive a warning that this profile is closed.
The most effective ways to hide friends on VK through a computer
Of course, it is not always necessary to hide the entire list of contacts. And there’s no need, because the administration offers effective ways with which you can close as many friends as necessary, and even choose for whom to leave the entire list open, if you have specific wishes in this regard.
One or more
So, the question of hiding one or more contacts from other users on the network is on the agenda, but there is no idea how or where to start. In fact, everything is not as complicated as it might seem initially, especially if you follow the most simplified instructions, which involve performing the following steps:
- Log in and click on the avatar thumbnail, which can be found in the upper right corner, and then go to settings.
- After the general settings menu opens, you should select the “Privacy” section located in the right side tab.
- One click on privacy - and the user will be presented with a privacy settings menu, where you can select users who need to be hidden from the general list. To do this, you need to go to the “Who is visible in the list of my friends and subscriptions” section and check the boxes next to those users who will be publicly available in the future.
It is noteworthy that in the same way you can add to the list those contacts that were hidden before, which is very convenient.
An important step that should not be forgotten is the mandatory saving of new settings, without which all previously performed manipulations will be in vain. In addition, you should be sure to indicate the “Only me” option next to the “Who sees my hidden friends” option, otherwise not only strangers, but also the profile owner himself will not see them.
More than 30 people
It also happens that you want to make information about yourself as private as possible, leaving only bright photos that capture the most memorable moments in life. In this case, it makes sense to close all users so that no one can see this data in the future. And everything would be fine, but what if there are far from 30 of them, because who wants to waste their time going through this entire list?
It turns out that there is a way out in this situation, albeit not quite a standard one, involving the following steps:
- First you need to go to the “Friends” tab.
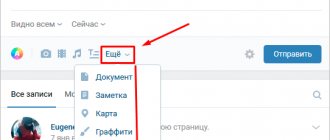
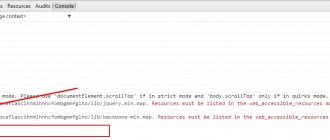
- The next stage involves using the hotkey combination Ctrl+Shift+I, which will allow you to go to the “Console” section.
- In the field that opens, enter the command “function adder(user,list,add,st) { var o = user; o[6] = parseInt(o[6]); add? (o[6] & 1 << list || (o[6] += 1 << list)) : (o[6] & 1 << list && (o[6] -= 1 << list)) ; setTimeout(function () { ajax.post(“al_friends.php”, { act: “save_cats”, uid: user[0], cats: o[6], hash: cur.userHash }, { onDone: function() { var el=document.querySelector(“.left_label.inl_bl”); el.innerHTML=el.innerHTML>=1?(el.innerHTML-0)+1:1; } }); },st||0) ; } function itr(list,add){ function fn(start){ for(var i=start||0,len=cur.friendsList.all.length;i”, then click Enter.
- Next, without closing the window, you need to enter another command “itr(30, true)” into it by clicking Enter again. The result of such actions should be the opening of a new section “My Page” on the left side of the screen, and with it a number indicating the exact number of users (in this case, 30, since this is the number written in the command).
- The next stage involves updating the page, after which the designated number of positions will be automatically closed.
And to understand how effective the described algorithm turned out to be, you should simply go to your page from any other profile, making sure that 30 friends are really no longer on the list.
All friends
An almost similar solution is proposed if there is a need to close all your friends at once. At the same time, there is a faster method of going to the console, for which you just need to hold down the F12 hotkey. As a result, the user will again find himself in a submenu with a set of incomprehensible symbols and signs, under which he will need to enter the same command as in the previously described method.
New way 2021
A relatively new solution to the issue under consideration is the complete closure of the page, and with it any confidential information, including that relating to friends. Of course, this technique is very radical, but it is official, and therefore 100% effective. As for completing the task, the following steps are implied:
- After authorization, you must again click on the icon located in the upper right corner and select the settings menu.
- Next, go to the “Privacy” section and find the “Profile Type” option.
- In the window that opens, you will need to change the status of the open profile to closed, with the obligatory further confirmation of your choice.
It is important to remember that in this case, all closed private information will remain available to friends of the profile owner, which always corresponds to the initial user requirements. In addition, to activate the setting, you must click on the “Yes, close” command in the confirmation window, which will certainly appear based on the results of previously performed actions.