Let's look at how to remove a person from the blacklist on your phone, social network or popular program.
The blacklist (also “blacklist” or abbreviated as emergency) is a function built into most phones and programs that allows you to limit the circle of contacts.
Thus, the user can protect himself from calls from unwanted numbers or incoming messages.
You can block contacts both on a regular phone and on a social network, game or desktop program.
Also, there are special programs for managing blacklists on a mobile device. The owner of the gadget can delete a contact from the emergency situation at any time.
Blacklist functions:
- Blocking incoming messages and sending multimedia files;
- Limiting viewing of your account (this feature is used by social networks);
- Blocking incoming calls.
The above functions can be used by the phone and the social network either individually or in combination.
How does the blacklist work?
The principle of blacklist operation is similar on all devices. Essentially, this is a built-in filter whose purpose is to block contacts.
By adding someone to an emergency, you save the other user’s data in a hidden contact book, which is stored on the site server or in the phone’s internal memory.
When a user added to the emergency situation tries to call or send a message, their signal will not be sent to you directly. It is simply blocked by the device.
A blacklisted contact receives a voice message indicating that you are offline (when trying to dial your phone) or a text notification that the message cannot be sent (on social networks).
Pay specialists (hackers)
These people know how to remove them from the blacklist on VK, but they will not save you from being re-linked. You will have to pay for this work (unless the experienced hacker is your close friend). Please note that profile hacking is a completely illegal action, and it is also unethical and dishonest.
If, nevertheless, you decide to get out of someone else’s ban in this way, look for cool specialists who will do their job efficiently, that is, unnoticed. Otherwise, your page may be completely blocked.
Smartphone with Android OS
Emergency on Android allows you to block any contact from the phone book or a new incoming number.
You cannot add to the blacklist only those subscribers whose number is recognized as “Unknown”.
Users often add numbers to the blacklist by mistake, because this action requires just pressing one key in the phone book menu.
If you encounter a problem in which another user cannot reach you even in stable cellular network mode, check his contact - most likely, he is simply in an emergency.
Features of blacklist in Android:
- The user can view all incoming messages from blocked numbers at any time . They arrive on the phone, but are saved in the “Spam” or “Blocked SMS” folder (the name of the folder depends on the OS firmware version). At the same time, unwanted SMS are not displayed in the main window of the Messages application;
- Texts and calls from blocked numbers come without a notification tone . You can see the list of missed calls in the “Blacklist calls” directory.
The method of deleting from an emergency situation in Android depends on the installed version of the system. There are only three ways to remove a contact from the blacklist - for versions of Android 5x, 6x, 7x generations, for Android 4x .
Please note that there is no blacklist on earlier versions of Android OS 2nd and 3rd generations.
Follow the instructions to remove another subscriber from the blacklist on Android. For Android 4x , 5x , 6x : _
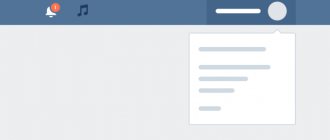
- Open the standard Messages application;
- In the upper right corner, click on the “Options” field;
Fig. 2 – window of the “Messages” program
- In the drop-down list, click on the “Settings” item and in a new window open the “Block messages” line;
Fig.3 – settings window
- In this window you can manage the black list and the contacts added to it. It is possible to configure blocking only certain phrases and words. Click on “Block List” to see the blacklist;
Fig. 4 – emergency settings
A list of emergency numbers will appear in a new window. To delete a contact, click on the minus sign on the right next to the desired phone number.
The item will be automatically removed from the list and another user will be able to call you or send a message without any problems.
Instructions for Android 4x:
1Open the inbox window;
2Press the “Menu” and select “Settings ”;
Fig.5 – viewing the blacklist and deleting numbers
3In the new window, click on “Add to spam” ;
Fig. 6 – list of spam numbers
4 In the window that appears, click on the number you want to remove and hold down. A pop-up window will appear in which you can change the contact details or remove it from the blacklist.
Fig. 7 - removal from emergency situation on Android 4x
Blacklist on iPhone and iPad
In iOS, the blacklist has been used since the eighth generation of the OS. The principle of deleting and adding numbers is identical. Only the general design of the interface differs.
Follow the instructions:
- Open the main menu of your iPhone or iPad;
- Go to the settings window;
- Click on the “Phone” and the “Call Blocking” ;
- In the window that opens, click on “Change” ;
- Next, select “Unblock” , and then click on the phone number or contact name that you want to remove from the blacklist.
Fig. 8 - blacklist in IOS
How to view blocked numbers on Android and iPhone
If communication with an important interlocutor is lost, and the number in the phone book is not deleted, there is a possibility that the user accidentally sent it to the “black-list”. To verify this and remove the blocking, he needs to familiarize himself with the list of contacts included in the emergency situation. The location of the “special” folder depends on the specific firmware version installed on the smartphone. You can find it as follows.
On iPhone devices
- First of all, you need to open the “Menu”.
- Go to the “Phone” section.
- Select the “Blocked Contacts” tab and go.
A list of all numbers included in the “black-list” should appear in the window that opens.
On Android smartphones
- Enter the “Phone” section.
- Click on the icon in the upper right corner of the screen (three vertical dots).
- Select "Settings".
- menu, select the line “Call blocking” and go.
- A complete list of all blocked numbers will appear in the tab.
Remove a contact from emergency in Windows Phone
If you are a user of the Windows Phone operating system and there is a need to remove a contact from the blacklist, use the spam filter.
This is a built-in option with which the system filters out unwanted numbers and advertising mailings.
Often, owners of smartphones on Windows are faced with the fact that the system mistakenly identifies the phone number as unwanted.
Based on the text of the messages sent, some words can be identified as advertising, which is why the contact is added to the emergency situation.
To remove a number from the blacklist, follow the instructions:
1Go to “Call Log” ;
2Then in the lower left corner of the screen, click on the “Options” ;
3In the pop-up window, select “Blocked calls” ;
Fig.9 – call log in Windows Phone
4Next you will be taken to the spam filter settings page. Click on the item “Blocked numbers” ;
Fig. 10 - spam filter in Windows Phone
5Tap and hold the desired contact until the system menu appears. Click on “Unblock” and wait for a notification that the action was completed successfully.
The above method works on all Lumia and Microsoft smartphones.
In the contact unblocking field, do not forget to check the number of blocked numbers or messages in your spam filter settings to ensure that the number has been successfully activated.
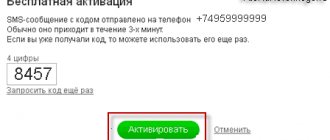
Instructions on how to remove a number from an emergency situation for MTS subscribers
The service is provided on a paid basis and will cost the subscriber 1.5 rubles daily, regardless of the number of blocked contacts.
To completely refuse further use of this service, you need to send the code *111*442*2# or send a message with the text 442*2 to subscriber 111. However, in this case, all numbers are cleared from the “Black List”, and the subscriber becomes vulnerable to telephone spam.
You can unblock an individual contact in the following ways:
- *442*24*phone#;
- Message with the text 22*phone to number 4424.
The option works on almost all MTS tariff plans, but it is better to check this point with the operator.
Feature phones
Owners of push-button phones also have the opportunity to add numbers to the blacklist and remove them from there.
Since regular mobile phones can be installed with the manufacturer’s OS or a simpler modification of Android, Bada, there is only one principle for removing a number from an emergency situation:
- Go to the “Settings” window;
- Select the “Calls” or “Calls” field;
- Open the “Black List” section and delete the desired item.
The unblocked contact will again be able to send you messages and voice calls.
Social media
The “Black List” function can be found not only in phones, but also in all popular social networks.
By blocking other users, you limit the number of people who can send you text messages, call you, or post information on your wall.
Also, the blocked contact is removed from friends/followers and will no longer be able to view your photos or posts.
VK
Adding a user to an emergency on VKontakte is very simple. Just go to his page and select “Block” under the photo.
To unblock, you can go to his page again at any time and click on “Unblock”.
Fig. 11 - the first method of unblocking a user on the VK.COM website
There is another way to interact with emergencies on the VKontakte website. Go to settings. Click on the “Black List” item on the right side of the window.
Next, find the person you need and next to his name, click on “Remove from list.”
Fig. 12 - viewing the sheet and deleting it from the emergency situation on Vkontakte
The social network Facebook also allows you to manage your own blacklist.
The only peculiarity is that a blocked person will no longer be able to view your page or even go to its address.
Also, your profile will not be available in his search or timeline.
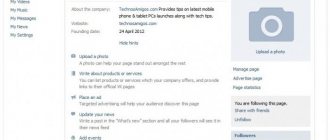
To unblock another account, go to your page settings:
Fig. 13 - Facebook account settings
On the left side of the window, click on the “Block” item. Then, next to the username, click on “Unblock”:
Fig. 14 – deleting an account from an emergency situation on Facebook
Classmates
Follow the instructions to remove a user from your emergency situation on the Odnoklassniki social network:
- Open your profile;
- Scroll down the page and click on “Other sections”;
- Among all the items, select “Black List”;
- Hover your cursor over the photo of the blocked person and click on the “Unblock” field that appears.
Fig. 15 – Emergency in Odnoklassniki
Users of the social network Twitter can remove any user from the emergency situation. By going to its page and pressing the “Do not ignore” button in the action menu.
Fig. 16 – removal from emergency situation on Twitter
You can manage blacklists on Instagram only from the mobile application window. This option is not available on the web version of the site. Follow the instructions to remove a person from an emergency:
- Open the application and go to the account settings window (gear key in the first upper corner);
- Click on the “Options” ;
- In the new window, select “Blocked users” ;
Fig. 17 – Instagram settings
- Click on the desired user and select the appropriate key to resume access to your account.
Fig. 18 – deletion from blacklist on Instagram
How to remove a person from the blacklist in Odnoklassniki if you made a mistake
You can return a person to full-fledged friends at any time, everything will depend only on personal desire.
- We carry out all the steps described above, open a window with photographs of those people whose access to the page is limited.
- Place the mouse cursor over the photo of the selected client and select the unlock option that appears. This is the very bottom line of the list.
- Click on the button and confirm the restoration with the delete from emergency button.
That's it, the person has the right to write messages to you, leave comments, rate photos and much more. Now he is a full-fledged friend and you can communicate with him completely calmly. We managed to remove all restrictions.
Messengers and programs
Viber
In order to remove a contact from the emergency list in the Viber messenger, open the settings and click on the “More” item.
Select the section “Privacy”—“List of blocked numbers.” Select the user you want to remove from the list and click on the “Remove from…” button.
Fig. 19 – viewing emergency situations in Viber
Telegram
To remove a contact from an emergency situation in Viber:
- Open a conversation with the user;
- Click on his name at the top of the window;
- In the pop-up list of actions, click on “Unblock User”.
Fig. 20 – deletion from Emergency in Telegram
« Previous entry