Telegram channel Programmer and business. Every day there are interesting stories about how a programmer builds a business.
Initially, VKontakte groups and communities were decorated with avatars - vertical pictures in the upper right part of the page. Not long ago, the developers made improvements, and now you can use covers. Users liked the innovation. In this article we will figure out how to put a cover on VK in a group or public page.
Changing the avatar in the group
Depending on the preliminary settings of the group, only admins can take photos or this opportunity is provided to all participants. To set a picture in a new group, you need to perform several steps :
- Launch WhatsApp.
- Log in to the group (where admin rights are available).
- Click on the name.
- Touch the area reserved for displaying the picture.
- From the list that appears, you should select Gallery.
- A list of folders with files will appear. Specify the location of the document you need, based on the folder name.
- After clicking on the selected file, you need to set the display frame. By holding the touch on the edge and pulling in any direction, you can change its size from larger to smaller and vice versa.
- To save the changes, click – Finish.
The changes have taken effect, the image will be loaded within a couple of seconds. After which it will be displayed to all participants in the conversation.
If you need to replace the old logo with a new one, the instructions will be slightly different. Because you first need to remove the installed one in order to be able to download the new one. To do this, in the group you need to do :
- Open information about the group. To do this, first click on the three dots and select the appropriate item.
- Click on the picture.
- Select Pencil – Edit.
- Tap the last option – Delete.
- Confirm the decision.
- Click on the area again to bring up the list, in which this time you need to click – Gallery.
- Select a new option by similarly finding it in the desired folder. After you have set the desired display size, be sure to click on “Done” to save.
In June, an emergency update was released; now changing the chat background is not possible for each dialogue individually. Now the new picture is applied immediately to all dialogs without exception.
How to replace an image with a new one
To make communication in the group interesting and exciting, the messenger developers allowed users to change the avatar of their groups. This can also only be done by the conversation creator or its administrator.
Changing the group picture on WhatsApp is easy. However, in this matter, you need to take into account the details. The algorithm for this action completely depends on the device on which the messenger is loaded. So the picture replacement device for Android-based gadgets and for Apple equipment will be slightly different. Each of these schemes should be considered separately.
Changing the picture on Android
You can change the picture in WhatsApp in a group on Android quite simply. To do this, just go to the group, click on the “Menu” button, select “Group Info” or click on the group title. In the window that opens, you need to click on the free field at the top and, finally, add a picture from those that are already on your phone or tablet, take a new photo or find a suitable image on the Internet.
How to change pictures on iOS
To change the avatar in a WhatsApp group using Apple gadgets, first of all you need to go to the group and click on its name. It is located on top. Then click on the inscription “Photo Place”. A menu will open in which the user will be asked to make a choice:
• take a new photo with your phone camera; • select a photo from those already available on your phone or tablet; • find a picture on the Internet.
It is enough to do one of these actions and delight the conversation participants with an attractive image.
Instructions for PC
If a person uses the messenger on a PC or laptop, then most likely he has a special application installed, or he logs in through the web version. In this case, he can also communicate in groups and change avatars in them. The principle of operation in both cases is as similar as possible to that described in the instructions above. The general algorithm of actions does not differ from what is proposed for Android or iOS.
- First of all, you should click on the avatar
- then you need to select the appropriate file from a folder on your computer and upload it to your profile.
In the web version of the messenger, you can change your avatar using any browser.
When uploading a new photo image, you should consider its dimensions. Otherwise, the picture may look too compressed or, conversely, elongated.
How to put a group avatar on WhatsApp
Adding a picture to a WhatsApp group is easy, you just need to follow a few simple steps. It is important to remember that only the creator of the conversation or its administrator can do this; ordinary users cannot initially upload or change images.
- First of all, you should directly enter the chat in which you need to change your avatar;
- Next you need to open the menu (three dots at the top);
- Find the “Group Info” section and click on it.
- In the window that opens, click on the camera icon and select, take, or find a suitable image on the Internet (it should not contradict the rules of the messenger). After this, the photo installation process will be completed.
It is important to remember that the image can be changed, so you should not choose it too carefully and fear that it will remain there forever.
How to upload a cover to a VK group
Everything seems simple, but after changing the design of the contact, a lot has changed, so for many, finding this treasured button for creating and downloading a header is not so easy. Moreover, this function is an innovation after the VKontakte design change.
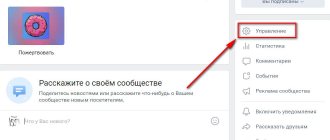
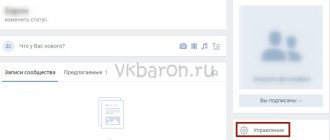
To create a cover, you need to go to your group. You must be a group owner or administrator to be able to do this. Find the button with an ellipsis on the right under the group picture. Click on it to display links with controls. Click on the “Manage Community” link.
Fig2. Where is the VKontakte “Community Management” button located?
This will take you to your group's dashboard. Here you will automatically be taken to the Settings section. If you suddenly find yourself in another section, then you need to be right here:
Fig 3. Setting up a VKontakte group
This section is the most important for us. Here in front of you is already the treasured function to download the community cover. Here she is:
Fig 4. How to upload a VKontakte cover
However, that's not all. Next we will talk about another option for managing the cover, so we advise you to read on. So, you clicked "Download":
Fig 5. Download window for the community cover
Select the selected photo on your computer. We recommend using a high-resolution photo so it looks clear and not blurry. After that, choose the area that is most suitable for you:
Fig 6. Selecting the picture area for the group header
You can select any area of the picture by increasing or decreasing the selection field. The higher the quality of the photo (higher resolution), the sharper the small areas will look, since in the end, even the selected small pattern will be stretched to a large header:
Fig 7. Image area can be selected to any size
Now let's see what it will look like. Once you have selected the area you want, simply click “Save and Continue.” You will first receive a message indicating that the image has been successfully uploaded. But that is not all. You must click on the “Save” button, as shown in the figure, otherwise you will not succeed. Many people see a message that the image has been uploaded and immediately go to the group, which then misleads them like “Where is the header?” Therefore, we repeat, click “Save”:
Fig 8. Don't forget to click SAVE after loading the image
When you click "Save", nothing will change visually. But you can already check what happened. In order to go to the group, the link to it is located here, above the “Settings” subsection:
Fig 9. How to go from the settings section to a group
This is what we got. In the screenshot you can see that our header is a little blurry.
Fig. 10. For the cover of the VK group, you must use a high-resolution image
This is because we selected a very small area of the picture, and the picture had a small resolution. To ensure everything is clear, use a high-resolution photo or keep the exact dimensions. The exact dimensions of the header for the VKontakte group are 1590x400 pixels.
More on the topic:
- How to find out who visited my VKontakte page
- VKTarget - a new way to earn money on your VK page
To show additional tricks for working with the VKontakte group header, we just had a reason to change the image. You may need to change a photo, or delete it, or edit it, and these settings, at first glance, are hidden from view. But as soon as you hover your mouse over the header, pop-up buttons will appear in front of you:
Fig. 11. How to edit, change or delete the cover of a VKontakte group
When you hover your mouse over them, hints will pop up as to what exactly these buttons mean. But, if suddenly you have some restrictions in your browser for pop-up windows and tooltips, then these buttons mean the following:
Figure 12. Description of cover editing icons
We will do the following. We'll edit our image so it's clear, so we'll click on the edit cover button. By the way, in the lower right corner you can rotate the picture if you wish. Once you've finished selecting your area, click "Save and Continue":
Fig 13. How to rotate an image when loading a cover image
Now our group has a bright and clear cover (header, header, whatever you want to call it):
Figure 14. High resolution cover looks clear and attractive
Now let's talk a little about trade secrets and tell you some secrets on how you can make your cover not only beautiful, but also sell your products, services, or attract as many people as possible so that they want to stay once they get into your group. How to make the background for a group in contact 100% visible to everyone? Therefore the next topic will be called:
Do you use Contact at work on your PC? Then you might be interested in this article:
How to become invisible on VKontakte