Instructions for installing Google calendar on the VKontakte community page
The most important condition, which must be observed, is that you must have administrator rights for the group in which you want to install “Calendar”.
1. Sign up for Gmail. 2. Go to the “Services” tab.
3. Select Calendar.
4. In the “My calendars” tab, select “Create a calendar”.
5. Edit the name, description of the calendar, and location at your discretion. BE SURE to check the box next to “Share this calendar.”
6. Click the “Create Calendar” button. The calendar you created will appear in the “My Calendars” menu. 7. Select the calendar you created (the square next to its name will turn green). Go to “Calendar Settings” by clicking on the arrow to the right of the name.
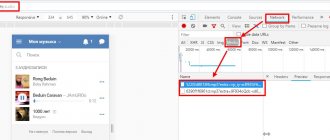
8. In the “Calendar Address” item, click the “HTML” button. A link for your calendar will appear in a pop-up window. Copy it.
9. Go to the website of the social network “VKontakte” using the link https://vk.com/dev. Select "Create an application".
11. In the window that opens, enter your phone number. Click the "Get Code" button. After this, the “Confirmation code” line will become active. You must enter the code received via SMS. After that, click the “Submit Code” button.
12. If the code is entered correctly, the application editing window will open. Be sure to select the group in which the calendar you created will be displayed. To continue, click the “Save Changes” button.
14. The calendar you created will be displayed in the selected community. Changes to the calendar are made through Google Calendar.
Source
How to make an open menu?
In the new window, you need to right-click on the created menu and click on the “Edit” link. In the “Return to Page” tab in the browser bar you can get a link to the menu. It needs to be copied.
Afterwards, you need to make a regular post in the group. You will need another thematic picture with the inscription “Menu”. To do this you need to upload a photo. The post will act as an open menu at the top of the page. To the message in it you need to insert the received link, which must be immediately deleted after the page with the menu appears below. The post should not contain unnecessary links, it will be ugly.
How to make a menu in the VKontakte group? Now you need to right-click on the date of the news. It should open in a new window. There you can see a new inscription “Pin”. That's exactly what she needs.
Afterwards, you can admire the beautiful menu in the group. In order to combine the pictures, you need to practice with their sizes.
That's all. Creating a menu in VKontakte is not that difficult. If you follow the instructions described above, anyone can do it.
In this article I will tell you how to beautifully design a group in contact. Agree, the more beautiful the group, the more pleasant it is to subscribe to it. At the same time, the group will have a convenient menu that you just want to go to and view its contents.
Less talk, let's start creating a menu for a group on VKontakte
. First, you need to actually create the group itself, as I wrote in a previous article.
And so, it all starts in Photoshop, we create a picture of the menu you want. Basically, this is some kind of background with the names of the headings. An acquaintance just asked me to make a beautiful group for his company aero-stomadent, which deals with industrial ventilation, so I’ll do it.
I found a wonderful background of Alaskan nature, and in fact, I will do everything on it.
We write the menu itself in the background. For example, I write about what the company does. These will be the buttons for which I will later make more pages. Each word will be a menu button in the future. On the right, make this part the group's avatar in the future. Now the mode is picture to small images. Select the “Cutting” function from the menu, then right-click on the canvas and cut so that each word is separate. It is advisable to cut it approximately like this. After cutting, we save the file, not just but through “Save for Web and Devices...” (or Alt+Shift+Ctrl+S), it will create a folder with all the already cut files. Now we are not going to the group yet, we still need to create a wiki markup. Or in other words, create a page.
How to create a Wiki page on VKontakte?
Open a new browser tab and paste the following link there: https://vk.com/pages?oid=-XXX&p=Name of page where XXX is your group ID. For example, this happened to me. https://vk.com/pages?oid=-91934542&p=menu
Then click
Fill with content
.
Here we see a very simple editor, select the camera function to add all our photos to the menu. It should turn out something similar to mine. But there are spaces between the pictures, to remove the spaces - we enter the wiki markup mode (this is the quotation mark in the top right corner) and enter the following tag “option;nopadding;” before photo sizes. For example []
And it all came together. And so, all that remains now is to insert links into each button. Again, everything is done in wiki markup. We drive in previously prepared links to articles that you consider necessary. Click save, see what happened, everything came together for me, if you click it goes to the links “https://vk.com/page-91934542_49969122” Then I go to the group and before that I make a picture that will be displayed for people in the group. And I just post. I paste a link to the menu and add a photo that I just took.
Hello, friends. Everything moves, everything changes. The social network Vkontakte also does not stand still. So my publication about the creation of a single block on VKontakte Avatar+Menu has become irrelevant today. Now, when creating a group, the News block, which was necessary for such a menu, is simply missing.
Fortunately, Vkontakte has the ability to create wiki pages. Using such a wiki page, we can create a community menu, and then pin this menu to the top of the group.
So, let's take it in order.
Instructions for installing Google calendar on the VKontakte community page
First, you need a calendar that you will embed. To do this, you must have a Google account.
1) Go to Google Calendar and create a calendar that you will post in the application.
2) Fill out the calendar information at your discretion.
3) Below, in the “Calendar Address” section, click on the “HTML” button and save the link that will pop up in your notepad - you will need it later.
4) On the next tab, be sure to share the calendar. You can immediately add editors to the calendar if you are not the only one working on it. Save.
5) Now, when creating events that you want to display in your calendar, specify the name of the calendar so that they fall into the desired calendar.
6) Go to Vkontakte. Go to the VK application creation page and click “Create application”.
7) You are interested in the “IFrame/Flash application”, here you fill in all the necessary information and click “Proceed to download the application”.
9) Now select the group in which you want to place the application widget (only possible for groups where you are an administrator), fill out additional information, upload covers and other things that are available on this page.
10) On the “Settings” tab, insert the previously saved link into both columns “IFrame Address” and “HTTPS Address IFrame”, you can change the size of the application to the desired one, then select “The application is enabled and visible to everyone” in the “Status” column and click "Save changes."
10) Now the calendar will appear in your group as a widget.
When you launch it, you will see the VK application with a built-in Google calendar.
Source
VKontakte events on the computer version of the site
Next, we will look at the process of creating an event in the full version of the site, as well as the main features that are available to the administrators of these pages.
How to create an event?
Essentially, an event is a separate page, which is in many ways similar to a group or public page. In order to proceed to creating it, you must first go to the corresponding tab in the left menu, which is called “Groups,” and then click on the “Create a community” button.
On the next page in the general list you need to select the “Event” item.
Next, the site will ask you to enter, one by one, all the basic information that relates to the event being created:
- His name;
- Choose a theme (there are different options from parties to fairs);
- Select the type of event, which can be open to everyone or closed (in this case, you can join it only by invitation of the administrator);
- The actual start date and time (you can also specify the end time of the meeting);
- Specify the organizer, which can be the user himself or one of the groups he administers (from which participants can subsequently be invited without restrictions);
- You can also additionally write your address, phone number and email for contact;
- At the end, the site will ask you to indicate the address of the place where the meeting will take place.
To confirm your actions, you need to click on “Create a community”. After this, the event will be completely created.
Note!
The event administrator will subsequently be able to change all this information without restrictions, including the name, location and date of the event (even after it has ended).
Setting up an event
Immediately after creating a meeting, the user is taken to its page, where further settings can be made. So, for example, right below the name of the event you can enter its status, and also add a description a little lower and change the address. To set an avatar for the event, in the appropriate area on the right, click on Upload a photo.” To go to other settings, click on “Management”.
Here, on the first “Settings” tab, in addition to changing the name, description and type of event, you can add a special horizontal cover to it at the top of the page by clicking on the corresponding “Add” button. Here you can also set a new unique address for the created page.
Note!
VKontakte recommends uploading the event cover in a resolution of 1590*400, and with the latest updates it has become possible to add several consecutive pictures to the cover at once.
On the same page below, you can configure a special event button (by selecting the “Enabled” option in the corresponding section), when clicked on, a person who goes to this page will be able to use a special function. This can be forwarding a call to a phone number (especially important for mobile versions of VK), or making a call to the page of the selected administrator within VKontakte, and these first two functions allow you to quickly contact the page managers and organizers. This button can also open a specific website or third-party mobile application. The last option allows you to open a special application inside the VKontakte page itself (we will look at interesting applications for events later in this article). Depending on the selected option, you will also need to indicate here, for example, a phone number or a link to a website, and also select one of the standard names for this button. To confirm your actions here you need to click on “Save”.
The Sections tab allows you to enable or disable the various sections and features that will be available in the event. Here you can configure:
- A type of wall with posts that can be completely disabled, open (when any visitors can post), limited (when only administrators can post, but other people can comment on these posts), or closed (when the commenting function is not available to visitors) ;
- Display all other materials, including photos, videos, audio and others, which can be disabled, open (when all users can add them) and restricted (when only administrators can add them).
Also on this settings page, you can choose which of the sections will be placed at the beginning in the main block, and which of them will be placed in the second secondary block. To confirm your actions, you need to click on “Save”.
In the “Comments” section, you can install a special filter that will automatically ban all comments that contain obscene language, and here you can also set a filter for individual words by checking the second box and specifying in the window that opens, separated by commas, those words whose comments contain must be deleted. In the future, you can view deleted comments on the same page below. To confirm your actions, click on the “Save” button.
On the next tab in the settings, you can add links to various people or VKontakte groups, as well as to third-party sites. To do this, click the “Add link” button, then indicate it in the appropriate column and add a signature, then click the “Add” button. After this, the link will appear in the corresponding column on the event page.
On the next tab, you can add one or more addresses that relate to this event. To do this, you first need to select the “Enabled” option in the “Addresses” column, then click on the “Add address” button and indicate in the menu that opens the country, city, address and name of the place to be added. After adding all addresses, click on “Save”.
On the Messages tab, select the Enabled option to enable messages on the page. This will allow users to communicate with the event page. Here you can also enter a special greeting that will be displayed when a person opens messages from the event page. To confirm your actions, click on “Save”.
On the Applications tab, you can install special add-ons that expand the functions of the page. For example, for events, the function of selling tickets through the page itself is especially relevant, so you can find the corresponding application in the general list and click “Add”.
After this, the application will be added to the page, and to set the correct parameters for its operation, click on the “Go to settings” button. Each application will have different settings based on the features it adds. To add an app button to a page, you must enable it in the Settings tab (as described above).
Daria Sopina
Read more posts by this author.
Daria Sopina
From the many VKontakte applications, I chose the most effective ones - those that will help develop the community and convert visitors into subscribers or buyers.
But first, let's figure out how to install applications in a group. To do this, go to “Management”, and then to “Applications”.
Click on “Add” and the application will appear in the group
Personalize content and encourage activity
Personalize the content - make a widget in which every visitor or subscriber will see themselves. Offer a discount in your greeting, encourage you to subscribe to updates or participate in some activity.
To set up a personalized greeting, use the Community Widget app. It displays the user's avatar and name, and you can write the text of the message, set a button and select a link that the person will follow.
The widget may look like this - offer the visitor something that might interest him: products, articles or discussions
When a person has become your subscriber, motivate him to actively communicate, like and comment on your content. For example, show the most active participants in the group: they will be pleased. Connect the Pedestal application - it will calculate activity points and display a rating above the community posts. You decide how many points you can get for likes, comments and reposts.
This is what the activity rating looks like: it is updated every day, once every hour or half an hour
Competition will encourage users to communicate more actively. You can also offer subscribers bonuses for points: for example, discounts or small gifts. The application automatically adds points to the balance, and users can then pay with them for purchases in their personal account.
Chat with subscribers
To always stay in touch, set up an Autoresponder Bot. It's simple: add keywords that subscribers can use in your message and write response options. This way you can easily create an endless number of answers to a variety of, even unexpected, questions.
Add a command to write an answer to other possible questions like “how much does it cost”, “price”, “what is the price”
Even if the manager is offline, the user will instantly receive a response to the message. And in the description of the group there will be a proud o.
To increase activity, create a chat for all community subscribers. There they can ask you questions, share news, discuss new products and communicate with each other. “VKontakte Chat” can be connected in one click, and a widget for jumping into the conversation appears in the group.
This is what the chat link looks like: to start chatting, a person must subscribe to the group
If you want to work with mailings from VKontakte and fully automate communication with subscribers, connect Chatgun. The application allows you to:
There are many scenarios available: customize responses to sending goods, payment, first message and many other actions. Add media files and animations of the bot typing text, and also enable notifications to administrators about important messages.
You can gain more knowledge about promotion on social networks and running advertising campaigns, as well as upgrade your skills to an advanced level at the master class Advertising on VKontakte for hyperpros from SMM.school.
Script response settings are varied: you can even add people to the list of subscribers and remove them from it - for example, for violating the rules
Show the benefits of the product
If you want to show off your product and text alone is not enough, create a landing page in the Spycat app. It’s easy to create a landing page in a visual editor - you can choose one of several templates and add and edit blocks, videos, galleries, and images. And also leave buttons, when clicked, the user will go to the community, subscribe to it, or allow the newsletter.
Place the landing page itself in the group menu, advertising or regular post, or in a widget. The application will notify you about all new requests from the landing page, and will also tell you about the achievement of goals set in Yandex.Metrica: for example, about a click on a product.
Show not only the benefits of the product, but also what customers say about it. The Reviews app will help: if you add it to the community, people will be able to leave reviews about you. And you can display them as a separate widget. Important: to leave a response, the user must install the application on his page. Motivate customers to leave reviews - offer discounts or bonuses.
Before writing something, the user will see reviews from other people
Why doesn't VKontakte show friends' birthdays?
Usually VKontakte reminds you of friends’ birthdays under the sign of a bell:
But sometimes the reminder doesn’t work. Maybe it’s the VKontakte website that’s buggy, or maybe your friends are deliberately hiding their birthday so that they don’t have to be congratulated by the whole crowd and don’t have to answer everyone. We advise you to find out the birthdays of your friends who are really dear to you and set reminders in your mobile phone so that they repeat every year. You will learn how to do this from the instructions for your phone. And we told you how to find out the birthdays of your friends on VK a little higher: look up or rewind these instructions a little back to see.
Birthday is a he, not an it! It’s correct to say “it was a birthday”
and not “was”, because the word “day” is masculine. In addition, the word “birthday” does not exist at all, just imagine! Learn to speak and write correctly, it is useful in life.
Make it easy for your subscribers to purchase
Writing in private messages to make a purchase, get a price estimate, or find out about free time for an appointment is not very convenient. Make it easy for customers to interact with your group.
Make an online appointment for services in the DIKIDI Online application. It was created for beauty salons, but can also work in other related niches. Clients will be able to choose specific services, a specific specialist and a time convenient for them. To activate the application, connect to the DIKIDI platform.
This is what the registration process looks like
uCalc is suitable if you offer complex products that require custom pricing calculations. You make a calculator, the client will find out the price, and the application will prompt the subscriber to immediately fill out a lead form and even take an advance payment. At the stage of creating the calculator, you will be transferred to the service - there are templates for taxis, cleaning, real estate and many other areas.
This calculator can be assembled in 5 minutes: add blocks in the visual editor and make changes to the formula
Choose the Qtickets application if you sell tickets to events or are engaged in information business: promoting courses, webinars, personal training. To gain access, first register on the site and create an event. After this you can install the widget into the group.
Add multiple events and set the price for them depending on the rate or seating
“Reservation” is ideal for those who rent out something: engage in car sharing, run billiard halls, sign up for quests, and so on. Customers can choose a specific time and receive a discount for reposting. And the app will send them a booking reminder closer to the time of their visit. You will see information about all records in a single interface.
Make interesting content
Unusual content in the news feed always attracts attention. In the Tests application, it is easy to create a variety of tests: with buttons and text answers, with or without pop-up windows, with results calculated by points or by correct answers. Set up bonuses or automatic sending of messages to those who answered correctly: for example, if you are holding a competition.
This is what one of the test options looks like: when you select an answer, a tooltip appears explaining whether you made the right choice
“Profiles” is an application for those who want to receive a lot of information about subscribers. from colorful questionnaires or long questionnaires. There are a lot of options: ask questions that can be answered with text, a number, a choice from several options, time and other data.
Some user data is entered automatically; the application takes information from the profile
And in “Voting” they create polls. But not the kind you are used to seeing in your feed, but brighter ones: with images or videos. Allow only community members to vote, or leave the option to change your mind in the settings. And by the way, this application is not only for groups: you can even use it to conduct surveys on personal pages.
In the settings, everything is simple: add options and videos or photos to them, and then see how many people voted and which answer is the most popular
There are many applications for groups on the VKontakte social network, but you shouldn’t add everything. Determine which ones will solve the problem more effectively and use them.
By the way, you can focus on communities that are popular with your target audience. The Pepper.Ninja parser has a “Who is your client” function: use it to find out which groups are interesting to your subscribers and what applications they use there. And install similar ones in your group. I recommend using no more than 2-4 applications so as not to distract users' attention.
Using applications, you stand out among competitors, make the content interesting and varied, and make the ordering process easier for customers. As a result, this will help reduce the cost of attracting a buyer - you will spend less money on advertising and receive the same number of orders from the social network.
Source
How to share a calendar
There are two main ways you can add an event to your calendar - open the ICS file or open a direct link to the calendar.
ICS file
ICS is a common file format for calendars. Most services and calendar apps support it. To add an event to their calendar, a subscriber needs to download the file and open it.
Plus:
Versatility. Subscribers will be able to open the file on any device.
Minus:
The file will need to be placed in file storage. It's not as convenient as just copying the link.
Link
Everything is simple here - the calendar generates a link, you copy it and paste it into the letter. The subscriber clicks the link and adds the event to their calendar.
Plus:
Convenience. There's no need to host files in the cloud, and recipients don't have to download anything.
Minus
:
Different calendars generate links in different formats, which are not always supported by other services. If you want to reach a wide audience, you will have to create links in each calendar separately.
Which method to choose
If you are sure that all subscribers are using a particular calendar service, you can grab a link from that service and use it. If there is no such information, it is better to insert a link to the ICS file in the letter; this option is more universal. Additionally, you can generate links in several popular services and add them to the letter.
Also keep in mind that in some services you can only share a specific event from the calendar, while in others you can share the entire calendar.
In the table below we compared popular calendar services by their capabilities:
| You can share the link | You can share the ICS file | We publish one event or the entire calendar | |
| + | + | Event if we share a link. Calendar if we share an ICS file | |
| Outlook (web version) | + | + | Calendar |
| Outlook (program) | — | + | Event |
| iCloud | + | — | Calendar |
What to consider when creating an event
When naming a calendar or event, make sure the user understands what event you are talking about. Please include the full title, a short description, and a link to the program or additional information.
Use the corporate colors of your events as the calendar and background colors for your newsletter.
Now let's look at how to share a calendar in each of these services.
How to add an address and working hours in a VKontakte group
If you have an offline business representative - an office or a store, then you definitely need to know how to add the address and working hours in the VK group.
When a user wants to find information about a company, he first looks for it in the contact. And if, having visited the group’s page, he sees that there is an address, phone number, opening hours, some publications, then the buyer understands that the company is working.
If the client does not find the address quickly, he will not go looking for it in Yandex, unless you provide some super unique services. He will simply find a competitor or forget about you if the service was not really needed.
Address and opening hours are one of the necessary conditions for promoting a group for offline business. Don't force the client to extract information from you, give it right away.
What is needed for this?
How to make a menu in a VKontakte group? In Photoshop you need to create two pictures that were previously one. The first is for the avatar, the second is the menu itself, this image must not be cut into several parts. “In Contact” on the page intended for the menu, you need to insert a code with links to parts of the image and sections. And if an open type is needed, you will need a third picture, which is pinned to the top of the community.
To create a beautiful menu you will need Photoshop skills. Those who are bad at drawing are advised to choose good pictures. For those who are experts in this program, instructions are given below. The process is divided into several stages.
How to add an address in a VK group
Go to the menu item of the Management group.
Go to the Addresses section.
How to add an address in a VK group. Step 1
In Addresses, select Enabled .
To display your address on the map, leave the Show map .
Click Add Address .
Enter a detailed address or select a point on the map.
How to add an address in a VK group. Step 2
Click Save .
After adding the address, cells for entering phone number and opening hours will become available.
How to add work time in a VK group
Under Opening Hours, select your option. The most common answer is “Open during stated opening hours.”
Select this option and you can specify the days and hours that your office or store is open.
How to add a lunch break in a VK group
To specify a lunch break time, click on the plus next to the work time and the Break .
If you have several addresses, click the Add address and make similar settings.
Be sure to click the “Save” button at the very bottom of the window.
This is what the address and map look like in the VK group.
What does an address look like in a VK group?
Source
How to make an interactive calendar for a group announcing events in the city?
Ilya Sergeenko Sent 06/21/2021 — 22:56
- Posts: 4
- Points: 35
- Warnings: 0
- Online: 6m
Actually, the topic reflects the essence of the issue. I want to create a group in VK in which I will post future events in our city, but I want these events to be able to be selected according to the calendar. If you write events in the news feed as a list, it is difficult to read when there is a large amount of material. Forum members, tell me what can be done here?
Anna Lvova Posted 06/22/2021 — 11:09
- Posts: 23
- Points: 2
- Warnings: 0
- Online: 1d 5h 28m
OnlyFun Posted 06/22/2021 - 11:20
- Messages: 400
- Points: 68
- Warnings: 0
- Online: 4d 23h 11m
Actually, the topic reflects the essence of the issue. I want to create a group in VK in which I will post future events in our city, but I want these events to be able to be selected according to the calendar. If you write events in the news feed as a list, it is difficult to read when there is a large amount of material. Forum members, tell me what can be done here?
Local hashtags, for example: # [email protected] group domain
Choose the hashtag format yourself, you can #June22@group domain
Next, you create a wiki calendar or contact local craftsmen, they will make you a clickable calendar and that’s it.
SOAX Sent 01 04 2021 - 21:42
Do you want to try top proxies for free? Register: soax.com
Free test for 1 hour! Is 1 hour not enough? Bro, tell us about your case and we'll give you more time for the test! With a volume of 1TB per month or more, we are ready to make an individual offer!
Within the port and taking into account the selected targeting, you get access to the entire pool of IP addresses! Specify the IP address rotation condition or just leave the default settings and enjoy your work! To obtain the most static IP address, there is access by node!
Pay per day, week or month! Targeting by country, region, city or provider! Adding additional ports or traffic! Node access and more!