How to hide saved photos on VKontakte
If you want to open or hide saved photos in VK , you can do this in the “Settings” section, “Privacy” tab.
In the “Who sees the list of my saved photos” column, select the desired value.
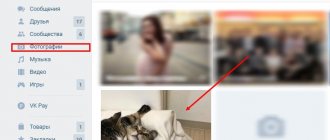
If you want to delete saved photos or move them to another album , then first go to the album with the saved photos.
Next, open the saved photo.
- Under the photo, you can click on the “Delete” or “More” button to move it to a separate album;
If you want to delete all saved photos in VK in one action, then this will not work.
At the moment there is no working extension/application/script. And do not try to use fraudulent programs for this - there is a chance of being hacked.
Recovery methods
It is logical that the methods for restoring missing records from the wall depend on the reasons for the incident. Users are able to get snapshots back using the following methods:
- deleting and re-uploading photos to the album;
- by changing the privacy settings of the album;
- reloading the footage into an album with free access.
In the first case, page owners will have to:
- Remove the desired photo from the list of downloaded files.
- Find the desired entry in the list of photos on your phone or computer.
- Upload the detected file back to the album.
- Save changes.
- Check if there is a loss in the feed.
The first step is optional as it is required to remove duplicate photos.
If the user does not have a suitable photo, it is recommended to save the file before deleting it so that you can use the saved photo later. If you couldn’t save the frame in time, you should ask your friend if he saved it in the past.
If the issue is in the album settings, you should make the pictures freely available and set a privacy level that allows you to show downloaded entries.
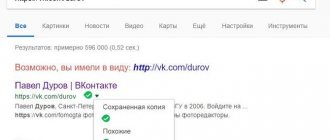
How to view private photos and albums on VKontakte
If you look at the page of the user whose id we just received, you will see that only one photo is available for viewing. And there is no “Photo Albums” block. This means that all photos and albums are hidden (see).
So let's look at them already. To do this, go to the address bar again and type the following text:
https://vk.com/albums***
As you can see, there are more than 500 photos here.
There is an alternative code. Here he is:
https://vk.com/id***?z=albums***
Enter it into the address bar, and instead of asterisks, write id again. Next "Enter". The result will be the same.
Now you can view all the photos that the user has uploaded to his page (see). Including hidden ones.
How to recover hidden photos from your computer?
As mentioned above, there are many reasons why the user decided to hide his photos. However, there are often cases when he wants to restore access to them and does not know how to do this. To do everything correctly, you must follow the steps below.
- Open any browser you have on your computer.
- Go to your page on the social network VKontakte.
- Fill in the blank fields where you need to enter your username and password.
- A page with news will appear in front of you, but you need the “Photos” section, which is located on the left side of the screen.
- Go to the albums section.
- Select the album you want to return.
- Go to the album you want to open.
- Click on the edit button.
- Who can view this album? Select all users or just friends.
It is clear that a lot of questions arise about this, because this does not solve any problem. However, if you hid several photos a few months ago, then all you need to do is download these frames to your computer.
After that, delete all hidden pictures and upload them again. Of course, this will take too much time and effort. But for now, a more convenient and simpler method does not exist at the moment.
We tried to answer all your questions. As you can see, there is nothing complicated in restoring hidden pictures - the main thing is to follow the above steps.
How I learned to protect images
Protection image
In this article I want to outline the difficult path that I went through “protecting” images on the web. Before we begin this exciting journey, I want to outline two approaches to protecting images:
- restriction/prohibition of posting direct links to original
images - you are paranoid and trying to limit the distribution of copies
of images
UPDATE
Of course, there is no universal protection. An article about how not to directly substitute data from GET into SQL queries. Only in the context of image protection.
▌Limiting copies: my children's bike
At the beginning of my journey, traditionally, there was a bicycle.
Many years ago I was developing a wonderful project. There were a lot of wonderful photographs of animals and nature. It was these photographs (or rather their full-size version) that had to be protected with all our might. The client wanted not only to prohibit direct links to image files, but to deprive the user of the opportunity to download these same images. At the same time, I did not want to add watermarks. We've already read that programmers lie all the time. Therefore, we had to do what the client wanted. The solution turned out to be quite nice. When requesting a page with a photo, we generate a certain $secretKey and save the path to a full-size copy of the image into the session under this key: public function actionView() { // … $_SESSION['protected-photos'][$secretKey]['file' ] = $photoPath; // ... } In the view we indicate the path to the photo in the following form: Now in actionSource we get from the session the path to a full-size copy of the photo, send it with the correct headers and clear the path to the full-size file: public function actionSource() { $secretKey= $ _GET['key']; $session = &$_SESSION['protected-photos']; $file = $session[$secretKey]['file']; if (is_file($file)) { header('Content-type: image/jpeg'); echo file_get_contents($file); } $session[$secretKey]['file'] = "; } As a result, if the user tries to download / open in a new tab / share the picture, he will get a small copy of it back.
Important:
The weak point of this approach is quite obvious: if a page with a photo is requested not from the browser, but, say, through
wget
. In this case, the img tag will not make a request for /photo/source/{secretKey}. This way it will contain a full-size copy of the photo.
▌We limit direct links: .htaccess
.htaccess
accordingly .
You can not only prohibit direct links to images, but also specify a stub that will be displayed on third-party resources instead of original images from your site. Here is an example of such a configuration: RewriteEngine On RewriteCond %{HTTP_REFERER} !^https://(.+\.)?mysite\.com/ [NC] RewriteCond %{HTTP_REFERER} !^$ RewriteRule .*\.(jpe?g |gif|png)$ https://i.imgur.com/qX4w7.gif [L] The first line contains a directive that enables the operation of the transformation mechanism. Everything is simple here. The second line we block any sites except our own mysite.com. [NC]
code means "no variations", in other words case-insensitive URL matching.
With the third line we allow empty referrals. And finally, the last line takes all files with the extension JPEG, JPG, GIF or PNG and replaces them with the image qX4w7.gif
from the
imgur.com
.
If necessary, you can do it differently: prohibit direct links to images for specific domains.
RewriteEngine On RewriteCond %{HTTP_REFERER} ^https://(.+\.)?myspace\.com/ [NC,OR] RewriteCond %{HTTP_REFERER} ^https://(.+\.)?blogspot\.com / [NC,OR] RewriteCond %{HTTP_REFERER} ^https://(.+\.)?livejournal\.com/ [NC] RewriteRule .*\.(jpe?g|gif|png)$ https:// i.imgur.com/qX4w7.gif [L] Each RewriteCond, except the last one, must contain the
[NC, OR]
.
OR
means "or next", i.e. match the current domain or the next one.
Also, instead of a placeholder image, you can return an HTTP error with code 403:
RewriteRule .*\.(jpe?g|gif|png)$ — [F]
Important:
do not try to return an HTML page instead of images. You can return either a different image or an HTTP error.
▌Limiting direct links: nginx
For nginx everything is similar: location ~* \.(jpe?g|gif|png)$ { set $bad_ref “N”; if ($http_referer !~ ^(https://(.+\.)?myspace\.com|https://(.+\.)?blogspot\.com|https://(.+\.) ?livejournal\.com)) { set $bad_ref "Y"; } if ($bad_ref = "Y") { return 444; } } Update:
VBart suggested in his comment that it is much better to use ngx_http_referer_module for these purposes.
▌Limiting direct links: Amazon CloudFront Signed URLs
Amazon CloudFront is one of the best options for delivering content to users.
In addition to its direct responsibilities as an ordinary CDN, it also makes it possible to generate signed links. Such links make it possible to limit access to a file by time range, as well as by IP. This way, for example, you can specify that an image will be available for 10 minutes. Or 7 days starting from tomorrow. On average, a link to a file looks like this:
1
d111111abcdef8.cloudfront.net/image.jpg?
And now point by point:
- Base link to your image. This is the link you used to access the image and previously, before the signed links.
- Arbitrary query parameters that are typically used to log access to images. CloudFront allows you to transfer, cache and log these parameters. Important:
the name of the parameters should not match those reserved by CloudFront itself:
Expires
,
Key-Pair-Id
,
Policy
,
Signature
.
It's best to prefix your parameters with x-
. This will be especially useful if your images are stored on Amazon S3. - Rules for accessing images in JSON format and without spaces (details).
- A hashed and signed version of the access rules from the previous paragraph (details).
- Signature key (details).
Important:
CloudFront does not support CNAMEs with HTTPS. Those. you won't be able to replace d111111abcdef8.cloudfront.net with images.example.com. There are two solutions to the problem:
- Revert to using the https://*.cloudfront.com domain for images.
- Keep the domain images.example.com, but use it via HTTP.
Choosing one of the two options is essentially a matter of taste. Fundamentally they are not different from each other.
▌Epilogue
I hope the approaches described above will help you quickly navigate the difficult task of protecting images on the web. And some useful links on the topic:
- Hotlinking: .htaccess generator
- Hotlinking: .htaccess configuration
- Hotlinking: Nginx configuration example
- Hotlinking: Check
- Amazon CloudFront Signed URLs
Hiding photos on the main page of VKontakte
You've probably noticed that the last photos you uploaded are loaded on the main page. So, it turns out that some of them can be hidden. Let's see what I mean and how it's done.
Go to your page, hover your mouse over the right corner of the photo you want to hide on the main page. Look at the screenshot and everything will immediately become clear to you:
They write to us that this photo will no longer be shown in this block. This action can be canceled by clicking the “Cancel” button:
How to view saved photos in VK if they are hidden?
So, how to see hidden photos of VK users? There is no official scheme of action here, since the developers of the social network respect the desire of users to maintain their privacy. If you want to view hidden VK photos, you should follow these steps:
- You need to go to the profile of the user whose photo you want to see.
- Click on an empty space with a regular mouse button.
- Select the “View page source code” section.
- Press Ctrl+F.
- In the search, enter “albums”, only without quotes.
- Numbers appear in the line after this word; they need to be copied. This is the page code.
- You need to go to the user’s profile again and enter “?z=albums” in the address bar after the ID, also without quotes.
- The previously copied fragment is pasted.
- Press Enter and enjoy seeing hidden photos.
Important! This option to view private photos if access is closed is not entirely legal; the VK administration does not approve of it.
For this reason, you should not be surprised if the ability to view saved photos if they are hidden is closed.
How to open an album with saved photos
If, on the contrary, you want to make the album available to other users, then our following instructions will help you.
From a smartphone
You can open the “Saved Photos” album in the VK mobile application as follows:
- Log in to your VK account.
- There is a gear icon in the upper right corner - click on it.
- In the new window, select “Privacy”.
- We find the line “Who sees the list of my saved photos”.
- Select the value “All users”.
From computer
Now let's look at how to open save files in VK on a computer:
- Go to your profile.
- Click on your mini-avatar icon in the upper right corner.
- In the menu that opens, select “Settings”.
- Now, in the list on the right, find “Privacy” - click.
- Also find the line “Who can see the list of my saved photos” and set the value to “All users”.
Please note that with this setting you can open access to your saves to a certain circle of people. To do this, you need to set other values that are offered in the menu.
Now you know everything about saves in VK and their settings. You can create your own personal collection and decide who to share it with. Well, our instructions will always come to your aid.