All the photos and videos we create using your iPhone or iPad contain information about the location where they were taken. We are talking about metadata. This information makes it easier to organize and sort your media files. But transferring photos and videos into the wrong hands will allow strangers to find out where you live, work or relax. Luckily, starting with iOS 13, you can easily erase geotags from images and videos before sharing them.
♥ BY TOPIC: How to find out the GPS coordinates of a photo (the place where it was taken) on an iPhone.
How to Remove Location Data from Photos and Videos to Keep Your Location Secret
When someone shares a photo, information in the form of geolocation coordinates comes with it in EXIF. The recipient, using the regular Photos application, can determine where the photo was taken - at home, at work, or somewhere else. Before iOS 13, there were several practical solutions for removing geotags from photos and videos. For example, you could simply disable the location service, take a screenshot of the photo, or delete/change the GPS coordinates recorded in the photo using third-party applications (links at the end of the article).
However, iOS 13 has a built-in feature that allows the user to remove location information from a photo, video, or even groups of them. Then media files can be sent via messages, mail, AirDrop, Facebook, VKontakte, instant messengers, etc. This will allow the author of the photo not to worry about someone else with negative goals finding out your location from the photo from your iPhone.
♥ BY TOPIC: How to view photos and videos taken on an iPhone or iPad on a map.
What to do if Facebook is blocked or access is lost
To unlink an Instagram profile from a Facebook page, you must first regain access to it. There are no other ways to disconnect social networks.
How to restore access to a Facebook page:
- Go to the main page on Facebook and scroll down to the bottom. At the very bottom there is a “Help” item. We click on it.
- The system will send you to the Help Center. Among the topics that the site will offer, we are looking for “Can’t log in to Facebook.”
- Scroll down the page to the point where you will be asked to fill out a form to submit an appeal against the shutdown.
- In the form that appears, fill in the required fields and attach an identification document.
After this, you just have to wait until the account is unblocked and you can unlink it from your Instagram page.
A few more ways to regain access to a Facebook page that was lost for various reasons:
- If your Facebook profile has been hacked, you can send a one-time login code to the mobile phone number linked to the page.
- If you can’t remember the password for the page, you can send a code to your linked email or mobile phone to change the password. Then simply go through the password reset procedure and come up with a new one.
- If the page was blocked by social network moderators, you can go to the “Trusted Persons” tab and restore the profile through them.
- If you can’t remember your login, you can search the page by your full name, linked mobile number or email.
- If a page has been deleted, it can be restored. But only if 2 weeks have not yet passed.
- If the methods listed above do not help or you have another problem, contact Support. They will tell you how to restore access to the page in your case.
Open the Share menu
Deleting location data is only possible in the Photos app. That is why, to clear geotags, you need to share media files directly from Photos. In this application, find the album or section that contains the content you plan to send. To share a single photo or video, simply open it and click the Share button. And to share several photos and videos, click “Select” in an album or section, mark them all, and only then click the “Share” button. The Share panel opens to configure data sharing.
♥ ON TOPIC: New in iOS 14: How to show thumbnails of photos and videos with the actual aspect ratio in “Photos” on iOS.
How to disable photo geolocation data saving for Android
Every time you take a photo with your smartphone, the device stores data and codes for that specific photo. Some of this data includes your location when the photo was taken. Sometimes such data is very useful, but in some cases it can be dangerous.
For example, when you post an image on a social network, anyone can see this data. And if you took the photo at home, then consider sharing your home address with your ill-wishers.
It's not all that scary, actually. Some social networks, when uploading photos, delete geolocation data for security reasons (Facebook), but there are also those where they are visible to everyone (VKontakte).
If you don't want your device to save your location data, you can simply disable this feature, but not everyone knows how to do this.
In this example, we will tell you how to disable geolocation for the most common Android devices: Google (Pixel, Nexus), Samsung and LG, as well as for users of Android devices from other manufacturers.
For Google Pixel or Nexus devices:
- Launch the camera. In the top left corner, click on the list and open the menu.
- Select settings.
- The topmost item will be “Save location”. Turn it off.
For Samsung devices:
This example uses a Galaxy S7 Edge running Android 7.0 Nougat, but the process should be the same or similar for all current Samsung smartphones.
- Launch the camera and click on the gear icon in the top right corner.
- Scroll almost to the very bottom of the menu until you see the “Location Tags” or “Location Tags” item. Move the switch to the off position.
For LG devices and any other Android smartphone:
Regardless of your device manufacturer, Android allows you to disable location data recording when saving a photo. Interestingly, this is the only way to disable this on LG devices.
- Don't turn on the camera. From the Home screen, swipe down from the top to open the notification panel. Open Settings by clicking on the gear icon in the top right corner.
- Scroll down the Settings menu and select All Apps.
- Click on "Camera" and open "Permissions".
- Here, turn off "Location".
It's worth noting that this disables geolocation data for a specific camera application. If you have installed a third-party camera app, you may want to check its permissions and settings.
Delete location data
At the top of the Share (Activity View) menu, you will be able to see the location definition for the selected media. This may be an indication of a specific city or the phrase “Locations included” if there are several places at once.
Now at the top, click on the word “Options” with the side arrow.
In the “Enable” section, you need to deactivate the “Geolocation” slider. This will allow you to remove embedded coordinate data from a photo, video, or group of them. All you have to do is click “Finish” and now “No geolocation” will be written above the media file. You can now share photos through your preferred app or service as usual.
♥ BY TOPIC: New iOS 14: how to sort photos and videos using search filters in the Photos app on iPhone and iPad.
On your personal page
Select a news item or create one. Add some images. There are two ways to secure it.
First way
Open the post by clicking on the date it was added.
In the More drop-down menu, click Pin.
Second way
Any publication has three dots at the top right - this is a drop-down list of available actions. It also has a “Pin” item.
Make sure you remove location data from photos or videos
The Photos app lets you see where a photo or video was taken. You just need to swipe your finger on the photo. When the location service is turned on, a map fragment will appear below the photo indicating the point where the photo was taken. In the case of remote coordinates using the above method and transferring the image or video to another person, the third-party device will not be able to determine the location where the photo was taken.
It's important to note that this feature only affects photos and videos you send via messages, email, or social media. Locally stored media will contain location data. In any case, the photo will also contain metadata about the time the photo was taken, the type of device, shutter speed and aperture.
♥ ON TOPIC: How to keep track of a person who was given an iPhone.
How to unpin a post
Once the news is no longer needed, it can be unpinned. This is done as follows: in the drop-down menu of this entry, instead of the “Pin” button, the “Unpin” button appears. Click on it, and the article will return to its rightful place, according to the chronological order of other publications.
Post competitions or important announcements in a prominent place. This way the news will not get lost under the volume of other articles and photographs. Especially if fresh articles are published every day.
How to pin a post to a wall in a group
There are situations when a post needs to be pinned on the wall of a group or community. First of all, we are talking about situations such as:
- demonstrating to users the rules of the group;
- publication of important information that all community members should know about;
- announcement of a promotion, sale, competition and other promotional events.
Attention! A post pinned to a group is not displayed in the news feed, but directly under the community name.
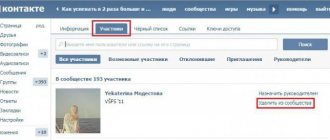
To pin a post on the wall of a VKontakte group, you need to:
- Write the required post or choose a ready-made one.
- Click on the publication date.
- In the menu that opens, click the “Pin” button.
Important! Only the group administrator has the right to pin a post. Other users will not see the corresponding button in the menu, and therefore they will not be able to attach a post to the wall. If necessary, you can contact the group administrators with a request to secure the post.
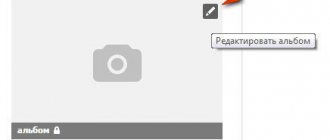
How to remove a gift from your avatar in Odnoklassniki without completely deleting it?
If the user wants this gift to remain in his general list, but at the same time be removed from his main photo (for example, if he just wants to see his usual “clean” avatar), you can simply remove this gift from the main photo. To do this, you first need to go directly to your personal page and hover your mouse over the image of the gift next to your avatar. Next, an area with additional functions should appear, where you need to click on the “Delete” button. After this, all that remains is to confirm the deletion in a new pop-up window. It is important to understand that after these actions the gift does not disappear completely, since it can still be viewed in your general list of gifts, that is, it disappears only from the main photo.