VK.com provides a multifunctional and convenient API that allows you to do everything that comes to a programmer’s mind, and even a little more. The API allows you to send messages, receive and publish wall posts, and perform absolutely any actions that exist in VK, on behalf of the user to whom the token was generated. Having figured out the API using VK as an example, in the future you will be able to quickly delve into the API of any other sites without any problems. And, due to the fact that 90% of all APIs have a similar implementation, understanding this article will be an excellent start for you, and a good school for mastering “adult toys”.
A recent article looked at what a REST API is . Read the information on the link - it will definitely be useful.
- What is VK API, different API groups.
- Obtaining an access token
- Requests to the API (using the example of retrieving all user posts from the wall)
- Summary
Publishing a story through VKontakte developer tools
Step 1. Open developer tools
Open the link https://vk.com/dev/execute
Scroll to the very bottom of the page to the Example Request section and find the Code field.
Section Example of a request in VK
Step 2. Enter the code to upload a photo story from your computer
If you want to publish a story with a photo, then insert this line into the Code field
return API.stories.getPhotoUploadServer({"add_to_news":1});
If you post a video, then this one:
return API.stories.getVideoUploadServer({"add_to_news":1});
Click Run.
Step 3. Upload photo history to VK via computer
The Select file button appears.
Select a file in the Example request in VK window
If you previously specified a code for uploading a photo, then select a photo, if a video, then select a video.
The video or photo must be prepared in advance and located on the computer.
Keep in mind that the size of the photo or video should not be more than 5 MB, and the duration of the video should not be more than 15 seconds.
For picture size for stories, see the article https://howvk.ru/raskrutka-gruppy-vk/vse-razmery-oformleniya-gruppy-vkontakte/
You won’t be able to use the built-in VK editors to design stories, so prepare the photo in advance in Photoshop, add all the effects and captions you wanted.
Step 4. Check that the upload is correct, upload another photo if necessary
After you select the file, if everything is fine, something like this should appear:
Successful photo upload
If you need to upload several photos to your story, click the “Select file” button again and select the desired photo.
Click Run again.
You can check your news, there should be a story there:
This is what a story uploaded from a computer to VK looks like
Use stories to notify friends about new articles in your group; this is another effective tool for promoting a VKontakte group.
VK API. Authorization for the site
In order not to write a very large article, I reduced the code only to the necessary minimum. Those. no checks, powerful filters for errors, etc. Only what is directly necessary for authorization, for understanding what is happening. Also, the article assumes that you have at least basic knowledge of PHP and HTML. Only functions and techniques that are very rarely encountered will be described in detail.
Before we begin, I want to explain the algorithm a little.
- We create an application on the off-site VK
- We get his ID
- We make a link on the site in which we send a request to the VK server
- We receive code in response
- We make another request in which we insert the application ID, the protected key and just this code
- We get the access_token needed for further use of the API. From this moment we can assume that the user is authorized. The wrong user is not given a token
- ???
- profit!!!11
First you need to create an “application”. This can be done here: https://vk.com/editapp?act=create
It's simple. We put a stamen in front of the website and fill in the information. Yes, seriously, local hosts can also be specified and they work quite well.
After creation, all that is needed is to open the application settings and copy the application id and secure key somewhere. We'll need them soon.
The next step is to start working on the code part. I'll create a new file with a link, let it be authreg.php. Also, I'll create another file that will handle everything else. I'll call it auth_vk.php.
Open authreg.php. It will just contain a link.
'>Log in via VK
All. We won't need this file anymore.
Let's open auth_vk.php.
In this example, I will save all authorization data in the session. You can do it differently. First of all, I will open a small condition for checking the code value that came to us in GET from the VK server. Next, we will send the received code value + protected key and application id to the VK server to receive an access_token, and we will also immediately use it, receiving the first and last name of the person who clicked on our button. We will record the entire result in the session and send the user to another page of the site. In practice, I would recommend modifying this script and recording a new user in the database and so on.
A little about what requests to the VK API should look like
In order to call the VKontakte API method, you need to make a POST or GET request via HTTPS to the specified URL:
https://api.vk.com/method/"'METHOD_NAME"'?"'PARAMETERS"'&access_token="'ACCESS_TOKEN"'
METHOD_NAME – name of the method from the list of API functions, PARAMETERS – parameters of the corresponding API method, ACCESS_TOKEN – access key obtained as a result of successful application authorization.
(c) From official documentation
[collapse]
The file_get_contents function here is used to get the response from GET in php without reloading the page. Directly into a variable. Comfortable. The json_decode function allows you to decode JSON strings.
A little about JSON. For reference.
JSON strings look something like this:
{"response":[{"cid":1,"name":"Moscow"}]}
[collapse]
You can add other things to the fields variable that this method allows you to use. With your first and last name you can also get an avatar, online, city, gender and much more. More details about the users.get method: https://vk.com/dev/users.get More details about the fields parameter: https://vk.com/dev/fields
Actually, that's all. Authorization has already been completed. However, in order to make sure that everything is as it should be, I suggest creating mypage.php, we go there at the end of the script and, to check, we will display everything from the sessions that we received on the screen there. Contents of mypage.php:
I sketched it hastily. If you make any mistakes or suddenly need details, write in this thread, I will answer as soon as I can.
lastrowid property
Let's now imagine that we have another cust table that contains car buyers. Moreover, if a trade-in purchase occurs, then the owner’s previous car is added to the end of the cars table, and a record appears in the cust table with the name of the buyer, the identifier of the car traded in and the id of the new purchased car:
To implement an SQL query for adding a record to the cust table, we need to know the car_id of the car traded in. Let's assume that Fedor has not yet made a purchase and the cars table does not contain a record with his surrendered car. Let's add it. Let's run the following query in this program:
with sq.connect("cars.db") as con: cur = con.cursor() cur.executescript("""CREATE TABLE IF NOT EXISTS cars ( car_id INTEGER PRIMARY KEY AUTOINCREMENT, model TEXT, price INTEGER ); CREATE TABLE IF NOT EXISTS cust(name TEXT, tr_in INTEGER, buy INTEGER); """) cur.execute("INSERT INTO cars VALUES(NULL,'Zaporozhets', 1000)")
Here we create another cust table with three fields and then add the Zaporozhets car, which is rented out by the buyer Fedor, to the cars table. How can we now find out the car_id of this entry? To do this, you can use a special property:
last_row_id = cur.lastrowid
which contains the rowid value of the last added record. In our case, the car_id and rowid fields will be the same, so we’ll use this value and create another request to add a record to the second table:
buy_car_id = 2 cur.execute("INSERT INTO cust VALUES('Fedor', ?, ?)", (last_row_id, buy_car_id))
Now, when we run our program, we will see the required entry in the cust table. This is how the lastrowid property is used.
This concludes this lesson. Next time we will continue to look at the API functionality for working with the SQLite DBMS.
How to make a story from a group?
Of course, it is not surprising that many people wonder whether it is possible to post a story from a computer to VK from a group. Alas, this opportunity is available only to popular communities with a large number of subscribers and about. If you and your group do not belong to them, then you will not be able to post a story and share it with subscribers of your community.
The stories function for groups is still at the testing stage and is not yet available to a wide range of owners. But we are following developments and will definitely let you know when it appears!
VK API - Application creation
First, let's define what the VK API is and what capabilities it provides us. VKontakte API - allows a developer to interact directly with the VKontakte database using special http requests. How can this be useful to us as developers? Using the API, we can retrieve a wide variety of information about users, groups, wall posts, photos, and much more. Of course, the service has certain limitations; more about this below the cut.
I warn you right away, the article is not for beginners and I will not explain some points, as the article will turn out to be very long. With these articles I just want to show the principle of working with the VK API and code examples. And of course the code will be available on github.
basic information
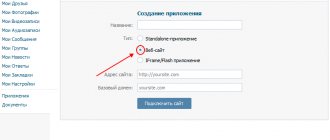
The first thing we need to create our application is to go to https://vk.com/dev. Next, go to “My Applications” and click the “Create Application” . VKontakte allows you to register 3 types of applications, a brief description of each:
- A standalone application
is for mobile clients, desktop programs and sites where interaction with the API will be carried out from Javascript. - Website
- if you want to write a script for a website that will use the API, specify this option. - IFrame/Flash application
- games on VKontakte, etc.
We write the name of the application, select the type “Website”, in the site address and base domain we indicate the actual address of your site and domain. If you are developing locally, you can specify https://localhost.
Creating an application
Our application has been created, now in the editing section, go to “Settings”. This page will contain the data we need, namely id , protected key and service key . All this is needed for user authorization. The algorithm for interacting with the API is very simple:
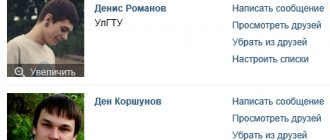
- The user authorizes a VK account in the application.
- Receives a special token.
- Makes requests to the API.
Now we need to actually write the code that will allow us to interact with the API. We will write in PHP with the inclusion of some libraries. We will need composer , if you do not have it installed, you can download it by following this link.
In the project folder, create a composer.json file and write the following into it:
{ "require": { "slim/slim": "^3.0", "twbs/bootstrap": "4.0.0-alpha.6", "illuminate/database": "^5.4", "slim/twig-view ": "^2.2", "guzzlehttp/guzzle": "~6.0" } }
We save the file, open the console and go to the folder with our project, which contains the file we created. Run the composer install command. With this command we installed the Slim mini framework, Bootstrap for fast layout, a package for working with a database and a template engine.
Application structure
The structure is very simple and includes several files and folders.
- app - for application settings, in this folder we will keep routes, classes and other settings files.
- public - the main folder containing the index.php and style files
- resources - folder for views
Creating files
public/index.php
How to make a story via a computer in VK using an emulator
An emulator is a program that simulates a phone. With an emulator, you can run phone apps on your computer because the services and programs will think they're running on your phone.
Let's use the Bluestacks emulator.
First I tried the Nox emulator. It is light and fast, but it is at the stage of posting stories that the VK application crashes on it. Therefore, I will only tell you about the working option - Bluestex.
Type Yandex Bluestacks in the search, the first line will be its website.
Download and install as a regular program.
It is quite large: 446 MB.
Important note: without virtualization technology enabled, the computer is very slow. The application itself will tell you how to enable virtualization after installation.
BlueStacks installation instructions:
- Install the downloaded file. There are no special features during installation, then further ok.
- After launch, log in to your Google account;
- Go to the Play Store in the emulator and download the VKontakte application;
- Launch the application;
- Start creating a story;
- The application will request access to the camera and microphone. Allow everything.
- You can take videos or photos from your computer.
- To upload your picture to history, first load it into the emulator's memory.
TopChatWords
In this case, the procedure is not much different:
- To see how many messages are in the dialogue, you need to go to Google Play Market, enter TopChatWords in the search bar.
- Select an application from the list, press the “ buttonInstall”.
- Open the downloaded application, log in through the VK application, or manually enter your username and password, and provide the necessary permissions.
- Select the dialog you are interested in and click on it.
- Click on the “Begin”.
- The counting of messages in the dialog will start.
- The application will display the number of sent, received, and most frequent messages:
VK-API blitz
VK provides several API implementations:
- Streaming/Long Poll - allows you to get data in real time. Immediately, when updating data in VK, we receive up-to-date information, without refreshing the page. Streaming and Long Poll implement different approaches, but their essence is the same.
- Widgets for the site - everything is simple here: you copied the code, without tricky settings, and you have a working widget on the site.
- Open API - runs on the client. Just as easy to set up and use. The advantage is that it is not necessary to have a server to execute requests. Will work in regular HTML + JS.
- Callback API - allows you to receive data from VK itself without executing a request. If the data is updated, VK itself sends us new data. For example, a user has subscribed to our group, and VK will automatically send information about this user to our script.
- REST API - allows you to interact with VK data from a script. Allows you to automate any user actions.
For us, as programmers, at this stage the REST API . Which allows you to interact with users, groups, advertising, and other entities. You can read more about all available methods here.
To gain access to the REST API, you must have a special key vk api token . This unique value, similar to a login and password, identifies the user on whose behalf requests are made.
As Rule 2 of REST API design states, there should be no state saved between requests. The system, by definition, cannot use sessions, so the use of a token is important for identifying the user.