What is needed? What kind of photo should it be?
You need to take a high-quality photo that shows your face next to the screen and the application on the screen,
which you are drawing up.
The support service will compare your face with the face in the photos on the page you want to restore (if there are at least one photo on the page!),
and make sure that it is the real owner of the page, and not an attacker, who is asking for restoration. And the application in the background is needed so that an attacker cannot take any photo of you and send it on your behalf. Now you understand that such requirements are necessary for the security of your own page.
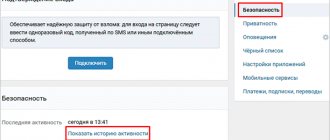
No number or email - page recovery through support.
This can be considered a complete loss of access and it is necessary to restore the page. Here all you have to do is ask for help from support specialists; for your convenience, copy and follow the link:
The numbers [ 76889766 ] need to be replaced with your id - these are the numbers from the address of your page, if your address does not have an ID, it was replaced with letters, then see how to find out your id.
Next, you will be asked to enter your current phone number and take a photo in the background of your page to which you have lost access. Upload the photo to your computer and then send it to support; the verification will be done manually.
Next, take a photo of your passport unfolded; the photo must be of good quality. If your page did not contain your real first and last name, then upon successful restoration they will be changed to the real ones from the document.
Leave your comment when and under what conditions you lost access. I don’t think you will remember the specific date, write the approximate date, you can indicate the reason, for example, that your phone was stolen.
As written in one of the blogs on this topic, technical specialists. support does not eat their bread for nothing and are obliged to help you gain access to your VKontakte page, another thing is that this will take quite a bit of time, since there are a huge number of people who want to get help.
Reasons for refusal to restore the page by the support service.
It often happens that you may be denied restoration, the reasons may be:
- Insufficient data, such as unreadable photos or you provided a non-existent phone number.
- You are trying to restore access to someone else's page by mistake. Carefully make sure that you are asking to gain access to your account.
- You have not included the required photographs in full. You need to take photos against the background of the recovery page and a photo of your document, it could be your passport. Images must not be of low quality, otherwise such applications will be rejected.
- Do not fake pictures in editors, such as Photoshop or Paint, this is very easily recognized by support specialists. Such applications will be rejected.
- Your page does not contain visible recognition features to identify you, such as photos of you or your real name. If the name is real, then a photo may not be required, just as if the name is not real and you are in the photo, be prepared for it to be changed and brought into line with your data from the document.
- Also be prepared to be denied restoration if your page was blocked for violating the site rules. This does not apply to temporary freezes for spam.
How to take a photo correctly?
You need to take a photo of yourself against the background of the monitor (screen) so that your face and application are clearly visible on the screen. The photo should be clear (in focus), the lighting should be good (the face should not be in the shadows). We recommend using a horizontal photo format (landscape orientation). It will be more convenient if you ask someone to help you. If you use VK only from your phone and don’t have a computer, laptop or tablet, you’ll have to find something of this. In addition, it is recommended to submit an application from a computer. Many people have problems with their phones.
Some people get confused - they think that they need to take a photo in front of their VK page, which they need to restore. This is not true. You need to take a photo against the background of the application page that you are filling out and where you are going to attach this photo.
How can you avoid getting into a similar situation again?
Read what you need to do to ensure that your VKontakte page is always safe: VKontakte Security.
It can happen to anyone: your page was hacked and deleted, you forgot your password or lost your phone. What you definitely shouldn’t do is get upset, because with our help you can restore the page and change the VKontakte password under the new 2017 design.
Let's decide which option for restoring access to VKontakte is right for you. Since the following will be a very long article, and it is not at all necessary to read everything, select the method you are interested in from the table of contents in the quick navigation.
Why doesn't VKontakte accept photos?
VKontakte checks the quality of your photo and does not approve your application if the photo is not of sufficient quality. Or the application is simply not sent if the photo is bad. The problem can be solved. You just need to understand that taking a good photo is your personal concern. It is useless to cry in support and ask for something. You must solve your problem yourself. You will have to take the photo again and send it again.
Advice:
Don’t argue with support about the quality of your photo. It is not for you to decide which quality is sufficient and which is not. You yourself find yourself in such a situation that you have to send a photo to restore access to the page, so follow the requirements.
Now specific solutions for different situations:
The photo in the background of the application is too dark
Photo is too dark
VK writes: “The photo against the background of the application is too dark, try taking the photo in a well-lit room, use a flash or reduce the screen brightness.”
How to fix?
- Make the light in the room brighter, turn on another light source, shine the light on your face (table lamp, floor lamp, etc.) and take the photo again.
- If you take pictures in the evening, try to do it better in the morning or during the day when the room is light.
- Try making the screen darker (turn down the brightness).
- You cannot take pictures in front of a window or in front of a lamp. Light sources should be behind
the camera or
to the side,
but not in the frame. - If your phone automatically adjusts the brightness so that the screen is very light but your face is very dark, try adjusting the brightness. You can tap on a dark place on the screen - for example, a face, a wall, a shadow - to adjust the brightness balance.
- Try turning on the flash on your phone (camera). But if it is reflected on the screen, it will be worse.
- If you have a tablet, try opening an application on it and going outside with it during the day to take a photo.
The main secret: make the room as bright as possible. Take photos during the day. Add even more light. Turn on the chandelier. Bring lamps and point them at yourself. But there should be no light sources in the frame (except for the screen with the application).
Image quality is too low
VK writes: “You are trying to upload an image of too low quality. Please attach a higher resolution photo."
What to do?
There is a requirement: the photo must be at least 1300 pixels
(dots) horizontally. It is not at all necessary to look for another phone with a better camera or camera. Most modern phones can take such a photo without problems. When shooting, we recommend using a horizontal photo format (landscape orientation), where the long side is horizontal.
It may be a matter of camera settings if for some reason it takes low-resolution photos. Tell me, you have 18 megapixels, the photos are excellent, what don’t you like? Or maybe you once selected low quality in the camera settings, like on the cheapest phone. If you look at photos only on a small screen, then there is no difference for you. Set your camera to the highest quality setting or ask someone to sort it out. If all else fails, ask a friend with a good phone to take a photo of you.
How to find out the size of a photo on a computer?
- Open the folder where the photo is stored.
- Click on the photo with the left mouse button once (select this photo).
- The size will be shown at the bottom of the window. For example, 960x720 is not enough, but 1300x1000 is already enough.
Advice:
if all else fails, invite one of your friends to your place to help you take a photo. It's actually not difficult. A good photo can be taken with almost any phone in sufficient lighting.
Photo is blurry (out of focus)
If the photo is not sharp enough (the face or screen with the application is unclear, out of focus or blurred), then it will not be accepted. On your phone, you can focus the image by pressing your finger on the screen where you want to focus - on the face or on the screen. The distance from the head to the screen should be small. On the camera, focus is achieved when you press the shutter button not all the way (halfway). And if the focusing is not automatic, but manual, then you need to turn the ring on the lens.
And if the photo is blurry and you can’t take a clear one, it means the room is too dark. Make sure the lighting is good.
Photo is grainy, low quality
Most often, the photo turns out grainy when there is not enough light. To fix this, use the same tips that we have already given: make the light in the room brighter, bring another lamp, shine the light on your face. If you are taking photos in the dark, wait until the morning or afternoon, when the room will be lighter.
The photo does not load or is not sent, an error appears
This means that you have problems with your browser (the program through which you access the VKontakte website) or computer, Internet connection, and the like. Try clearing temporary files (cache and cookies) or installing another browser and sending an application with a photo through it. If nothing works, the photo file is not added, find another computer (laptop) or invite a computer technician.
If you're trying to upload a photo for your application from your phone, don't try. Many people have problems with this. For example, you click on the “Select file”
and nothing happens. There is only one solution to the problem: find a computer or laptop and create an application from it, through the full version of the VKontakte website.
There are no photos of me on the page I want to restore
Then there is no point in sending your photo in the background of the application - your application will be rejected. Why? Explanation here: The application to restore the VKontakte page was rejected. What to do? The only exception is if the photos on the page were deleted by the person who hacked it (read there).
improve, and with them the number of megapixels increases, which is directly related to the resolution of the final image. Today, with a simple point-and-shoot camera you can get a photo of good quality with high resolution, but what to do if an image of this size is unnecessary?
Restoring a VKontakte page.
The very first thing you should do if you lose access to VK is, of course, to use the instructions from the first person, in this case from the development team.
- Check if you have the Caps Lock on your computer, this is the key on the left side of the computer keyboard, it makes all entered characters uppercase and capital letters. Accordingly, if the password uses lowercase characters, then entering the password will be incorrect. To disable this feature, press the Caps Lock key again and try entering your password again.
- The second reason for entering a password incorrectly may be the wrong language selected when entering. As a rule, the password contains English letters, and if you enter them on the Russian keyboard, the password will be incorrect. To change the language, press two keys simultaneously, Alt + Shift , or click on the language icon in the bottom panel.
- To ensure that you enter it correctly, you can use the address input line in your browser and after you have written your password correctly there, copy and paste it into the input field. Use the right mouse button to bring up a menu with copy and paste functions.
These were the simplest manipulations when restoring the page, if you are sure that this is not the case, then we will proceed to other recovery methods, do not lose hope, we will definitely help you regain control of your page!
How to reduce the size of a photo?
A three-dimensional image is not always good. For example, if you need to send photographs within your means or upload them to an Internet site, then there is no need for extra megabytes! YES, mobile devices do not always cope with opening high-resolution images, often freezing or notifying about an incorrect format.
Paint ability of standard Windows program
In order to reduce a photograph, it is enough to use a standard graphic editor -
Paint
. Does this program come with all builds and versions of Windows? Therefore, you will definitely find it along the path: Start - Programs - Accessories - Paint.
Instead of an afterword
For a novice user, the Photoshop program will seem like a magical tool that, with mysterious ease, can change any photo beyond recognition. But how!? Tell! How he does it? What is the mechanism? What happens inside the photograph that it changes in any way, as if it were a chameleon? Nothing complicated, you just need to know what digital photography consists of and what rules apply to it, then everything will fall into place.
Namely, this is the type of graphics that Photoshop works with; it consists of tiny elements - pixels
, like any object made of the smallest particles - atoms.
Pixels
- these are tiny square-shaped elements that contain information about color, brightness and transparency.
The term comes from crossing two English words - picture (image)
and
element (element)
.
A digital image file consists of vertical and horizontal rows of pixels that fill its height and width, respectively. The more pixels an image contains, the more detail it can display. They are elusive to the human eye because they are negligible. You'll have to zoom in a lot to see them:
Pay attention to . The visible part of the image is marked with a red frame. I zoomed in to 1200% on the area where the panda's nose and mouth are. As you can see, the image consists of a set of colored squares. When enlarged, it looks like a patchwork quilt of square pieces.
By looking closely, you can understand the basic principles of image construction:
1. Pixels are square in shape and arranged in a grid in the image (think of a checkered notebook sheet).
2. Squares are always strictly one specific color; they cannot even be a gradient. Even if it seems to you that some square is shimmering in color, then this is nothing more than an optical illusion. Enlarge this area even more and you will see this.
3. A smooth transition between colors occurs due to gradually changing tones of adjacent pixels. Even the line of contact of contrasting colors can contain more than a dozen tones.
Image Resolution
The concept of image resolution is inextricably linked with pixels.
The resolution of a digital photograph is written as follows: 1920×1280. This notation means that the image is 1920 pixels wide and 1280 pixels high, that is, these numbers are nothing more than the number of those very small squares in one row and column.
By the way
, if we multiply these two numbers - 1920x1280 (in my example we get
2,457,600 pixels
), we get the total number of
“patchworks”
that make up a particular image.
This number can be shortened and written as 2.5 megapixels (MP)
. You came across such abbreviations when you got acquainted with the characteristics of a digital camera or, for example, the camera in a smartphone. Equipment manufacturers indicate the maximum value that their product is capable of. This means that the higher the MP number, the higher the resolution of future images can be.
So, the higher the resolution, the smaller the pixels, which means the quality and detail of the image increases. But a photograph with a higher resolution will also weigh more - such is the price of quality. Since each pixel stores certain information, as their number increases, more computer memory is required, which means their weight increases. For example, the photo with bears at the top of the article with a resolution of 655x510 weighs 58 KB, and a photo with a resolution of 5184x3456 will take up 6 MB.
Pixel sizes and printing
It is important to differentiate situations when we talk about pixel sizes and their impact on the quality of the photo.
Looking at images on a monitor screen, we see that the pixel sizes are always the same. Computer resolution size is considered to be 72 dots per inch
.
Note
Please note that when you create a new document in Photoshop, the program offers you exactly this value by default:
When viewing large photographs on a computer, for example, 5184 × 3456, you can feel how detailed it is, there is no grain and no defects, it is bright and clear. But believe me, such a photo is again 72 dots per inch. Just for fun, let’s open the image properties:
A large photo will look great on a computer due to its scale. What is your screen resolution? Obviously not 5184x3456, but smaller. This means that the computer must reduce such a photograph so that it fits entirely on the computer screen. The pixels are compressed and their sizes are reduced, which means great image quality. If you were to view such a photo at its original size, you could easily see blur and fade in the image, as well as hard edges of contrasting details.
Pixel sizes are something that people mostly think about when it comes to printing a photo. Here 72 points may not be enough.
For example, I created a document measuring 655x400 pixels with a resolution of 72 pixels. Look at the print size column
:
Photoshop has calculated that an image of 655x400 with a resolution of 72 pixels can be printed on paper measuring 9.097x5.556 inches (in centimeters this is 23.11x14.11)
655 pixels wide divided by 72 pixels per inch = 9.097 inches wide 400 pixels divided by 72 pixels per inch = 5.556 inches high
It would seem, “Wow! What a big sheet of paper you can print on!” But in fact the photo will look something like this:
Blurred photo, no sharpness or clarity.
Printers are considered high-resolution devices, so in order for photos to print beautifully, you either need to print photos initially at a large size, like mine 5184x3456, or change the number of dots per inch in the range of 200 to 300.
I’ll take the same 655x400 image again, but change the number of pixels to 200, this is what Photoshop writes:
The print size has decreased by almost three times. Our image now prints 200 pixels onto 1 inch of paper.
What happens is that the image will be small, hardly fit into a standard 10 by 15 photograph, but it will be of high quality, clear and detailed.
It turns out that there is a certain minimum resolution for printing photographs. If the picture is initially small in size, as mine was, then there’s nothing to even think about good print quality.
Uploading large VKontakte photos in high quality | Photo lessons and photo processing
Today, the social network VKontakte is the most visited website in Russia, and is also in the TOP of the most popular resources in countries such as Ukraine, Belarus and Kazakhstan. More and more young people are registering on the largest social network in the CIS and are gradually mastering the technologies of this powerful portal.
One of the main functions of VKontakte is uploading photos, which is used by the majority of participants in this network. In this article I would like to draw attention to how to correctly upload large VKontakte photos so that they do not lose quality, but become even better than the original image. Interested? Read on...
No loss of quality
Most people have already learned various features of this social network, for example, almost everyone already knows how to download music in VKontakte, “pull out” a video in HD quality, or transfer various types of files in messages to friends. But the main problem for most people was and remains the same - not properly optimizing their photos before uploading. Users make simple mistakes, due to which their photos lose quality, become less clear, the image becomes blurred, and also do not pay attention to banal color correction, which would help them significantly improve the quality of their photos.
What should you do to avoid this? You need to follow simple steps:
Never upload the original image
Owners of new DSLR cameras and modern smartphones have photo resolutions of approximately 12+ megapixels, which means their photos are approximately 4928 by 3264 pixels in size. But not many people know that the maximum allowable size for a VKontakte photo is 1280 pixels in width and 1024 in height. Accordingly, if you upload the original image to your album, its quality may deteriorate significantly due to the fact that VKontakte will reduce it to the required size. Because of this, distortions appear in pictures that are visible to the naked eye.
Let's look at an example of such a photograph. Below you see a photo whose size is 2585x1929. Pay attention to the distortions that appeared on the girl’s legs (click to enlarge):
Now, let’s consider an option with the same photo, only manually reduced in a photo editor:
The difference is immediately visible, isn't it? Therefore, always try to make your photos smaller before uploading them to your photo albums not only on VKontakte, but also on other social networks, because There is a size limit almost everywhere, and every time your photos will be compressed by the site’s scripts.
Always sharpen your image
Absolutely any time you make your image smaller, it will lose sharpness and become less quality. The so-called “blurring” of the image occurs. to avoid this, after reducing the image, always add sharpness (sharpness), thanks to this your photos will remain as clear, sharp, clean as they were before resizing (reducing).
Do color correction
Try not to be lazy and process each photo before uploading. Basic color correction will add richness and a fresher look to your photos. It doesn't take much time, and the result is phenomenal. Let's consider an example of an ordinary photo uploaded to the social network VKontakte:
Now, pay attention to the image below, to which all the above recommendations were applied: reducing the size, increasing sharpness, color correction:
As can be seen from the example, photography has acquired a completely new look and is perceived completely differently. In order to learn how to properly reduce and sharpen your photos, we recommend our article entitled How to reduce the size of a photo and increase sharpness, and you can find a lesson in simple color correction in our article Color correction in Color Efex Pro.
If you have any questions after reading this article, we will be happy to answer them in the comments to this article!
PS Do you visit our miniblog? Lately, we have a lot of interesting articles, such as: Secrets of autumn photography, 5 mistakes of beginning photographers, Carrying a camera through the airport, and 7 things you forgot to do when buying your first SLR camera. © Phototricks.ru
phototricks.ru
“Contact ruins photos!” or How to compress photos into contacts without losing quality.
How many times have I heard this phrase from photographers and not only - “Contact ruins photos! Look at the print, not the screen!” There is, of course, meaning in this statement, but it’s also not worth saying so categorically.
So, the task: How to compress photos to contact without losing quality?
There are 2 main mistakes that people make:
1) Upload photos that are too large and let the contact algorithm reduce them. 2) Use a color space other than sRGB
Let’s analyze the algorithm for compressing photos in Photoshop “to contact”, in which we will take into account both of these factors.
———————
The optimal size at the moment, which is comfortable for a person to look at, and which does not suffer so much from pinching, is 1000 points on the long side. Clamping is carried out in 2 stages.
Select Image, Image Size
We set one and a half sizes from the one we want to get, and select the Bicubic reduction algorithm, sharper. This will sharpen the picture, but it will be excessive.
We get rid of “oversharpening” in the second step - we set the final size, in this case it is 1000 points, and select the Bicubic reduction algorithm, for smooth gradients.
The next step is to save the photo to disk.
We select the JPEG file format, quality within 75-85. Be sure to check the Convert to sRGB checkbox.
This must be done so that if you work, for example, in the Adobe RGB color space, and ordinary people have not even heard such a word, then in this case they will see exactly the same picture on their screen as you do.
All. Upload to contact. Leave the “Enhance photo clarity” checkbox.
westkis.com
What size should an image be in order to print it beautifully?
Let's say you came back from a vacation from Crimea, or took 100,500 photographs of a child and, of course, want to print something in a photo album (example 1)
, and make one of the most remarkable ones in the form of a painting on the wall
(example 2)
. Let's figure out what size such photographs should be and whether modern cameras can achieve this.
Example 1
So, as a rule, a photo album contains photos measuring 10x15 cm
(in inches this is
3.937x5.906
). Now we’ll find out what the minimum photo size should be for everything to print beautifully. For calculations we take a resolution of 200 dpi.
200 pixels per inch x 3.937 inches wide = 787 pixels; 200 pixels per inch x 5.906 inches high = 1181 pixels.
That is, a photograph 10×15 cm = 787×1181 pixels, minimum (!)
And having learned the total number of pixels in this resolution (787 × 1181 =
929447 pixels), rounded to the nearest million, we get 1MP (megapixel). I have already written that the number of megapixels is the most important characteristic of modern cameras. The average number of MP in cameras and smartphones reaches approximately 8 MP.
This means that current technology will easily make it possible to take photographs that are immediately suitable for printing 10x15 cm photographs.
Example 2
Now let’s look at the case when you have chosen a photograph and want to hang it on the wall in a frame measuring, say, 30x40 cm (I took the frame size from the IKEA store catalog), I’ll immediately convert it to inches: 11.811x15.748. For this size of photo, I would take the maximum resolution size: 300 dpi, this is already considered professional and the highest quality print (just what you need for a large framed picture). And now the calculations:
300 pixels per inch x 11.811 inches wide = 3543 pixels; 300 pixels per inch x 15.748 inches high = 4724 pixels.
Therefore, your photo must be at least 3543x4724 pixels. We multiply the values and get 16,737,132 pixels or 17 MP!
Thus, to print a photo into a frame, you will need a powerful camera. In this range are already being considered. And this is an expensive and serious type of technology.
In general, you should now be able to understand at least a little how the Photoshop program works and how all these photo editing shenanigans are achieved. Having learned about pixels, their properties and capabilities, this process should no longer seem like magic.
If you notice an error in the text, select it and press Ctrl + Enter. Thank you!
How to change the resolution, size of a photo, picture or any other graphic image? I will describe in as much detail as possible three ways to change the resolution of a graphic file. I want to warn you right away that if you increase the resolution of a picture or photo, the quality will not increase. A high-quality image must initially be obtained using good high-resolution equipment.
Method one.
If you have good internet, you can use a free online service. Type in the search bar of your browser “ change image resolution online”
"and many online services are offered to do this.
Some of these services offer not only changing the size and resolution, but also other options such as cropping the image, flipping or combining several into one, adding some effect and much more. The essence of these services comes down to one simple algorithm of actions:
- upload a file, a photo (which needs to be changed), - change or set the resolution (size) you want to get (crop the photo or something else), - immediately see the result, and if you are satisfied with it, click download (upload or save to disk) - download the finished (modified) file to your device (computer, tablet, etc.). This service is convenient when you need to edit a photo or picture, for example, if you are on the go and have a tablet or phone at hand, there is no way to use any program. Some users believe that this is easier and more convenient and always use this method.
Method two.
Using the Paint
"which is present in
the menu
in
standard programs
in all versions of Windows, I will show using the example of Windows 8.1.
1. Launch the “Paint” program.
2. Open the photo or picture that needs to be changed - to do this, in the upper left corner, click FILE and then OPEN. In the window that opens, select the file on your computer and click OPEN again.
3. After the file has opened, click “Resize”, in the window that opens, select how we will resize it in “Percentages” or “Pixels”. Set new dimensions horizontally and vertically. You can check the “Keep proportions” checkbox if necessary (for example, in a photograph). You can also set the slope in degrees. Click "OK".
The image instantly takes on the specified dimensions.
4. Now you need to save the result in a new file, so as not to lose the original, click “File” then “Save As”, select in what format you want to save the file ( if you don’t know what format to choose, always choose JPEG
), in the window that opens, indicate where to save it, write a new name for the file and click save. If the original image is not needed, then you can simply click “Save”, the file will be saved on top of the file you opened with the same name and in the same location.
What to do if I don’t have a VK password
If you have access to the phone number with which you registered on VKontakte, then returning the page will be easier.
- Open the main VK again and click on the link Forgot your password.
- The following form agrees to help us, but only if you indicate the associated phone number or email.
- Then in the form you must enter the first and last name that are indicated on the restored VKontakte page.
- You will see a message on the screen stating that recovery data has been sent to your phone number or email address.
- The email will contain a link to a form to create a new password. Click it and enter the data in the form.
If the letter to restore your old VKontakte page does not arrive by mail, you may have indicated the wrong address that was associated with your account. If you do not receive an SMS from VK, make sure that the phone number is the one with which the profile was registered.