Geolocation is a mark of the place on the map to which a photo or video is attached.
The photo may not necessarily be taken exactly where the mark is. The user may have posted from this location. Or maybe he himself wanted to link these exact coordinates to the post. Instagram rules do not prohibit specifying any place tags that the user likes.
Why is geolocation needed?
Geolocation on Instagram has many non-obvious functions. Tagging the place where the photo from the post was taken is just one of them. In addition, the place mark is used for:
- Building a route. Clicking on a geolocation will open the map in your default mapping application. Usually this is Google Maps. After this, you can build a route from your location to a place on the map.
- Instagram profile promotion. By indicating a popular geotag (for example, Red Square) in the “add place” field, you can attract new subscribers. Under the geographic marker of each place on Instagram, you can see the most popular posts of all time and recently published ones.
- Advertising. This point is relevant for business. Users mark a place, such as a restaurant. Thus, they recommend it to their subscribers. Other people follow the geotag and see a photo from this restaurant. By actively developing the establishment’s geolocation on Instagram, you can attract new visitors.
- Travel publications. Geolocation on Instagram allows you to specify exact coordinates. This way you can share them with friends or save them for yourself to return to your favorite place.
Method 1: Standard means
All modern smartphones have a camera and an application to control it, which usually includes the ability to activate geotags. As an example, we will use the Google Camera solution installed in “pure” Android 10.
Why not subscribe?
Distribution of new, sometimes interesting and useful, materials from the site remontka.pro. No advertising and free computer help for subscribers from the author. Other subscription methods (VK, Odnoklassniki, Telegram, Facebook, Twitter, Youtube, Yandex.Zen)
01/24/2019 at 19:12
Thank you very much for your work. Helps a lot.
08/18/2020 at 16:30
I’m glad I found your information - I think it will help you depend less on cunning repairmen who fix one thing and turn off another in order to return to it. Thank you for your competent advice - good health to you.
09/07/2020 at 16:33
And I thank you. Sometimes with the number of possible options it is almost impossible to understand anything. And you help save time! Thank you
10.23.2020 at 10:32
Hello! There was a problem when transferring photos from the phone to the memory card. The problem is with point 3, I don’t have a “move” section, much less a “memory card”... What should I do and what’s the problem?
23.10.2020 at 13:01
Perhaps the item is called differently by your phone manufacturer. Look carefully at the various camera settings, there is almost always something like this.
Add geolocation
You can put a geolocation on Instagram both in a regular post and in a story. To do this, you do not need to download and install additional applications.
Create a geotag in a published photo or video
In order to add a geotag to a publication, you need to complete only 2 steps:
- Before you publish a post, click “add location.”
- The nearest geotags will appear in the list. If it contains the one you need, click on it. It will automatically link to the post.
If the menu does not contain what you need, enter the name of the desired location in the “place search” field.
This way you can link any geographical position to a publication. She may be in another city, country, or even continent.
Create a geotag in stories
You can create geolocation in stories using stickers. Watch the video instructions or follow the step-by-step algorithm below.
- Add a photo or video for your story, but don't post it. At the top of the screen, click on the stickers icon.
- Select a sticker with a geotag and the words “place” on it.
- Select a geo from the list, if it is there. If not, search using the “search for a place...” field.
- The sticker that appears can be moved around the screen. With two fingers you can change the size by squeezing or stretching the sticker. If you click on a sticker with the name of a place, its color will change. You can choose from purple, white and rainbow.
Once you attach a geolocation to your post, followers will be able to open the location on a map. In addition, look at other posts from this point.
Editing GEO tags in GeoSetter
Launch the GeoSetter program, select the photo you need in the file manager built into the program, right-click on it and select “Edit data” .
In the window that opens, switch to the “Location” and paste the data obtained from Google Maps “Latitude” and “Longitude”
“Yes” button in the meta tag editing window .
In this case, the message “The image has been changed with GeoSetter. You see the original values here only" , that is, "The image was modified using GeoSetter" . In fact, new data is not written to the image by default. To apply the changes, you need to press the file manager update button (F5) and confirm saving the new settings in the dialog box that opens.
By default, GeoSetter duplicates edited photos, preserving the original by adding the suffix “_original” .
That's all.
If you now open the properties of the processed photo and switch to the “Details” , you will find, among other metadata, a “GPS” with the latitude and longitude you specified.
How to create your own geolocation
If none of the geopoints suggested by the search are suitable, you can add your own. Most often, this is needed by business account owners so that users tag their establishments in their publications.
It’s easy to add to the list of geolocations on Instagram, but this should not be done on the social network itself. Only those users who have linked statistics to their profile can create their own location.
How to create a new geolocation:
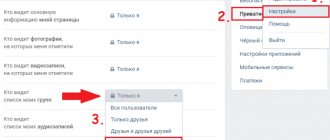
- Go to your business page on Facebook.
- In the left menu, select “information”.
- Click on the “edit” item.
- Provide the address and name of the new location. Save your changes.
GPS track
Preparing a GPS track is a more delicate matter. The track must contain the time for each point. It is advisable that the track be continuous (I turn off GPS during stops and overnight stays ⇒ the tracks of individual crossings need to be combined into one). It is better to remove “erroneous” points from the track (in areas with poor reception, GPS coordinates often “jump”). It is desirable that the maximum time interval between track points be small (otherwise you will have to rely on automatic interpolation already in the process of assigning coordinates). In the case of Garmin navigators, this all means that you do not need to use the “Save track” function in the device. It not only does not save the track, but also removes time data from it, and also reduces the number of points to save memory. Read more about this here. For our purposes, we need to either take the main and only active track from the device’s memory (usually called “ACTIVE LOG #XX”) or the “raw” GPX track saved to the memory card. And it’s better to forget about the “Save track” function in Garmin and carry out all the processing of the tracks on the computer. You can copy a track to your computer in any convenient way (I have already described some of them in a previous post).
It seems that the most versatile and powerful tool for processing tracks is GPSBabel. In case I want to immediately take the active track from a Garmin device connected to /dev/ttyUSB0, the command would look like this:
$ gpsbabel -t -w -i garmin -f /dev/ttyUSB0 -x radius,distance=3K,lat=45.058646,lon=6.907375 -x track,pack -x discard,hdop=3,vdop=3 -x position, distance=5m -x interpolate,time=60 -o gpx -F mytrack.gpx where the command line parameters mean the following:
- -i garmin -f /dev/ttyUSB0 says to take the source data directly from the Garmin device connected via USB (if the source data is already available as a GPX file, you can replace it with -i gpx -f source-track.gpx; if there are several source GPX files, then you can specify them all, for example, -i gpx -f 20080621.gpx -f 20080622.gpx -f 20080623.gpx -f 20080624.gpx);
- -t -w says that you only need to take information from the device about tracks (-t) and route points (-w) - I include route points because the track will be useful for other purposes;
- -x radius,distance=3K,lat=45.058646,lon=6.907375 is a filter that cuts off everything that is not included in a circle with a radius of 3 km relative to a given point (optional);
- -x track,pack - this filter combines the tracks of individual transitions into one large one;
- -x discard,hdop=3,vdop=3 - this filter discards points from the track for which the horizontal or vertical error measure is greater than 3 (as HDOP and VDOP are related to meters); in practice, this filter really effectively filters out points that suddenly “jumped out” of the trajectory; the value “3” is empirical, sometimes I even indicate “10”;
- -x position,distance=5m - combines points the distance between which is less than 5 m (short stops)
- -x interpolate,time=60 — interpolates the track so that there are no more than 60 seconds between adjacent points (this is one of the most useful filters for creating geotags!);
- -o gpx -F mytrack.gpx - saves the result to the file mytrack.gpx in GPX format.
You can check the quality of the resulting track by viewing it in some program. My favorite so far is the Viking, it's quick to launch and allows you to load Google Maps underneath the track to see how the track relates to the terrain. If the track turns out beautiful and correct, we move on to the next stage.
Instagram location is not detected
Geolocation may not be added if the Internet connection is unstable. The transmission of geodata on the smartphone may also be disabled. Check these functions, if everything is fine, try rebooting the device.
You can enable location detection by going to your phone settings. Select “personal information”, then “location” and move the slider so that it lights up. On many smartphones, GPS is enabled in the quick menu. Geolocation detection on iPhone is enabled in settings. Item “privacy” – “geolocation services” – move the button to the right.
How to mark the location of a photograph in a photo
It is a rare smartphone user who does not use the camera function in his gadget. This is not surprising, because the phone is always with us and, if necessary, taking a photo can be done quickly and easily. The camera in a smartphone can be used both to capture a good moment or documents, and to create shots while traveling. Marking the location where a photo was taken using a smartphone can be useful, for example, when visiting interesting places or traveling to save a frame with the coordinates of the shooting point. This data can be used for personal purposes for the convenience of saving information. So, if you need to obtain accurate information about the shooting location, it will be enough to simply look at the image parameters and take the GPS coordinates from there. When creating a frame, the camera will record additional information with coordinates (metadata, EXIF). If the photo of interest with available data has been downloaded to your computer, then just click on the photo parameters and select the section with metadata in the properties.
How to indicate data with coordinates on a photo taken on a smartphone / How to remove the display of coordinates on a photo
Every modern smartphone, like Highscreen brand phones, has a location function - geolocation. The function is very necessary and important, it is thanks to it that GPS works - navigation or the ability to search for a smartphone if it is lost. Because of this, the basic location service setting is usually left turned on. You can check whether location transfer is enabled by clicking on the “Settings” menu item in the “Location/Geolocation” section.
At the same time, the smartphone camera has its own geolocation parameter, which can be turned on or off. The setup is very simple: go to the “Camera” section, select the settings item and find the “Location” section there. Accordingly, click enable if there is a need to link coordinates to the photos being created and click disable if you are not interested in having the shooting coordinates saved on your photos, which is something many people don’t want when posting photos on the Internet.
You should be careful when posting pictures with coordinates on the Internet, since often anyone can view this information by downloading the picture and/or using one of the programs that displays the data. Additionally, there are options for adding data after shooting, deleting such data, or changing it to something else.
See also: How to choose an inexpensive and good smartphone Smartphones with a large battery are convenient How to increase the battery life of a mobile phone What is OTG
Branded online store for mobile phones Highscreen Current catalog of Highscreen smartphones