In addition to creating a website, they often order complex design of social network accounts in a single style. The most popular is creating a menu in VK (for a group in contact), designing a channel on YouTube and Instagram.
In this article I will tell you how to make an adaptive menu for the VK community.
To create a beautiful menu, you need a little knowledge of graphic programs (Photoshop, Gimp, Corel, Illustrator).
I do it in Photoshop.
To begin with, I found suitable pictures. Very good images can be found on photo stocks, but they are paid (the cost can be included in the order price if you are making a custom menu).
Pictures for VK group design
From the pictures we collect layouts for group design:
- avatar
- group hat
- menu button
- menu
Since we are making the right menu for the group, I won’t talk about the minimum sizes, only the recommended sizes in VK for normal display on all devices.
How to create a menu in a VKontakte group
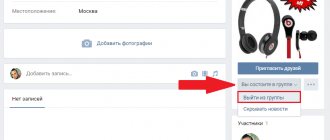
- Join the group.
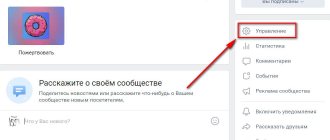
- Under your avatar, go to the “Community Management” section.
- Several items will open (photos, documents). Go to the “Materials” section by clicking on “Restricted”. This is a necessary measure: otherwise (with open access) anyone will be able to create new pages, ruining the group menu.
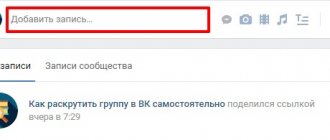
- Return to the community home page. Remove pinned posts. Reload the page.
- Open the section called “Latest News” (it is located directly under the community description). You will see that the “Edit” item has appeared next to it.
- In the editing window that opens, select the wiki markup mode. It is selected by clicking the button on the right. Hover your cursor over it: the name of the mode you are currently in will be displayed.
- You can start editing. We change the basic title of the heading (“Latest News”) at our own discretion. A short description will do: “Group menu.”
- To make new items, write the section names in a column, highlighting them with double square brackets. For example: [[Prices]], [[Contacts]].
- The “Page Preview” button will show you what the group menu looks like.
Layout in VK for dummies
I used to think that wiki markup was only applicable to communities. I don’t know if something has changed or it’s always been this way, but now it doesn’t matter at all whether you create a group or a public page. Pages can be made both here and there.
Well, all that's left is the small matter of layout. Open the “List of Wiki Pages”.
And add a new one.
Give it a name. In our case, the menu.
Click on the link.
And move on to editing.
The first step is to add all the parts of our picture.
Loading.
Do this from the folder from bottom to top of the list. From the very last one (the bottom one, in my case “Write to admin”) to the top one (“Menu”), then everything will fit correctly, although it’s not that difficult to drag fragments with the mouse. Whichever is more convenient for you.
How to make a VKontakte group menu with buttons
Graphic buttons are often used by content managers, administrators, and moderators when creating a VKontakte group: it’s quite convenient. This technique holds the attention of even a casual visitor, “forces” him to stay on the page, study its content in detail (and even subscribe to updates). We answer the question: how to create a menu in a VKontakte group?
- Choose any bright picture that fits into the theme and style of the blog. Then upload it to a photo album on your personal page or to a community album.
- Find it in the photo album, copy the link to the photo in the address bar of your browser.
- Open the group editing mode as described in the previous section of the article. Requires wiki markup mode.
- We write code. photo-AAAAA_BBBBBB - paste this link from the photo address. Next: |400px| (image width, you can choose any value, up to 600 px). And finally, a working link - copy it in the current browser line.
- Enclose what you write in double square brackets. Final link view: [[photo-AAAAA_BBBBBB|400px|link]].
The most “important” wiki markup codes*
*Which I use most often
First level title. To design the first level heading, the symbols “==” are used on both sides of the heading.
Indentation from the edge of the page. For indentation, use the “:” symbol before a paragraph. The more colons, the more indentation. I use this markup to show examples and separate them from the main text level.
Gray text. To give an example, I'm using markup that makes black text appear grey. To do this, you need the markup " " and you need the closing text " " (remove the spaces before the closing bracket).
Tables. There is a lot to be said and said about tables; I use them regularly.
The table begins with "{| " and ends with " |} ", to denote a line, the code " |- " is used, and in order to break the line into cells, the code " | is used. "
In the table, I often use:
- Invisible table borders: noborder;
- Expand the table to the width of the page (by default the table is created at 500 px, and the width of the wiki page is 600 px): nomargin;
- Fixed-width columns (by default, the table stretches depending on the content). If you need to make three columns of the same width, after you have written the code that opens the table, write |~33 33 33 on the next line.
Quote with embedded table with three columns
Read on for 7 wiki markup tricks that not everyone knows about, and figure out how to create repost buttons, community subscriptions from wiki posts, and much more.
How to make a group menu with pictures
A difficult task: how to design buttons in a group without using Photoshop? Not everyone knows how to masterfully use graphic editors. Ready-made images from the Internet will come to the rescue.
- Upload the necessary photos directly to the community photo album. If you want to “paint” text on them for greater expressiveness, do this in the Paint editor in advance.
- Select the section called “Latest News”, then move the cursor over the item with editing.
- Find the “Add Photo” button (with a camera icon) on the work panel. If you decide not to upload photos directly to the group album, you can do so directly here by downloading images from your computer.
- After the download is complete, you will see: links to photos have appeared in the text field.
- Put forward slash | at the end of each link, and after it indicate the address of the necessary pages to which the picture will be attached (link to video albums, photos, audio...).
- After completing these manipulations, enclose the resulting links in double square brackets [].
- Click on the preview button. If everything is ok, save the changes.
- Press the buttons in the menu to make sure everything works.
Types of menu: what are they?
Wiki pages on VKontakte can be divided according to different criteria:
Type:
- Text (text only);
- Graphic (using images of buttons, backgrounds, etc.).
By display (depending on the image used):
- Closed (the structure itself is not visible);
- Open (all items are visible at once);
- With an adjacent or common banner (can be either open or closed).
Regardless of the type you choose, they all work on the same principle.
Also, don't be afraid to combine these types. For example, you can first make a graphic part with buttons (background, style, design), and then supplement it with various text information (for example, “Frequently asked questions”, using spoilers).
How to make a graphic menu in a group
If you want the group menu to look stylish and attractive, it's time to think about a graphic menu. Creating a menu in a VKontakte group is a rather long process if you are encountering it for the first time. The more clickable items in a menu, the more difficult it is to manage. What to consider?
- The width of the image should be no more than 370 px, maximum 390.
- The future menu should be cut into strips in Photoshop. Upload the resulting images to your account album.
- Click the “Latest News” section, the “Edit” button.
- Find the camera icon, upload pictures. You will see the download code for each image in the text field.
- Now you need to assign a link to each image. If you would like it to link to a community wall post, find it and copy the URL. If you need to go to another site, copy its address.
- Separate the image loading code with a forward slash | and paste the link after it.
- Save changes and preview.
The final stage of registration
If you simply paste a link to the page into the message field, the menu will not become a status picture. To do this you need to act differently.
Finally, the time has come to decide whether you have a public page or a group. The future strategy depends on this.
If you don’t know what you have, then go to the management section from the “My Groups” category.
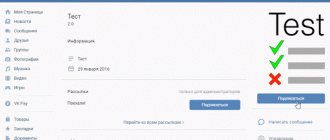
If you want to do as I did and put a picture with a link to the menu, then go to the second part and we will continue to beautifully design the public. The result will be something like this.
I’m not a fan of making the menu just a status picture, but some people want just that. I have no right to criticize anyone, and if you have a group, then you can realize your task.
How to make an interactive menu in a group
Many sales sites create an interactive menu on the home page. The effect of a pressed button, special highlights, underlining keys - effects make the site attractive to buyers. If you run a VKontakte business account, you will need the ability to create an interactive group menu.
- Create a document in Photoshop by placing an image with a menu header there.
- Design the navigation line: you can write the main sections of the future menu (“About us”, “Prices”, etc.) on a white background. Highlight them in different colors if necessary.
- Cut each picture so they are framed individually.
- Go to the VKontakte website (group, section “Latest news”, “Edit”, wiki markup mode).
- Upload photos from your computer.
- Copy the address of the desired page, paste it into the image code using a forward slash. A separate wiki page is created for each image.
- Clicking on these links will open the corresponding sections of the community. After the transition, you will see the “Fill with content” item. Load the same buttons, but with a different color order.
Ready! Now the buttons will begin to change color when you navigate to different sections of the community.
Working in Photoshop or do-it-yourself menus
Well, now you can proceed with the step-by-step instructions directly for creating the menu. Open Photoshop, then the illustration with the menu. I hope there won't be any problems. In the upper right corner, select “File” and then “Open”. We find the document on the computer. What's next?
The picture needs to be cut out. Select the “Cutting” tool. As you can see, it is hidden under the “Frame”. Just click on it and hold the left mouse button for a few seconds until an additional menu appears.
Now on the picture itself, right-click and find “Split fragment”.
In this particular case, I will divide the image into 4 parts. Why is this so? Any button on the Internet is a picture that is assigned a specific code. You point the arrow at the desired fragment of the illustration and your browser transmits the information to the computer: “Boy, there are additional features here.”
Sometimes the entire image changes. For example, the buttons that sink when pressed are just the second image, there is no animation there.
In my case, one picture needs to be divided into several parts and each of them needs to be assigned its own action. Somewhere is a link to a list of products, somewhere is a link to the website. There is also a part of the picture that is labeled “Menu”. Nothing should happen when you hover the mouse.
In a good way, I should have highlighted 5 parts in order to separate the buttons more evenly, but I justify myself by saying that if a person misses, he will still do what he wanted, and if he presses correctly, he will not know anything.
It's not a problem to make more categories or arrange them in two columns. If you understand the basic information, you can handle everything else.
I moved the lines to make it smoother. It's not difficult, it's done using a cursor.
Now we need to save everything for the web. You may have this function at the top, after the usual “Save as...”. I have some strange version of photoshop and the option I need is inside the “Export” tab.
Make sure that images are saved as jpeg (topmost category on the right). Next, click “Save”.
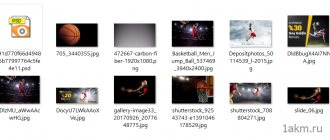
Specify the folder where the photos should be saved. That's right, there will be a lot of them.
OK it's all over Now.
We're done with that, now we can move on to the group itself and working with the code.