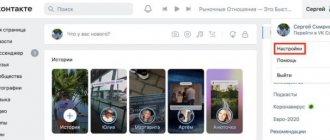
How to Flip a Video on iPhone or iPad
This cannot be done using standard iOS tools.
But third-party programs from the App Store are at your service. One of the simplest apps in this category is Rotate & Flip Video. The program is free, but displays ads. To rotate a video in Rotate & Flip Video, open it in the application: to do this, use the camera icon. Then press the button with the number 90 until you are satisfied with the result.
You can also flip the video horizontally or vertically using the adjacent buttons. When you're done, just click Save - after the ad, a new video will appear in your camera roll.
Alternatively, you can use the Google Photos app mentioned above. You can flip videos on iOS in the same way as in the Android version of the program.
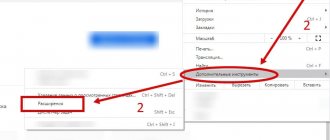
Using Free Transform
Flip and mirror text in word
You can also rotate an image in the following way. But before activating this mode, you need to make sure that the layer with the pattern that we will rotate is not blocked - there should not be a lock opposite it.
In the example the layer is locked. To remove the lock, double-click on the layer. A window like this will appear. You don’t need to change anything in it, just click “OK”.
Now press “Ctrl+T” on your keyboard. A frame with markers will appear around the object. Move the mouse cursor outside the picture to any marker. When the cursor changes to an arrow, press the left mouse button and rotate the picture. After turning, release the button.
In Free Transform mode, you can rotate the image as you wish, or specify the exact rotation value in the corresponding field in the top menu.
If, while rotating a picture with the mouse, you hold down “Shift” on the keyboard, then the rotation will occur at a clearly defined step: each time plus 15 degrees. That is: 15, 30, 45, 60, 75, 90 degrees and so on.
By activating Free Transform, you can rotate the active layer separately or a pre-selected area on this layer. To exit the mode, press the “ESC” button.
How to rotate a site page element
- How to rotate a site page element
- How to rotate text 90 degrees
- How to make a horizontal sheet in Word
- How to rotate a photo
Resize image online
Four photos up to 450px wide;
This example will focus on creating a stylish album page with rotated photographs.
I prepared images in advance (400px width) with addresses: https://uanon.ucoz.ru/prosto/povorot/photo_1.jpg https://uanon.ucoz.ru/prosto/povorot/photo_2.jpg https://uanon .ucoz.ru/prosto/povorot/photo_3.jpg https://uanon.ucoz.ru/prosto/povorot/photo_4.jpg
In the future, we will assign identifiers (id) to images in accordance with their names.
First, we will prepare a block for our photo album using the div tag
, and also add photos to it using
the img tag
(each image should be enclosed in its own div tag), like this:
note
Next you will need to set css styles for the block. List of styles: « position: relative;
» — will set the origin of coordinates from the upper left corner of our block;
« margin: 50px auto;
" - will set the indentation of our block "50px" above and below from the rest of the page content, and will also set the automatic indentation on the right and left, thus aligning our block to - will set the width to 900px and height to 650px, respectively.
The specified list of styles should be placed like this:
#photo_page position: relative;margin: 0 auto;width: 900px;height: 650px;text-align: center;>
Note the use of “#photo_page” - this is how we accessed the block ID. Now we will assign common styles to each image inside the photo_page block
These are rounded corners, gray border, white background, padding and shadow
Now we will assign common styles to each image inside the photo_page block. These are rounded corners, a gray border, a white background, padding and a shadow.
This will create a photo effect:
#photo_page imgborder-radius: 7px;border: 1px solid grey;background: #ffffff;padding: 10px;box-shadow: 2px 2px 10px #697898;>
Note the use of "#photo_page img" - this will refer to all images inside the photo_page block
It is also important to add this short style:
#photo_page div float: left;>
It pushes all blocks inside the photo_page block to the left edge.
Now we move on to rotating the posted photos. For this we need the transform style. At the moment, it is not used in its pure form, but only with a prefix for each browser at the beginning, like this:
-webkit-transform: rotate(value);-moz-transform: rotate(value);-o-transform: rotate(value);
This is the rotation style for browsers: Google Chrome, Mazilla, Opera (respectively). Instead of the word “value” we will insert a number with a deg prefix at the end, like this:
90deg - rotate 90 degrees clockwise. -5deg - rotate -5 degrees counterclockwise. And so on.
Photo style photo_1:
#photo_1 -webkit-transform: rotate(5deg);-moz-transform: rotate(5deg);-o-transform: rotate(5deg);>
The first image is rotated 5 degrees.
Style for photo photo_2:
#photo_2 -webkit-transform: rotate(-3deg);-moz-transform: rotate(-3deg);-o-transform: rotate(-3deg);>
The second image is rotated by -3 degrees.
Photo style photo_3:
#photo_3 -webkit-transform: rotate(-2deg);-moz-transform: rotate(-2deg);-o-transform: rotate(-2deg);>
The third image is rotated -2 degrees.
Photo style photo_4:
#photo_4 -webkit-transform: rotate(8deg);-moz-transform: rotate(8deg);-o-transform: rotate(8deg);>
The fourth image is rotated 8 degrees.
Let's look at how you can adjust the position of images. For example, you want to offset the first image 20px from the top edge and 10px from the left edge. In this case, you need to use the margin style. Here is the correct way to use it for our case:
#photo_1 margin: 20px -10px -20px 10px;
-webkit-transform: rotate(5deg);-moz-transform: rotate(5deg);-o-transform: rotate(5deg);>
Please note that the first style value is top padding; second - indentation on the right; third - bottom indentation; the fourth is the left indent. Important: in our case, the bottom indent is equal to the negative value of the top indent. If there is empty space below the image on your page, try making the indent below it even more negative
The work is completed, I provide a screenshot (taking into account the change in the indentation of the first image described in Step 12).
Add an indent style for any images whose position you are not happy with.
Using online services
How to resize an image
RotateMyVideo is a popular online service for basic video editing. Follow this link to download the file.
- On the main page of the site, click the “Pick Video” button and find the required video.
- Wait for the file to be uploaded to the server.
- On the new page, select video rotation options and click the Rotate button. Wait for the operation to complete.
- Download the edited video to your computer.
Each option serves specific purposes. Now you know how to flip a video on a computer in different ways, based on the task at hand. But it’s best to think about the correct position of the camera when shooting videos, so as not to encounter a similar problem.
Method number 1. Flip the video in the VideoSHOW program
VideoSHOW is a universal editor with professional editing capabilities. This program for working with video has an intuitive interface in Russian, so it will not be difficult for even a novice user to understand it. The application supports all known video formats and saves the processed file without loss of quality. Let's look at how to use it to correct a video or a separate fragment of a film with an incorrect frame orientation.
Step 1. Install the software and create a project
First, you will need to download the program installer. After that, unpack it on your PC by launching the installation wizard by double-clicking the mouse. After the software is installed on your computer, launch it and select “New Project” in the program’s start window.
Want to flip a video in a couple of steps? Download the VideoSHOW program and follow the instructions!
Step 2: Add a video
Open the clip for editing. To do this, use the explorer in the left side column. Find the folder with the desired file in the list and select it. All video files contained in it will be displayed in the central window. Drag the video to the timeline or select it and click “Add to Project” - it will move to the timeline.
Videos are available for preview on the right
Step 3: Flip the Frame
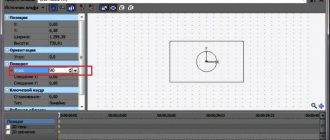
In VideoSHOW you can rotate the frame in several ways and at any angle, including arbitrarily. The fastest way is to use the toolbar above the timeline. Look for an icon with a rounded arrow on it. This button rotates the video 90 degrees. To rotate the video 180 degrees, double-click on the icon.
The program will immediately save the changes
If you want to set a custom angle for the video, click “Edit Slide.” In the new window, select the file so that green borders appear around it. Grab the yellow marker in the center of the frame and manually change the rotation angle. This way you can rotate the image in any direction, including 360 degrees.
Control the process using the built-in player
Another interesting feature of the editor is the creation of animation with rotation. In this case, the orientation of the image smoothly changes its position. To create an animated rotating video, go to the Animation tab in the slide editor. Find the “3D rotation” field and adjust the desired rotation effect using the arrows. This way you can rotate the video 90 or 180 degrees, flip it upside down or flip it. When everything is ready, click “Apply” to save your changes.
Animations can be customized down to the smallest detail
Step 4. Save the video
To export the result, open the “File” item in the main menu and select the appropriate option. You can save it in any video format, burn it to DVD, or compress the video without losing quality for publishing on the Internet.
Presets available for all popular formats
Of all the methods considered, VideoSHOW showed the best results regarding the quality of the original video file. You can flip or unfold the video in it in just a couple of minutes. However, VideoSHOW is not only a program for rotating videos. This editor offers many other features. You can overlay text on video, insert titles and footage, apply filters and effects, and much more. This is truly a universal tool for any type of work with video files. The program does not consume system resources and launches quickly even on laptops and old PCs.
Photo before loading
Another way to flip photos is to flip them before they are uploaded to the Odnoklassniki website, that is, in special programs on the computer. Let's look at how to do this.
Rotate a photo in Paint
- To rotate a photo in the Paint editor on your computer, open it, click on the “File” button and select “Open”.
- Open the photo you want and select the “Rotate” function.
- Click how many degrees you want to flip the photo and it will rotate.
Rotate a photo in the Windows editor
- To rotate a photo through your operating system's editor, simply open the photo by clicking on it.
- There are icons at the top, click on the one that represents a turn.
- The photo will turn over.
In this step-by-step instructions, we described in detail and showed how to flip a photo in Odnoklassniki. Now you know that this can be done both before uploading the photo to the Odnoklassniki social network, and after uploading it to the site. But don’t forget that your classmates only allow you to flip photos if you use a computer for this. It is not possible to flip a photo through the mobile application. Therefore, it is recommended to turn the photo over as needed in advance, and then post it in photo albums. Better yet, take pictures right away so that you don’t have to flip the photo later and waste extra time on it.
An inverted image in a contact from a phone. Rotate a photo online
1,977 views
Diaries do not have a function for rotating photos, like VKontakte, for example. But it happens that, as if, a vertical photograph is loaded with a horizontal one.
Let's take a closer look. For example, we have a folder with photographs, some of which we photographed vertically.
If you open the image in modern picture viewing programs, it will look something like this:
Everything seems to be fine. Now let's try to upload an image to the post. And it will turn out something like this:
What's the matter? The fact is that “modern picture viewing programs,” including those that come with Windows, automatically rotate photos for viewing. But in fact, the picture remains the same as you photographed it.
If you look closely at the first illustration of the post, you can see that the photos in the folder are horizontal.
What to do? As already mentioned in the same VKontakte, photos can be rotated, and they themselves are loaded “correctly”.
The Liveinternet website does not yet have such a function, so you will have to rotate the image on your computer and then upload it.
But here another problem appears: when we opened the photo, it was normal. If you rotate it, it will actually rotate and load horizontally into the post again. Trouble...
Usually the problem can be solved very easily: open a photo, admire its vertical orientation, and then select “Save As” (it varies in different programs, usually you can press Ctrl+S) and save the picture under a different name or in a different folder. After this, the picture will be vertical not only when viewed, but also physically.
And there is an even easier solution to the problem, when you don’t even need to open the photos and you can rotate them as much as you like. But I already talked about this.
If you find an error, please select a piece of text and press Ctrl+Enter
.
We still have many very interesting articles! Here are just a few of them:
Beautiful autumn landscapes of 2014...
Sea of money (23 photos)
If you love traveling and photography, then by the end of each trip you probably have a lot of wonderful photos. Unfortunately, some photos are rotated 90 degrees to the left or right, which can be awkward to view on a computer or mobile device. The situation is even more unpleasant when the horizon is “cluttered” in the picture. This makes the photos look unprofessional and does not produce the desired effect. But this does not mean that you need to delete such photos, buy a tripod and carry it with you everywhere! The right photo processing program will help you solve these problems.
We suggest you use Movavi Photo Editor. With its help, you can not only flip the photo and align the horizon line, but also change color settings, overlay text, remove unnecessary objects from the photo and much more. A simple and intuitive interface will allow you to easily cope with all these tasks, even if you have no experience in photo editing. To make sure of this, download our Photo Editor and follow the instructions below, which are suitable for both the Windows and Mac versions of the program.
Install photo editor
Open the downloaded file and follow the instructions on your computer screen. After installation is complete, launch Movavi Photo Editor by double-clicking on the program icon.
Upload the file to the program
Click Open File
and select the image you want to edit, or simply drag and drop the file into the Photo Editor window.
Rotate the image
At the top of the program window there is a toolbar for editing photos. Select Rotate
.
Below the Rotate
are two buttons: Press left or right to rotate the photo 90 degrees in that direction.
The buttons under the Flip
are used to flip the image vertically and horizontally.
There are two ways to align the horizon line in Movavi Photo Editor. The first way is to adjust the image angle manually. To do this, drag the slider on the Alignment angle
in the direction where you want to rotate the image. To the right of the scale it shows how many degrees the image has been rotated. Here you can independently set the exact value of the angle of inclination, if necessary.
The second way is to use the Level
for automatic leveling.
To do this, click the Set level
and using the left mouse button, draw a line on the image along the line, which should be strictly horizontal/vertical in the final image. For example, the chain on which a heavy lamp is suspended is always vertical, but the boundary between the sky and water when shooting a seascape should be strictly horizontal. Immediately after drawing the line, the photo will be automatically rotated and cropped in accordance with the set level.
Although some online services, third-party or the same “contacts” offer to rotate the uploaded photo
You can easily rotate an image
using almost any graphics program - Photoshop, ACDSee, PhotoScape or even the “native” Windows Paint program, for example.
However, you can rotate a photo clockwise or counterclockwise without using graphics programs (image editors), but using built-in Windows tools.
To rotate an image (photo) counterclockwise or clockwise,
you need to right-click on it and select the menu item: “Rotate clockwise” or “Rotate counterclockwise” and that’s it. Did you think it would be something unrealistically difficult?
You can rotate several photos at once.
To do this, select all the necessary pictures and right-click on any of them.
So, we selected the photos that need to be rotated, right-clicked, and indicated the appropriate menu item for rotation: clockwise - counterclockwise.
After a few moments (seconds if there are a lot of photos), the images will rotate in the specified direction.
By the way, to make it convenient to select photos to rotate, you need to specify the display of files in the folder
convenient for viewing. To do this, click on the black arrow next to the “Advanced” button at the top right of the open folder with files.
Select “Regular...”, “Large...” or “Huge icons” from the menu.
See you again on the pages of my blog!
This situation occurs quite often. Imagine you took some photos with your phone. Transfer them to your computer and... They turn out to be upside down. How can I turn them back to their original position?
Here's an example of what a photo might look like:
Agree, viewing such images with your head turned 90 degrees is at least inconvenient.
To rotate a photo, you need to use the application installed on the Windows operating system. For example, if you open an image using the Windows Photo Viewer, you will see something like this:
To flip the image, click on the arrow. Which one depends on which direction your image is rotated. In my case, you need to click on the left arrow (highlighted in red). After this, the photo will take the correct position.
After this procedure, you can close the window - the photo will not change its position.
Of course, you can always use another application. For example, there is a Paint application built into Windows OS. Right-click on the photo and select "Open with Paint."
The photo will open in the Paint editor. From the top menu, select "Edit" and then rotate the image the way you want.
The image has taken the correct position. Be sure to save it by pressing CTRL+S.
To flip the photo as a mirror, in the same Paint, select “Flip Horizontal”.
Then save the image.
As you can see, nothing complicated.
With any graphics application at hand, you can easily flip a photo. And for this you don’t need to install powerful graphic editors like Photoshop; much simpler applications will suffice. Facebook
How to rotate video in media players
First, let's learn how to rotate a video in all popular media players - Media Player Classic Home Cinema (MPC), VLC and Windows Media Player.
With this rotation, you only see the video from a different angle; this option is suitable for a one-time viewing of an incorrectly shot or encoded film or recording; the video file itself has been changed and will not be saved.
Media Player Classic
To rotate a video 90 degrees or any other angle in Media Player Classic and MPC Home Cinema, the player must use a codec that supports rotation, and also assign hotkeys for this action. By default it is, but just in case, here’s how to check it.
- In the player, go to the menu item “View” - “Settings”.
- In the Playback section, select Output and see if your current codec supports rotation.
- In the "Player" section, open the "Keys" item. Find the items “Rotate frame by X”, “Rotate frame by Y”. And see what keys you can use to change the rotation. By default, these are the Alt keys + one of the numbers on the numeric keypad (the one located separately on the right side of the keyboard). If you don’t have a numeric keypad (NumPad), here you can assign your own keys to change the rotation by double-clicking on the current combination and pressing a new one, for example, Alt + one of the arrows.
That's all, now you know how and can rotate videos in Media Player Classic during playback. In this case, the rotation is not carried out immediately by 90 degrees, but one degree at a time, smoothly as long as you hold down the keys.
VLC Player
To rotate a video when viewing in the VLC media player, in the main menu of the program, go to “Tools” - “Effects and Filters”.
After that, on the “Video Effects” - “Geometry” tab, specify exactly how you want to rotate the video, for example, select “Rotate 90 degrees.” Close the settings - when playing the video, it will be rotated in the way you want (you can also set an arbitrary rotation angle in the “Rotation” item).
Windows Media Player
The standard Windows Media Player in Windows 10, 8 and Windows 7 does not have the function of rotating a video while watching and it is usually recommended to rotate it 90 or 180 degrees using a video editor, and only then watch (this option will be discussed later).
However, I can offer a method that seems simpler to me (but also not very convenient): you can simply change the screen rotation while you are watching this video. How to do this (I’m writing a long way to the necessary parameters so that it is equally suitable for all latest versions of Windows OS):
- Go to the control panel (in the “View” field at the top right, put “Icons”), select “Screen”.
- On the left, select “Adjust screen resolution.”
- In the Screen Resolution settings window, select the desired orientation in the Orientation field and apply the settings so that the screen rotates.
Also, screen rotation functions are present in the utilities of NVidia GeForce and AMD Radeon video cards. In addition, on some laptops and computers with integrated Intel HD Graphics video, you can use the Ctrl + Alt + one of the arrow keys to quickly rotate the screen. I wrote more about this in the article What to do if the laptop screen turns over.
How to rotate the screen in Windows 10 or 7
To rotate the screen in Windows 10, right-click and select Display Settings. In Windows 7, right-click and select Screen Resolution.
In Windows 10, you will be taken to Settings > System > Display. In Windows 7, you will be taken to Control Panel > Appearance and Personalization > Display > Display Settings.
Find the Orientation option under Scale and Layout, select the drop-down menu below it, and then choose your preferred screen orientation: Landscape, Portrait, Landscape (Flip), or Portrait (Flip).
This window looks different in Windows 7, but has the same orientation options.
If you don't see the screen orientation option in the Settings app in Windows 10 or Control Panel in Windows 7, try updating your computer's graphics drivers. This option may not be available if you are using generic video drivers that are not suitable for your computer's graphics hardware.
How to rotate a photo through the menu
Open the image you will be working with in Photoshop. Next, click on the “Image” menu item at the top and select “Image Rotation” from the list. The additional menu will have several different items.
Here you can choose to rotate 180 degrees or 90 clockwise (“CW”) or counterclockwise (“CCW”). “Flip Canvas Horizontal” – used if you need to rotate it in a mirror manner. Accordingly, “Flip Canvas Vertical” is a reflection of the picture vertically.
By selecting “Arbitrary”, a window like this will appear. In it, specify the exact angle to rotate the picture or photo in the “Angle” field. Next, use a marker to mark which direction to rotate: “CW” – clockwise, “CCW” – counterclockwise. Click OK.
The picture will be flipped by the specified angle: clearly 90 or 180 degrees or by an arbitrary value.
How to rotate a photo on a computer
Many of us have encountered such an unpleasant situation when photos transferred from the phone to the computer turned out to be flipped 90 degrees to the left or right. Agree, viewing such pictures is extremely inconvenient. How to rotate a photo in the other direction? We will tell you about the simplest methods in our article.
Windows Photo Viewer
The simplest and most understandable method, for which you do not need to download third-party applications and open a bunch of programs. Rotating a photo is literally done in one click. All you have to do is double-click the photo and click the rotation arrow depending on which direction the photo is rotated. Voila! There is no need to save the result as it is saved automatically.
Another easy way to rotate a photo 90 or 180 degrees. This application is built into the Windows OS, so it is available to absolutely all users. So, to start working with Paint, you need to open the folder with the required image, right-click on it and select “Open with...” - “Paint” in the menu that appears. After the photo opens in the editor, select the “Rotate” button in the top toolbar. Here you choose the option to change the image, whether you will rotate it by 90 or 180 degrees or reflect along the horizontal or vertical axis. Once you have rotated a photo in Paint, you need to save the result.
Adobe Photoshop Lightroom is a graphics editor that is actively used for photo retouching. This service is somewhat different from standard Adobe Photoshop, so those who are used to working in a familiar photo editor will be interested in learning how to rotate a photo in Lightroom?
So, the easiest way to rotate a photo is to use the arrows in the bottom corners of the photo, which rotate the image 90 degrees to the left or right.
There is another option with which you can rotate a photo in Lightroom. To do this, open the Photo menu and select Rotate Left CCW (rotate counterclockwise) or Rotate Right CW (rotate clockwise). Here you can mirror the photo horizontally or vertically.
Flip your computer/laptop screen using hotkeys
The easiest way to return the image position back is to use a hotkey combination.
Select the required combination on the keyboard depending on the current screen position:
- The screen is rotated 90 degrees to the left - Ctrl + Alt + right arrow;
- Screen rotated 90 degrees to the right - Ctr + Alt + left arrow;
- The screen is rotated 180 degrees (upside down) - Ctrl + Alt + downward arrow.
The keys must be pressed simultaneously, otherwise nothing will work.
Try using the key combination Ctrl + Alt + F8 - this will return the graphics settings to the “Default” value.
Did it help? Bookmark this page (just in case) and you can continue working. If everything remains in place, we try the next method.
Flip the image through the screen parameters.
While digging through the settings, you could accidentally change the screen orientation from landscape, to portrait, or portrait, thereby flipping the image. Now the task is to return everything back.
1. On an empty space on the desktop, right-click. From the context menu, select Display Options.
2. You will be taken to Windows settings, “Display” section. Find the "Orientation" item, select "Landscape" and save the changes.
All of the above steps were performed on Windows 10. The only difference from younger versions is the design of the settings window. Don't be alarmed if the window design from the screenshots doesn't match yours.
How to flip a photo after uploading to OK
Expanding a photo that has already been uploaded to the profile owner’s album is easy. To do this, you will need to perform the following algorithm of actions:
- Open a social networking site.
- Find the photo you want to flip.
- Open it full screen.
- Under the image, on the right side, click on the “Rotate photo” link.
- Click on the line until the image is in the correct position. The turn is performed 90 degrees to the right.
Mission accomplished. No additional saves are required. If the change was made to a photo posted in the feed, then after closing it, the changes will not be noticeable until the page is reloaded.
Flip your computer/laptop screen using hotkeys
The easiest way to return the image position back is to use a hotkey combination.
Select the required combination on the keyboard depending on the current screen position:
- The screen is rotated 90 degrees to the left - Ctrl + Alt + right arrow;
- Screen rotated 90 degrees to the right - Ctr + Alt + left arrow;
- The screen is rotated 180 degrees (upside down) - Ctrl + Alt + downward arrow.
The keys must be pressed simultaneously, otherwise nothing will work.
Try using the key combination Ctrl + Alt + F8 - this will return the graphics settings to the “Default” value.
Did it help? Bookmark this page (just in case) and you can continue working. If everything remains in place, we try the next method.
Flipping a VKontakte photo
In both options discussed below, you can flip absolutely any image, be it a photograph or a drawn picture. However, the exceptions are stickers, graffiti and files added by other users.
Method 1: Third Party Tools
This method is suitable for you if the need to rotate a photo arose before uploading it to a social network site or if it is possible to delete it and then upload the edited copy. In this case, the advantages include the variability of the means and the absence of restrictions on the angle of rotation of the image.
Online services
Note: Some resources allow you to download the finished file directly to VK without downloading it to your computer.
Graphic editor
Read more: How to Rotate and Flip a Photo in Photoshop
Since Photoshop is a paid program and it is not always convenient to use it, you can resort to standard Windows OS tools. To do this, right-click on the picture and select the “Rotate” option depending on the desired angle.
Similar functions are provided by the basic Paint graphic editor integrated into Windows. This applies to both the standard version and the Paint 3D application.
There are also many graphic editors on the Internet that allow you to achieve the desired result.
More attention should be paid to the Avatan service, as it is characterized by high performance and ease of use
As a result, you will receive a modified image, which will subsequently have to be manually uploaded to VKontakte.
Method 2: Standard means
On VKontakte there are two related options for rotating a photo that you have added or saved. Photos of third-party users cannot be changed using the described methods. In this case, the rotation angle is strictly limited to 90 degrees.
- Open the social network site and go to the photo you want to rotate. The image can be located both on your page and in the community.
Once you've selected a picture, hover your mouse over the "More" link in the bottom toolbar. You can find out about the possibility of changing thanks to the “Delete” function, which is not available when viewing someone else’s image.
Click on one of the "Rotate" lines according to your requirements. After this, the photo will be flipped 90 degrees in one direction or another.
To access an additional way to rotate an image, from the same More list, select Photo Editor.
On the toolbar on the left side of the screen, click the Rotate button to rotate the image 90 degrees in a fixed direction. To rotate 180 degrees or more, you will need to repeat the described steps.
After completing the editing procedure, click the “Save” button.
This concludes the instructions and we hope you were able to edit the photo as needed.
VK video in mirror image
When processing video footage, sometimes there is a need to apply the result of video mirroring, including for the VKontakte website. The easiest way to accomplish this task is to use the pre-installed Windows Live Movie Studio program, which can be found in the list of typical Windows 7 applications.
So, in order to edit the video in mirror image, we follow the instructions:
- If an earlier version of Windows (Vista or XP) is installed on your computer, you have the opportunity to download the Windows Live Film Studio application on the official website at https://download.ru.msn.com/wl/ moviemaker. After installation, launch the program and add your own video using the “Add videos and photos” command from the main menu. It is worth noting that this program allows you to expand vertical video in VK.
- Wait until the application creates a storyboard for the video, and then select the frame that you need to mirror. You can select several frames or one or all video material. To do this, you need to select frames by holding the Ctrl button and highlighting the fragments with the cursor. Another option is to select everything using the hotkey Ctrl+A.
- Go to the “Visual Effects” tab in the main program menu (the “Home” tab is open by default). To activate hidden results, click the arrow icon at the bottom of the effects panel scroll bar. In the “Reflection” section, select 1 of the proposed options: horizontal or vertical reflection. The result will be formatted here. To view the total, press the recreate key in the navigation bar. If you are satisfied with the result, proceed to the step of saving the video file. There is such a way to rotate a video in VK using a converter.
- Then return to the “Home” section and click on the “Save Movie” button, which is located on the right side of the toolbar. In the menu that is formed, hover the cursor over the required version of the video recording from the proposed ones to see tips and select the format of the final result that you like.
- Now the video is ready and you can upload, and thus rotate the video in VK
Video rotation sites
The advantage of such services over software is their constant availability, provided there is Internet access, and the absence of the need to spend time on installation and configuration. As a rule, using such sites only requires following the instructions
Please note that some methods may not be as effective if your Internet connection is weak.
Method 1: Online Convert
A popular and high-quality service for converting files of various formats. Here you can also flip the video using several parameters of fixed degrees of rotation.
- Click Select File to select a video.
You can also use cloud services Dropbox and Google Drive.
Select the video for further processing and click “Open” in the same window.
In the “Rotate Video (clockwise)” line, select the required rotation angle for your video from those suggested.
Click the “Convert File” button.
The site will begin downloading and processing the video, wait until the procedure is completed.
The service will automatically start downloading the video to your computer via an Internet browser.
If the download has not started, click on the appropriate line. It looks like this:
Method 2: YouTube
The most popular video hosting in the world has a built-in editor that can solve the problem set before us. You can only rotate the video to one side by 90 degrees. After working with the service, edited materials can be deleted. Registration is required to use this site.
Method 3: Online Video Rotator
A site that only allows you to rotate a video to a specified angle. It can upload files from your computer or those that are already on the Internet. The disadvantage of this service is the maximum upload file size - only 16 megabytes.
- Click on the "Select File" button.
Select the required file and click “Open” in the same window.
If the MP4 format is not suitable for you, change it in the "Output format" line.
Change the Rotate direction parameter to set the angle at which the video is rotated.
- Rotate 90 degrees clockwise (1);
- Rotate 90 degrees counterclockwise (2);
- Turn 180 degrees (3).
Complete the procedure by clicking on “Start”. The finished file will be downloaded automatically, immediately after processing the video.
Method 4: Video Rotate
In addition to rotating the video to a certain angle, the site provides the ability to crop it and perform stabilization. It has a very convenient control panel when editing files, which allows you to significantly save time on solving the problem. Even a novice user can understand this online service.
- Click "Upload your movie" to select a file from your computer.
Also, you can use videos already hosted on your Dropbox, Google Drive or OneDrive cloud server.
Select the file for further processing in the window that appears and click “Open”.
Rotate the video using the tools that appear above the preview window.
Complete the process by clicking on the “Transform Video” button.
Wait for the video to finish processing.
Download the finished file to your computer using the “Download Result” button.
Method 5: Rotate My Video
A very simple service for rotating a video 90 degrees in both directions. It has several additional functions for processing the file: changing the aspect ratio and color of the stripes.
- On the main page of the site, click “Pick Video”.
Click on the selected video and confirm it with the "Open" button.
Turn the roller using the corresponding buttons left or right. They look like this:
Complete the process by clicking "Rotate Video".
Download the finished version using the “Download” button that appears below.
As you can see from the article, rotating a video 90 or 180 degrees is a very simple process that requires only a little care. Some sites may display it vertically or horizontally. Thanks to the support of cloud services, you can perform these operations even from different devices.
Describe what didn't work for you. Our specialists will try to answer as quickly as possible.
How to rotate a VKontakte image. Why are photos loaded horizontally in a diary?
Although some online services, third-party or the same “contacts” offer to rotate the uploaded photo
You can easily rotate an image
using almost any graphics program - Photoshop, ACDSee, PhotoScape or even the “native” Windows Paint program, for example.
However, you can rotate a photo clockwise or counterclockwise without using graphics programs (image editors), but using built-in Windows tools.
To rotate an image (photo) counterclockwise or clockwise,
you need to right-click on it and select the menu item: “Rotate clockwise” or “Rotate counterclockwise” and that’s it. Did you think it would be something unrealistically difficult?
You can rotate several photos at once.
To do this, select all the necessary pictures and right-click on any of them.
So, we selected the photos that need to be rotated, right-clicked, and indicated the appropriate menu item for rotation: clockwise - counterclockwise.
After a few moments (seconds if there are a lot of photos), the images will rotate in the specified direction.
By the way, to make it convenient to select photos to rotate, you need to specify the display of files in the folder
convenient for viewing. To do this, click on the black arrow next to the “Advanced” button at the top right of the open folder with files.
Select “Regular...”, “Large...” or “Huge icons” from the menu.
See you again on the pages of my blog!
In some cases, pictures taken with a digital camera or any other gadget with a camera have an orientation that is inconvenient for viewing. For example, a widescreen image can have a vertical position and vice versa. Thanks to online photo editing services, solving this problem is possible even without pre-installed software.
There are a large number of services for solving the problem of rotating a photo online. Among them are several high-quality sites that have managed to earn the trust of users.
Method 1: Inettools
A good option for solving the problem of image rotation. The site has dozens of useful tools for working with objects and converting files. There is also a function we need - rotating photos online. You can upload multiple photos at once for editing, allowing you to apply rotation to an entire batch of images.
- Entering the angle value manually (1);
- Templates with ready-made values (2);
- Slider for changing the rotation angle (3).
You can enter both positive and negative values.
- After selecting the desired degrees, press the “Rotate”
. - The finished image appears in a new window. To download it, click the "Download"
.
The file will be downloaded by the browser.
Additionally, the site uploads your image to its server and provides you with a link to it.
Method 2: Croper
An excellent service for image processing in general. The site has several sections with tools that allow you to edit them, apply effects and perform many other operations. The rotate function allows you to rotate the picture to any desired angle. As in the previous method, it is possible to load and process multiple objects.
- On the top control panel of the site, select the “Files”
and the method for uploading the image to the service. - If we select the option to download a file from disk, the site will redirect us to a new page. Click on the “Select file”
. - Select a graphic file for further processing. To do this, select the picture and click “Open”
. - After successful selection, click on “Download”
a little lower. - We sequentially move through the function branches of the top menu: “Operations”
, then
“Edit”
and finally
“Rotate”
. - 4 buttons appear at the top: turn left by 90 degrees, turn right by 90 degrees, and also in two directions with values set manually. If a ready-made template suits you, click on the desired button.
- However, in the case when you need to rotate the image by a certain degree, enter the value in one of the buttons (left or right) and click on it.
- To save the finished picture, hover your mouse over the “Files”
, then select the method you need: saving to your computer, sending to the VKontakte social network or photo hosting. - When you select the standard download method to your PC disk space, you will be offered 2 download options: a separate file and an archive. The latter is relevant when saving several images at once. Loading occurs immediately after selecting the desired method.
The added files will be stored in the left panel until you delete them yourself. It looks like this:
As a result, we get a perfect image rotation that looks something like this:
Method 3: IMGonline
This site is another online photo editor. In addition to the image rotation operation, it is possible to apply effects, convert, compress and other useful editing functions. The duration of photo processing can vary from 0.5 to 20 seconds. This method is more advanced compared to those discussed above, since it has more parameters when rotating a photo.
- Go to the site and click the "Select file"
. - Select a picture from the files on your hard drive and click Open
. - Enter the degree value by which you would like to rotate your image. A counterclockwise rotation can be made by entering a minus sign in front of the number.
- Based on our own preferences and goals, we configure parameters such as photo rotation.
- To learn more about HEX colors, click the Open Palette
. - Select the format you need to save. We recommend using PNG if the image rotation degrees were not a multiple of 90, because then the freed-up area will be transparent. After choosing a format, decide whether you need metadata and check the appropriate box.
- After setting all the necessary parameters, click on the “OK”
. - To open the processed file in a new tab, click "Open processed image"
. - To download the image to your computer’s hard drive, click “Download processed image”
.
Please note that if you rotate the image by a number of degrees other than a multiple of 90, then you need to select the color of the freed background. This applies to a greater extent to JPG files. To do this, select a ready-made color from the standard ones or manually enter the code from the HEX table.
Method 4: Image-Rotator
The simplest service for image rotation of all. To achieve the desired goal, you need to do 3 actions: load, rotate, save. No additional tools or functions, just the solution to the task at hand.
.
We present to your attention a new course from The Codeby
— “Penetration testing of Web Applications from scratch.”
General theory, working environment preparation, passive fuzzing and fingerprinting, Active fuzzing, Vulnerabilities, Post-exploitation, Tools, Social Engeneering and much more.
Have you ever encountered a situation where a picture looks correct on your computer, but when uploaded to an Internet site, it turns out to be upside down? I upload photos to websites a lot and often and I encounter this often. Sometimes the problem is easily solved, for example, in the WordPress console, when managing media files, any photo can be rotated. But not all websites allow this; for example, this problem is relevant for users of mail.ru, as well as for a number of other sites, including sites based on custom-written engines.
The easiest way to avoid this is to first rotate your photos on your computer. But that’s the problem: on a computer, the photos look correct, but when uploaded to the Internet, these same photos “stand sideways”:
The fact is that the programs on the computer are “smart”, they can read EXIF meta-information, and this information says that the photo must be rotated. Accordingly, on the computer you always see pictures from the correct angle. But among Internet services, not all are so “smart” - some do not know how to work with EXIF data, so it turns out that pictures look incorrect on the Internet.
This cannot be done using standard Windows programs; you have to look for other solutions. I found two such solutions for myself, both of them require the installation of additional programs, but these programs are completely free.
1) Rotate images using GIMP (program download page)
Open a photo that, when uploaded to the Internet, lies on its side with GIMP:
Immediately when opening a file, the program asks whether it needs to be rotated. We agree with the program and immediately save our file. In GIMP, instead of “Save” you need to select “Export as”.
I processed several photos in this way, but this method quickly disappointed me: if there are a lot of photos, then we cannot know which of them is upside down, since the standard explorer shows them correctly. So you can get confused. In addition, open it, click the “Rotate” button, select the export option, and change the settings there - honestly, this is very time-consuming and not suitable for modern hectic life. So I started looking for another option.
FastStone Image Viewer - advanced photo viewer
My father recommended the FastStone Image Viewer program to me (download page). This program is free for personal use. This program has a huge number of advantages specifically for viewing photos - it understands different gestures, offers additional functions when pointing at different sides of the screen, easily enlarges photos for detailed study, etc. - a very useful and very functional program - but now we are interested in something slightly different , I recommend that you study it yourself.
I tried the program, and upon first glance, it did not live up to my expectations - all the pictures were smoothed out correctly, although there were some problematic ones among them.
I went to settings and quickly found what I needed there:
You need to uncheck the box “ Auto-rotate according to orientation tag in EXIF”
"
And you also need to clear the thumbnail database
: