Hello. Today we’ll talk about wiki publications on VKontakte. After reading this article, you will learn: what to use wiki posts for, three ways to create wiki posts, how to edit the name of a wiki page, and what applications are useful when creating wiki posts.
Wiki publications are special pages on VKontakte, with the help of which you can expand the standard capabilities of the network. Format and layout an article, make a button menu with community navigation, make games, make an electronic textbook and much more.
Menu
Wiki publications are often called wiki menus, because using the functionality of wiki publications you can create a community menu and arrange working section navigation.
First we see a post in the community
There are many options on how to make a menu, most of which are described in the Wiki community. In Kairos they made something like a landing page with a navigation bar.
wiki-lending
What is a content plan and why is it needed?
A content plan is a very convenient table in Excel or PDF format (these programs even provide an individual template for this). It contains all the necessary data that needs to be used to fill the feed with content.
That is, you come up with a topic for the post, indicate a specific time when it needs to be published.
At first you will need about 5 posts per day. The content plan is drawn up for approximately 30 days. Every new month a new plan is thought out. But simply drawing it up is not enough. There's a lot of work to be done before that happens. What goals of the content plan are worth highlighting?
- Save time. That is, if you sit down and prepare all the necessary information for publication in a day or two, then for the entire month you will not have to think about what to write today and how to present this information.
- Saving money. Content plans are often created for money by freelancers. Therefore, if you arrange them yourself, you can save a lot. This is especially noticeable if you lead and promote three or more VKontakte groups.
- Calm. Agree, if you run one thematic community, then usually you can keep all the information in your head, but if there are more of them, then it is better to put it on paper or in a spreadsheet. After all, there is a high risk of accidentally forgetting something or losing relevant information from memory.
- Improved group statistics. With the help of a publication plan, you will be able to attract a larger percentage of the target audience, of course, if you first analyze it and know its “habits”, problems, and possible questions.
On a note! It is best to plan to post content for the group in a table with shared access for each user involved in promoting the community: admin, copywriter, designer, and so on. This way, all participants will be able to correctly build their working rhythm.
Useful links: Senler sending VK messages how to set up, Bot for sending messages to VK, VK registration of a new page.
Creating Wiki Posts
I know three options for creating wiki publications. For public, for groups and through additional applications: “Source Code” and “Mobivik”.
The method for public pages is to manually enter a link in the address bar. Needed in the link:
vk.com/pages?oid=-XXX&p=Page_Name
Replace -XXX with your community id and “Page Title” with the correct page name. If there are several words in the title, then an underscore is placed between them instead of a space. The method is described in more detail in SMM specialists.
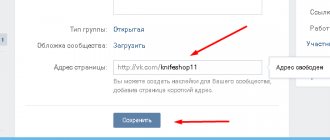
Method for groups . On the group page in the “Management” → “Sections” section there is a “Materials” column.
Select “Open” or “Restricted” and click “Save”
A “Latest News” section will appear on the group’s main page.
Clicking the “Edit” button will take you to the page creation window. When created and saved, the result will appear under “Edit”
The SMMplanner layout designer uses the “Source Code” application to create wiki publications, but it seems to me that pages are created a little longer through the “Source Code”.
You need to go into the application and select the “New” button opposite the community. Then you can create a new page.
To use the application, download it to your computer and log in using the access code indicated under the button to download the application
Or use the Mobivik application. Select a group, select the page you want to edit, and click “Get Link.” If you don't have one yet, enter the name of the future wiki publication.
When you receive a link to the page, go to it and click on the edit pencil in the upper right corner of the wiki publication
In the wiki page editing section, you have two modes available: visual and code mode. The full capabilities of wiki markup can be found in the Wiki community, where everything is described in sufficient detail.
The most important button that switches visual mode and code mode
I find it more convenient to work with clean code than in a visual editor, but this depends on the degree of knowledge of markup codes.
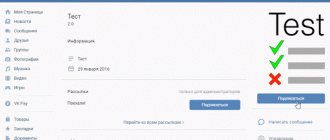
Post with a link to a wiki page: paste the link into a new post on your wall or on a community wall. If everything is correct, the site will generate a link block under the text field. Now remove the link text itself and click “Submit”.
How to make a post with a link to a wiki page
Copy the link to the wiki page and paste it into a new post on your wall or community wall. If everything is done correctly, the site will generate a link block under the post text field. Now remove the link text itself, attach the banner and click “Submit”. In the desktop version, the banner will also become a link to the wiki page, and in the mobile version it will open as a regular image.
The image attached to the post will become part of the link to the wiki page in the desktop version
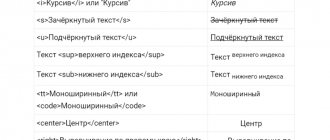
The most “important” wiki markup codes*
*Which I use most often
First level title. To design the first level heading, the symbols “==” are used on both sides of the heading.
Indentation from the edge of the page. For indentation, use the “:” symbol before a paragraph. The more colons, the more indentation. I use this markup to show examples and separate them from the main text level.
Gray text. To give an example, I'm using markup that makes black text appear grey. To do this, you need the markup " " and you need the closing text " " (remove the spaces before the closing bracket).
Tables. There is a lot to be said and said about tables; I use them regularly.
The table begins with "{| " and ends with " |} ", to denote a line, the code " |- " is used, and in order to break the line into cells, the code " | is used. "
In the table, I often use:
- Invisible table borders: noborder;
- Expand the table to the width of the page (by default the table is created at 500 px, and the width of the wiki page is 600 px): nomargin;
- Fixed-width columns (by default, the table stretches depending on the content). If you need to make three columns of the same width, after you have written the code that opens the table, write |~33 33 33 on the next line.
Quote with embedded table with three columns
Read on for 7 wiki markup tricks that not everyone knows about, and figure out how to create repost buttons, community subscriptions from wiki posts, and much more.
Table signs
- |+ – with this sign you will center the table title. It is placed immediately after the beginning of the table. Not required, but generally applicable.
- |- – line start pointer. It is required after the beginning and title of the table, as well as when creating cells on a new line.
- | – the sign is responsible for the transparency of the cell. Must be placed if the sign below is not selected.
- ! – the sign, in contrast to the previous one, makes the cell dark. Replaced with the previous code if necessary.
- |> is the end of the table. Not everything is set, but it is advisable to use it to prevent errors.
- When filling out the table, data from each cell must be placed after the °| sign. And in order to separate cells, you just need to duplicate the line type in one of two ways: °||° or !!
All these symbols will be useful to you not only for creating a VKontakte group menu, but for creating a table on any other site created using the wiki engine.
How to rename incorrectly named pages
It used to be that if you made a mistake in the name of a page, you would have to create a new page with the correct name. But “SMM people” found a loophole; when you open a wiki page with the wrong name, you need to write /market at the end of the address bar and go to a new page.
If you open the page in a new window, this method will not work, so only in a pop-up window (on top of the community).
A button for editing the page name will appear; the method is described in more detail in the material “How to change the name of a wiki page.”
How to determine what content users are interested in
At first glance, this question may seem like a daunting task. However, if you delve into it and follow a step-by-step plan, as in this article, you will easily cope with this task. But you must determine the estimated needs of your target audience yourself.
- Analysis of competing groups. View only those communities that are currently active. Scroll through the wall to see what content is published, and if necessary, subscribe to follow the news and new topics. Look at posts that have more likes, reposts, and comments. Mark the data you need in the Excel template. You will have to do the same work weekly in your group’s feed in order to understand what the client wants. But this is after the public gains momentum.
- Carefully study discussions in groups with related topics. Remember that you should only view current questions and their answers. That is, if this question was asked two or three weeks ago, then it will not be useful to you. Look for completely new information. If you come across questions that you are ready to clarify immediately in your community feed, add them to the list.
- Select several days and view competitor statistics several times. To do this, join the group and see at what time you get a fairly wide online presence. To avoid confusion, write down how many participants entered the VK public page at a specific hour.
- In these same groups, identify the most active visitors who are constantly interested in something new, regularly like and share information with friends. Go to their pages (available if they are open), see what topics and types of content they are interested in. It will suit not only the thematic option (after all, if you voice the supposed interests of the public in your feed, you will attract attention).
- If your group is young, but it already has a number of regular users, go to their pages. You need to check what additional interests and interests they have, and how they are willing to share information with their friends on a social network.
- Using likes, comments and posts, check which formats clients of competing groups like most. This is very important, because if your content does not coincide with this, then hardly anyone will be interested in it, much less evaluate it.
When you already have the listed information in your hands, you can consider that the content plan is ready. All that remains is to decide what formats can be published, choose a narrow topic for each post and systematize it all.
Content format: types
As a rule, the same information on the Internet can be presented in different forms. This is what is called content formats. Let's look at what they are.
News
Suppose you learned about a new household appliance that has just been released, then hurry to inform your target audience about it. Do not describe the details of a specific model, just let the reader understand that the device is very convenient for home use.
Educational material
Create instructions for using programs or connecting the system unit to a monitor, and so on. Here it is important to describe everything in the form of step-by-step actions and, if possible, supplement all this with pictures or screenshots.
Entertainment content
Even if you want to talk about a device or computer software, you can come up with an entertaining comic story about it, insert an anecdote. Such publications may be reposted from competing groups. This gives them the opportunity to promote their post and you to attract new users.
Engaging information
Here you can ask questions, create surveys in which your subscribers must participate. This way you will find out and analyze what exactly your audience liked about what you were talking about.
Image posts
This content format is a short review regarding a specifically selected model of household appliances, antivirus or some program. Here you talk about your own experience of using it, and try to add photographs and screenshots. At the end, you can leave an expert opinion.
Selling texts
If you don’t know how to do them yourself, then why not involve a copywriter in this matter. But, make sure that the text contains only interesting information that will prompt the user in your group to make a purchase. He should think about the fact that the thing described will definitely be useful to him.
Video content
As a rule, this is an overview of the model, an indication of the advantages and disadvantages, and possibly even instructions. However, if you plan to publish content of this format in your group on the wall, then be sure to write a description for it in text. That is, tell the reader why he should watch the video and what new things he will learn from it.
On a note! The publication of advertising posts should be small at first. That is, at the initial stages of promotion, in order not to spam the community wall, 20% of the advertising content of the total mass of posts is enough.
Please note that each described content format can be submitted in the following form:
Remember that the more diverse and colorful the wall of your VKontakte community is, the more interesting it will be for users. They will repost, so you will probably get new subscribers.
Important! Within the content plan you create, be sure to devote space to each post format. At the same time, alternate them and try not to use them daily.
Images
The maximum width of an image that can be used in wiki markup is 607px, which is the width of the wiki page itself. The height is practically unlimited (remember that the height of the page itself is 16,000 characters). Images can be uploaded in two ways.
Using the loader in the top menu of the editor.
Using code.
We upload the picture to a separate album of the group, open it, and in the address bar we see a long code like this
https://vk.com/club12345678?z= photo-12345_12345
%2Falbum-12345678_12345678
Copy the id of the picture from it (highlighted in bold). Then we frame it with double square brackets and paste it into the right places on the page. It turns out something like this:
[]
What's next? Edit alignment, text wrapping, size, link. To do this, write the required parameters after the vertical bar and separated by a semicolon. For example, in this code we set the size of the image to 300x100px and the text to wrap on the right:
What is wiki markup?
The more original a community is designed, the more interest it generates. You won’t surprise anyone with ordinary posts, and here wiki pages come to the aid of community owners - an alternative to the usual VKontakte posts. Thanks to this, you can embellish the public by adding articles with a variety of graphic and text elements (underlining, bold font, headings, lists), as well as creating a navigation menu. Wiki markup is indispensable when designing a community; it allows you to make it not only colorful, but also user-friendly. To create an original design for a public page, you will have to put a lot of effort into it, but the effort is worth the results!
Video
First, you need to upload a video to community videos. After downloading, open the video and copy its id (in bold) from the address bar.
https://vk.com/videos-12345678?z= video-12345_12345
%2Fclub12345678%2Fpl_-12345678_-2.
We frame this with square brackets and get this code:
We get a small picture with a play icon, which, when clicked, opens a full-fledged video player. In order for the video to be played on the page itself, VK developers suggest using the player tag.
But here we get a disproportionate black border around the video:
To remove it, you need to adjust the player size to the size of the video itself. For example, in our case the following parameters were suitable:
We received the video without black frames, it will play directly on the page