Liked comments
Bookmarks” section contains everything that we liked and where we liked it - from photos to links. An attentive user will ask the question, where are the comments, because they can also be marked with likes? Comments are not hidden, they are located in the News . After the transition, select the “ Like” and under it in the upper right corner click on the filter (in the old design, in the new design the filter is a separate block, see the screenshot above). By selecting only “Comments” , you can read all the comments you have tagged and remove the like if you wish.
Creating a separate pixel for each event
The simplest method that allows you to create audiences if the user performs a certain action, then only in this case the pixel is loaded and, as a result, the user ends up in this audience.
Creating a Pixel
You can complete the task by going to your advertising account in the “Retargeting” - “Pixels” tab and creating a new one.
We give the new pixel a clear name, then select a category and create it.
We copy the pixel code and then go to the Google Tag Manager interface.
Setting up GTM
In the GTM interface, first of all, we create a trigger that will record the desired action. For example, in the case of a purchase in an online store, this could be a visit to the thank you page.
Next, we give it a clear name and move on to choosing the type.
In the case of visiting a page, “Page View” is suitable.
Now we select activation when the page containing site.ru/thanks-page is loading.
Next, go to “Tags” and click on “Create”.
Give the tag a name and select its type.
In the case of VKontakte, you will need to select “Custom HTML”.
Copy the VKontakte pixel code and proceed to selecting a trigger.
Select the previously created trigger for visiting the thank you page.
Save the tag.
We publish the new version, everything is ready.
However, if you need to load a pixel only when, for example, the user clicks on a specific button, then you need to go to the desired page of the site, then right-click and select “View code”.
In the console that opens, we find the desired element and find the button ID (or class, if there is no ID) and copy it.
In this situation, you will need to use “Click – All Elements” as a trigger and select activation by Click ID containing abc.
Creating an Audience
In order to use this pixel in advertising, you will need to go to the VKontakte account “Retargeting” - “Audiences”.
Next we fill in:
- Title (required for navigation);
- Select the desired pixel;
- Rule: “All site visitors”;
- The period that interests us.
All is ready.
Read news from people and communities without subscribing to them
Yes, now you can do that. The only downside is that you first need to subscribe to the person or join the desired group. Then go to “ News ” and press the plus sign. In the list, select the lowest item “ Add tab ”.
A dialog box will appear with a list of friends and groups. Using the search, we add to the “ Showing ” block those groups and those people whose news you want to follow.
After forming the list, you can safely unsubscribe from communities and remove all friend requests entered earlier. The news will still be broadcast to your feed. Convenient for those who want to hide from others, for example, communities that are displayed directly on the main page.
Clearing your news feed from reposts
Is your news feed spammed? Do you want to remove some of the unnecessary news, in particular various reposts that are repeated from different people? Let's look at how to filter the news feed in the old design.
Old design
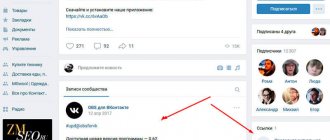
Click on the “ List of sources ” button in the news section, then at the bottom of the window that opens, switch to “ Black list ”.
Show copies in news item .
For those who do not have the “
Black List ” link, you must first select a repost in the news feed and click on the cross with the signature; this is not interesting. This way, you will create a blacklist and the ability to remove reposts from your news feed will become available.
New design
The functionality of the new VKontakte is simpler. Go to “ News Show copies option . All.
Setting up the VKontakte feed
You may have begun to notice that most of the posts that appear in your news feed have ceased to interest you. Most likely, the more friends you have and the more communities you subscribe to, the more often you will be interested in this topic. Therefore, now we will look at how to customize your news feed so that you are shown the news that interests you.
- Usually, by default, your page's news feed shows all the news in a row from all possible sources (friends and groups). In a recent change that was made by the VKontakte developers, it became possible to endow the news feed with a certain intelligence. Now VKontakte can track the news sources that interest you most and show posts from them. To enable this feature, you need to go to the “news” section of your page, and on the right you will see a toggle for “interesting first.” By default it will be on the left side. This means that you get information from all sources. If you switch it to the right, you will receive information first from your friends, and second from the groups you visit most often. Therefore, if you want to weed out less interesting content, switch this setting to the right so that you do not have to leave communities.
Setting up your news feed
- But it happens that among your friends, there may be people who post all sorts of nonsense, or post advertising content that you do not want to see in your feed, and at the same time you cannot remove these users from your friends.
In this case, there is a simpler option - this is to limit them in sharing information with you, without removing them from your friends. To do this, again, go to the “news” section, and above the post of the group or individual who posts such content, hover your mouse cursor on the right side of the post over the three horizontal dots. The “this is not interesting” function will appear. By clicking on it, you will restrict this source from sharing information with you. Thus, you will never see posts from this person or this community again.
Using the "not interested" feature
- Another way to quickly choose whose posts to view and whose not to see is to click on the special icon in the “news” section.
Entering the menu for selecting sources for displaying news
In the menu that appears after clicking on this icon, you can quickly and conveniently select those friends whose news you want or do not want to see. This is done using a checkmark.
Selecting sources for displaying posts in the news feed
If you hover your mouse over the word “actions,” additional settings will become available to you, where you can also adjust all hiding and showing news from other sources.
Additional settings for displaying news
News lists
Finally, a recent innovation regarding news lists. News, if you didn't already know, can be divided into different categories depending on a certain topic. For example, you can separately create news about cars based on those groups that publish all information about vehicles; naturally, the list is formed from the communities in which you are a member. It is very convenient to filter incompatible things in this way and read what interests you at the moment, and not all the garbage at once. VKontakte increased the limit on creating lists from 5 to 10, since people did not have 5 blocks to delimit the news feed. I described how to add a list above in the paragraph “Read news from people and communities without subscribing to them.”
I admit that I myself learned about some things only recently, so I decided to share this on the pages of my blog. I hope that this information will be useful not only for me. Thank you for your attention!
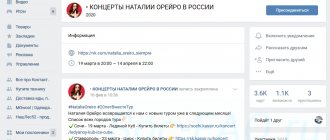
How to create an event in VK in a group
How to create an event in contact on behalf of a group? It is important to know that this function is only available on public pages. It is absent in other communities.
If you have an ordinary group, you can transfer it to public. But this procedure will take some time; you will have to wait for the community type to change.
It is important to enable the ability to create events on behalf of the group. For this:
- Open your community settings.
- In additional sections, find the “Events” item.
- Put a tick on it.
- Save your changes.
Now go to the main page of the public. A section with events should appear in the side menu. Click on the button to create a new meeting.
Next you need:
- Fill out the form that appears.
- Check the data is correct.
- Create a new event.
- Design his page.
- Information about the meeting will appear in the public section in the side section.
You have successfully created a VKontakte event on behalf of a group. A week before the specified start date, public participants will receive a notification. They will definitely be notified of this event.